You will need PSP 9 get a trial here
You will need my gold fill and if you want to use the picture I used it is in there too. Get that here
1.) Open images in PSP, minimise the gold, put goldbg into your patterns folder. Resize the image your going to work on to 360 pixels on longest side.
2.) Choose a color you like from the picture and place it in the Foreground, mine was #3b5fe2. In the background colors choose pattern and look for the gold pattern.
3.) Go to Image/Add Borders 13 pixels any contrast color to the picture you have. Fill with Gold, keep selected.
4.) Selections/Invert, Add Cut out, Horizontal and Vertical 0, Opacity 100, Blur 6.00, Color Black. Selections/Invert Keep selected.
5.) Layers/Duplicate, Selections/Invert, hit the delete key on your keyboard once. Selections/Select All/Float
6.) Effects/Cutout Horizontal and vertical 5. Opacity 60, Blur 5, Color Black. Repeat using -5 for Horizontal and Vertical. Deselect.
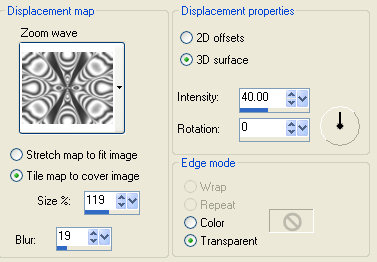
7.) Effects/Distortion Effects/Displacement Map use these settings.