Now x out all layers again and highlight Balloon 1. Copy and Past as New Layer. Rename this Balloon 3. Now this is the tricky part. I unexed balloon 2 and placed balloon 3 on top of it but make sure balloon 3 is highlighted before you move it. Now move ballon 3 above Lonely Bear 2.
Now go back to balloon 1 and copy and paste as before and place the copy on top of balloon 1. Rename this Balloon 4 and move it above Balloon Bear 3. Now we need to copy and paste the Full Balloon again and erase as before. Rename this Balloon 4.
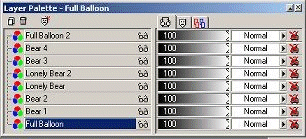
Now x out all your layers again except the full bear and copy and paste as before. rename this Full Balloon 2 and move it above Balloon Bear. Make sure all your layers are x out except Balloon 1 and Balloon Bear 1. Merge / Merge Visible. Do the same with Balloon and Bear 2 and Balloon and Bear 3 and Balloon Bear 4. Now remove x off all layers. Your layer palette should look like this. I renamed mine.
We are almost done. Now onto Animation Shop.
Click on Animation Wizard and check smae size as first image. Next. Transparent. Next. Upper left corner of the frame. With the canvas color. Next. Repeat indefinitely. I put 200 in the number box cause we are going to make some changes in a minute. Add image. Find your image. Click on it and open and than Next. Finish.
When you have your animation up clcik on frame 2 and right click and clcik on frame propeties. Change that number to 175. Frame 3, 150. fame 4, 125. frame 5, 100. Frame 6, 90. Frame 7, 80. Leave the last and first frame alone. You can resize your animation if you like. Play your animation and when you have it the way you want it Save.
Hope you enjoyed this rather long tutorial.
No copy-write infringement intended. I did this animation on my own. I do not claim to own the tube but I am the creator of the animation and tutorial.
Lori