
The site of Delta force Jedi’s
|
|||
Jedi-Dooku maps
|
Random files
|
Add-ons
|
DFBHDD Help
|
Help
If you cannot find what help you need here e-mail me with
your bhd
Name and I will reply or post ASAP Help mail
1.
AXD HELP
2.
Map making
4.
how to install Tunnel add-on
5.
Real Names
6.
Hosting
AXD HELP
This is easy and also can be a bit confusing to do and it is
installing the addon. First things first make sure you have the following
ADXv2b, enable-mod-weapons, and, restore weapons. If u need these files click here now
(note it is in a zip file if u need a FREE copy of
WinZip
click here now) now that you have all that fist get
the ADXv2b and open it up. If a pop up will appear click run, a blue screen will
appear with a girl with two hand guns, now click next. Were the ….. Are click
on it and find the your DEMO version of
BHD (what you click on to start the game
most people will have it in C:\Program Files\NovaLogic\dfbhdd) once
this is done click next once the installing is over you need to click next and
then exit. Now once you have clicked exit a command prompt screen will appear
this will say the following.
|
PACK Resource Management Utility version 3.0.54p Copr. 1999 NovaLogic, Inc. All rights reserved pack: Reading entry table pack: Reading entry table pack: Building merge queue pack: Generating entry table Hit a key to continue installation. Press any key to continue . . . |
Here press any key as indicated then the command prompt screen will
automatically finish the installation. Once that is done you will now install
the weapons. Click and open enable-mod-weapons
Now if the pop up appears again click run and then next and
next again. Once again near … make sure that in the box next to it has the path to your version of
BHD DEMO were you just installed the last addon. Once that is done click next
and start. Here is were it will automatically install the first bit. Once done
click next and exit. Now another command prompt window will appear (like the
one in the above table) again press any key and then it will finish installing
the adx mod on your pc.
The restore
weapons mod is for hosts to install so that non addon players can join
in.
If you don’t find what you are looking for here and want
help just send your questions to Help Mail?
Map Making
I will tell you a few simple things on how to make a map
and export it so you can host.
Start
Open up your copy of dfbhdmed_e then go to edit and
the General information tab. Under Mission Name put the name of the game (Like
city limits) then under Mission Designer Put your BHD name. When you get to
mission Terrain there is a drop down menu of available terrains. For a flat
surface choose Mis11. (For now ignore Mission Tiles under Terrain and map types
are not needed) In the next column there is a list and a heading Win
conditions. Click under critical one Box and then in the drop down menu next to
it choose the Eliminate all resistance. Next to that put the amount of kills
before a win (e.g. 200 means 200 red or blue deaths till a winner is
chosen). In the next column is Mission
Over rides this adds water, fog and day time only. For now just Choose a time
of day. Once you have done that press OK in the bottom Left Corner.
Setting up your
View
Now you will have an area view from the top press 4, 8, 6,
or 2 on the key pad to move around and page up or down for zoom. In the top you
will see a C, H, or D button press D and the map will Change to a black and
cream color. Now the black is flat surfaces and the cream is hills. Under the CHD buttons is a number 512 for the
grid lined press – till you hit 64 this will make the 4, 8, 6, or 2 buttons
move left 64m instead of 512. Now you are ready to add Buildings. (It is up to
you to choose CHD buttons it is that D is easy to c were mountains are but c
shows grid lines easier)
Adding Buildings
On the map right click anywhere and select insert Mode. A
list will appear of items on the side change foliage to buildings and click
anywhere in the list. If no picture is shown that item is not available for the
demo. (Note if you have Tunnel Add-on installed there will be no picture for
all new things installed)
As an example select Desert adobe hut 2 and then ok in the
bottom right corner. Click again on the map and select Desert Adobe hut 1 and
ok again. Now right click on the map and select the insert mode. Now when you
left click you will select a building. In the top corner is a Button that says
3D wireframe click it. (Only press Home and end to move up or down, Delete to
rotate, and page up or down for zooming.) This will give u a 3D look of the
selected item now click the 3D wireframe button and select the other building
and then the 3D wireframe button again. Now u will see both buildings. Once again
press 3D wireframe button and next to the 3D wireframe button click unselect
all. (if you insert a building and it is represented by * then when you press
3D wireframe button the program will crash and you will louse all unsaved work)
|
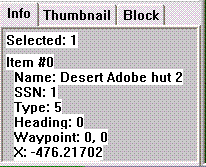
Changing Item Attributes
Now select desert Adobe hut 2 and at the bottom left
click the area that is like the picture at the right. There a pop up window
will appear. In the first column you will see a x, y, and z. in Z in the
first box if u change the number 3 to 7 the position of the building will
rise off the ground. Under the Z box there is another 2 boxes With 0 in each
box. In the 1st one it will face the building in a different way
and in the second it will flip it. (note that changing direction is done in
Degrees so 180 will face the object the other way) Once changed click ok and
then 3D wireframe to see the changes. Press 3D wireframe again to return. To
delete unwanted buildings select the unwanted buildings and press delete. |
|
|
|
Insert Start
Places
To choose were blue and red starts right click and choose
Insert mode. Click were the first red start place will be and then the pop up
window will appear. On the left were it says Foliage go down to Markers. In the
next column were it says area trigger go down towards the bottom and locate TEAM RED START MARKER (NOT START
PIMARY RED) and click on it and then ok.( put in about 4 to 5 near were you
want red to start). Now go to were blue will start click on the 1st place
were blue team will start and choose the TEAM BLUE START MARKER above the red one.
Saving and
exporting maps
Go to the top And select File go to Save as and save it as
anything mission1 ECT then go save and export save it as TDMM_(here put a 5 letter
file name).bms this will pack it as team death match now you need to pack it
(see hosting below) and you have your first map
If you don’t find what you are looking for here and want
help just send your questions to Help Mail?
Making cars move
(Even I have trouble with this I will explain in the best
way I can but for some reason most time it doesn’t work in demo mode if you can
help please Mail me) First select the car (boat or black hawk) that you want
then click on the map and when the pop up menu appears of what you want to
insert on the map go down to Markers in the next column select area triggers to
insert. Put one on the top left and another on the bottom right of the car. Now
select both of them and go to the edit attributes screen.
Under the waypoint list only one box will be available
number this 1 and press ok. Now the area triggers should have a box surrounding
the car. Now you need to name the area triggers. First go to edit located at
the top near file and go to Area triggers when the pop up menu appears
highlight one and in the description box to the right type (the Vehicles name)
and put out next to it so if it was a hummer you will put HUMMER
OUT. If more than one put 1 after out. Now select the 2- under the one you
just changed and in the description box put (the Vehicles name) back. Now it
should read HUMMER BACK, and then
ok. Now go start and edit again and click on waypoints now select 1- and in the
description box to the right put hummer out. Under the description there is a
color box leave it worded orange and under that there are three boxes CLICK ONLY WAYPOINTS DOSE NOT LOOP. Now
click on 2- in the description box
put hummer back and again click waypoints dose NOT loop. Now go to the insert
item screen and were you got the area triggers go down to were it says
waypoints and insert 1. Now select and copy that waypoint and every 20 meters
paste another waypoint till you get halfway or to a spot were it will turn
around and go back. Select every
waypoint in order from the hummer to the last one. Now go to the edit attribute
screen and were it says waypoint go to name and select the HUMMER OUT next to it will say 0 leave it because as you selected
the waypoints the map editor will number them automatically from 0 to the last
one (if you have 13 waypoints it will number them from 0 to 12 (NOTE ONLY 32 waypoints per set)) were
you put your last waypoint put two area trigger one at the top left and another
at the bottom right select both again and go to the edit attribute screen and
under waypoint were it says number put 2 now press ok. There should now be an
area trigger box surrounding your start and finish waypoints. Now insert a new
waypoint from the new area trigger you just made on a new path back to your
first area trigger and place the last waypoint inside the area trigger. Again
go to the start of the new waypoints and select them in order of were you
placed them from start to finish. Now go to the edit attribute screen and under
waypoint click HUMMER BACK. (Note if
you are using Helicopters you need to chance the z of the waypoints position to
the height of what height you want the Helicopters to go to) Now you are nearly
done you just need to set the events. First go to edit then go down to events
and were it says event0 rename it to hummer out. now in the top right corner
click reset box and set it to 10 and the box below that says delay to 10 so it
will reset after 10 seconds and also stop for 10 seconds for you to get in. now
under that in there is an if trigger which says new trigger click on it and put
the following
(Note all in drop down boxes)
1) Under trigger type put SSN
2) Under that in the trigger conditions put area trigger
3) Leave true box ticked
4) Under that were it says SSN find the Hummer or Vehicles
that you want to move
5) Now under that in the area box put Hummer out
6) Now press the ok button at the bottom
Now you set the hummers path you need to set it to go out
and need to set the speed. First in the THEN actions open new action and do the
following
1.
in the action type put
change AI single
2.
in action subtitle put
patrol speed
3.
under that in SSN find
the Hummer or Vehicle
4.
and set the speed to
25 to 30
5.
press ok
Now repeat all steps as before except in step 2 put combat
speed this will make the hummer continue at a steady speed under fire. Finally
you need to set the Hummer to go to a way point
1) In the action type put Redirect SSN
2) Under SSN find the Hummer
3) Under way point put hummer out
4) And under waypoint number put 0
5) Press ok
Now the hummer will go out now to make the return trip you
must do nearly the same as before so to make it east go to the bottom and
select the copy event and then paste event. Now rename the one you just pasted
to hummer back. Now just change the following
1) In event trigger under area change the HUMMER START TO HUMMER BACK
2) Press ok
3) Go to the THEN actions and change redirect SSN change
only the waypoint list from hummer out to hummer back and then ok.
Then in the bottom right corner press ok again and the
hummers should move.
Quick move
For a quick way paste all waypoints in a path around the
map returning to the start. Again select all in order from first one placed to
the last one and then go to edit attribute screen and under waypoint name put
1- and ok. Now they should be all connected like a dot to dot and back to the
start now select the Hummer and go to edit attributes and under waypoint name
put 1- as the name and 0 as were to go. Note the Hummer must be facing the 0
waypoint that leads onto the 2 one and it wont be that accurate
Install Tunnel add-on
Once you open the file it says installed. That is only onto
your pc once that has been done you need to install it to the game 1st
get all 4 files and place them in your demo file then simply click the install
file once that has been done a command prompt window will appear and it will
say
PACK: adding file to
PFF……….0k
After a few 100 things have been packed you will have
tunnel addon installed
Real Names
Easy to use open up Real names and in the 1st
box put in the name of the bms file (my e.g. TDMM_map01.bms) in the 1st
box were it has your maps name change the bms to bin ( so TDMM_map01.bms becomes TDMM_map01.bin). now in the second field
put the name you want displayed (what you put as the mission name in map editor
is recommended) then go to the file menu and create file. the bin file that was
just created will appear in the same file as the Real names program. Once made
pack it in a packit.exe and when you host the name will be changed from TTDM to
the one you put in the second field box.
Hosting
Before you start to host you need a map. If you want a map
visit Project Jedi for a map or my map page.
All maps from Project Jedi are in a Zip file designed to make transfer faster and are
all virus checked by yahoo (Click here for a free copy of WinZip) In the WinZip file there are two files one is the bms which
is the map and the other is a bin so when you go to host it has the name of the
mission instead of TDMM_. BOTH files need to be put into a packit.exe
designed to put it in the demores file. If you
make your own map you wont have a bin file and when you packit it will be the
name of the file.
How to pack
Once you open up packit.exe
(make sure packit.exe is in the demo folder) there is
a list on the side. Just make sure BHD demo is selected and the force box
below. Also make sure your bms file is in the demo folder and just drag it into
packit. If it says successful packed you have successfully packed it. If it
says “no files packed” Make sure that the map Editor is closed and try again.
Finding the Map
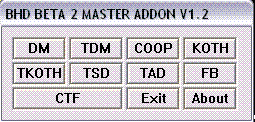
in the game
When you are ready to host a game YOU MUST OPEN UP THE MASTER ADDON SYMBOL in the Demo file
and select the button according to the type of game. An example will be if you
made a Team Death match you will select TDM. If you open up normally you can
only choose a Capture the flag game map.
If you don’t find what you are looking for here and want
help just send your questions to Help Mail?
Other Question
Listed here are questions that I received
Why dose it say
error when I load master add-on? If you open up master add-on and then select
any button such as TDM and it says error simply click on the TDM tag again and
the game will start.
Why don’t I have
mission terrain in map editor? Simply make
sure that when you installed it you installed it to the demo folder
Why doesn’t
packit work? Packit dose work make sure
when you open packit.exe that the BHD demo Icon is ticked and also the
force box below it. If you are packing a map and it doesn’t work make sure you
are packing the BMS file and NOT the MIS
and the map editor is closed.
When I pack why
can’t I find the map? A few reasons make
sure of the following
1.
that the BMS map file
that you are packing is saved as TDMM_(HERE YOU PUT ANY 5 LETTER NAME).BMS an
example is when I finished making my map when I export it I will export it as
TDMM_boats.bms
2.
When you are looking for the map before you
start the game load the master add-on and select TDM (Master add-on as pictured
below) if it says error click ONLY THE TDM again and the game will start. Once
started select multiplayer then host then on the bottom right will be a list of
maps and the map that you Just packed (mine was TDMM_boats.bms) will appear on
there as TDMM_boats if you got one of our maps it would come with a bin file if
you pack it the name will be different, instead of TDMM_boats it will be
Experts only.
How can I change the name from TDMM? You need to make a bin file
How do I make a
bin file? I use a program named REAL NAMES a small file that will be on
the Add-on page soon
If you don’t find what you are looking for here and want
help just send your questions to Help Mail?
Modding the
Default Settings
Listed in the tables are what settings to change in your
demo folder. Most people have been to
Jedi Server 1 and noticed the Spawn Takeover Times are 1
second this section will tell you how to change things like this. If you don’t
find what you are looking for here and want help just send your questions to
|
Spawn times |
To change the spawn takeover times go to your demo folder
and find the file named dfv.cfg
and open it up with notepad. Once opened scroll down and locate teamchange_time next to the = sign put
the desired time. Once the desired time has been inserted close the note pad
a pop up box will appear asking you “do u want to save the changes” click yes
and the spawn takeover times will change. |
|
Ping out |
To change the ping limit to allow people with greater
pings to access and play in the server open up the dfv.cfg file located in demo folder with notepad. Scroll down and
find maxping. Next to = put 2000 or 2500 close the notepad (WARNING
don’t put a low pin like 600 because if there is a problem with a server
peoples pings will jump and you will louse all players in your server) |
|
Warning all Modding wont affect your system but all people modding there dfv.cfg file do it at there own risk and Jedi-home takes no responsibility for any damage. For a replacement of dfv.cfg file click here |
|
Thanks to Jedi justice and any other people that helped with
this page from answers to questions.
All the Jedi links are owned by the Jedi squad and are
© .Add-ons are freeware and are not
owned by the Jedi squad we simply are providing a service to the community for
a better game play © 2004
Help page created by Jedi Dooku and Jedi Justice any errors please mail me