![]() Unpacking
Camp 4
Unpacking
Camp 4
"OK, so how does it all go into the box?" That was the most common question asked by the convention attendees, when they cast their eyes over the competition entries. The following is how Camp 4 did it.
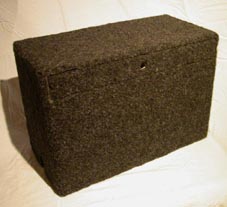
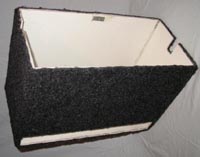
Here is the box in question. Please note the hole towards the top. This is your first clue that this is no ordinary carpet covered box.
 The
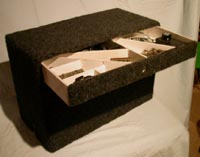
hole gives a fingerhold to slide out a drawer. This drawer contains everything
not glued down to the layout proper. This includes a loco, 2 trains worth of
rollingstock, the throttle, powerpack, a steam donkey winch, a steam log loader,
and a PECO track cleaning block and graphite stick, among other things. Note
that the drawer has specially shaped partitions for each item.
The
hole gives a fingerhold to slide out a drawer. This drawer contains everything
not glued down to the layout proper. This includes a loco, 2 trains worth of
rollingstock, the throttle, powerpack, a steam donkey winch, a steam log loader,
and a PECO track cleaning block and graphite stick, among other things. Note
that the drawer has specially shaped partitions for each item.
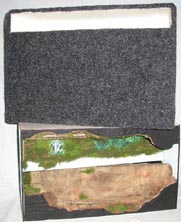
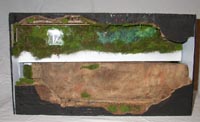
Now comes the clever bit. Using some cutouts thoughtfully provided in the ends of the box, and a hole in the bottom of the drawer recess if required, the box is lifted up to reveal what appears to be recognizable scenery.
 While
we've got the chance, here's the "inside story" on the box itself.
The box dimensions are just under the required 13" X 19" X 9"
overall. The carpet ensures that the box "sneaks up" to the dimensions,
and if it were to be packed tightly, would have a protective shock absorbing
layer.
While
we've got the chance, here's the "inside story" on the box itself.
The box dimensions are just under the required 13" X 19" X 9"
overall. The carpet ensures that the box "sneaks up" to the dimensions,
and if it were to be packed tightly, would have a protective shock absorbing
layer.
Note the small dark rectangle on the inside of the box. This is the metal plate half of a cupboard magnetic latch. There is another one opposite it, mounted on the inside face of the other wall. These, plus the magnet halves, which are located in the "lower" layout module, ensure that layout won't slip out of the box "sleeve" when being carried.
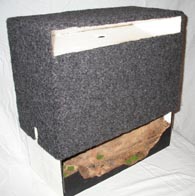
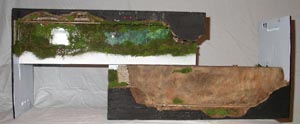 Now
this sort of looks like a layout..
Now
this sort of looks like a layout..
Ahh, now I see...
...If we flip the "upper" module over, and mate it with the "lower" one...
Taa Daa! we get one HOn30 Layout in a
Box! ;-)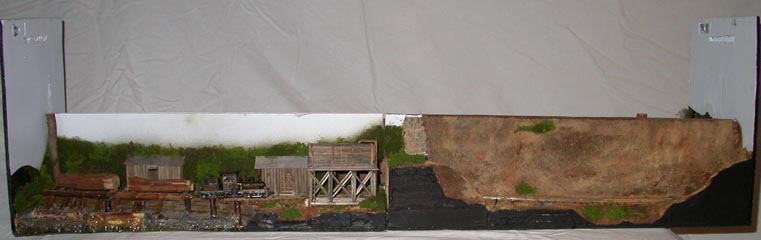
 Hopefully
this overview should clear some things up. At bottom left we have a log pond
dump, and the Camp 4 log camp. Moving to the right, we pass the wooden water
tank, past the wood cribbing, (past the brass Joe Works Shay ;-) ), and out
onto the Cliff switchback. From here we back up (to wards the left), through
the centre viewblock, (where the log train is sitting), and arrive in the rainforest/pig
sty pier trestle scene. Changing direction again, we head to the top right of
the picture, arriving at the log reload. You can see the below track water tank,
2 drum Washington Iron Works donkey winch, and the AH&D A frame loader.
Hopefully
this overview should clear some things up. At bottom left we have a log pond
dump, and the Camp 4 log camp. Moving to the right, we pass the wooden water
tank, past the wood cribbing, (past the brass Joe Works Shay ;-) ), and out
onto the Cliff switchback. From here we back up (to wards the left), through
the centre viewblock, (where the log train is sitting), and arrive in the rainforest/pig
sty pier trestle scene. Changing direction again, we head to the top right of
the picture, arriving at the log reload. You can see the below track water tank,
2 drum Washington Iron Works donkey winch, and the AH&D A frame loader.
4 scenes, a pig sty pier bridge, a log reload featuring ground snigging operation and A frame loader, a log camp, and a log pond. And all of this, in 8" deep X 36" long.