 Handlaying
Trackwork
Handlaying
Trackwork Handlaying
Trackwork
In the modelling world, there is a certain esteem held for those people who
have mastered the art of handlaying track. As I found in the process of lay
rail on Broughton Vale, it is easier than you may think. While the techniques
here were used to for HOn30, they can be adapted for use in just about any gauge
and scale, whether you model standard or narrow gauge.
The most convenient way to buy rail for me was to buy flextrack, and strip it of it's rail. For modellers of standard gauge, this may not make much sense, but if you are modelling narrow gauge, the plastic sleepers will probably look undersize in dimensions and in spacing, relative to the scale of your prototype. Be that as it may, plastic sleepers are not completely useless, as we shall see. When removing the plastic sleepers from your flextrack, cut a heap of them apart from each other, and set them aside. When you are ready to lay rail, assemble a pair of rails with a handful of single sleepers holding them together, sort of like VERY bad trackwork. (See pic below)
After preparing the roadbed, lengths of scale wood can be cut into sleepers or ties and carefully glued directly to the foam or Foamcore roadbed, following a pre-marked track centreline. As you place the prepared rail pairs on top of your wooden sleepers, slide the plastic sleepers along so they fit between the new wooden ones every four sleepers or so. The plastic sleepers will hold the track in gauge as you fix the rail in place. PECO N scale trackpins and CA adhesive were used to fix the rail on Broughton Vale Tramway. (See pic below)
When you are done laying rail, carefully melt all of the plastic spikes on one rail, and the inside spikes on the other rail away with a low powered soldering iron. This will free the plastic sleepers, and allow them to be pushed out sideways from under the rails with a pair of tweezers. Make sure you do this carefully, as it is heart rending to lay a perfect section of track, and then tear half of it out because you removed a plastic sleeper with a little too much force. (Don't ask me how I know this :-) ). When you have finished at least the basic scenery level, try using the bonded ballast technique, (placing and shaping ballast around the track, damping everything down with a water/detergent mix known as "wet water", and then flooding the ballast with 50/50 dilute PVA glue), this will also help to keep your rails in place. (See pic below)
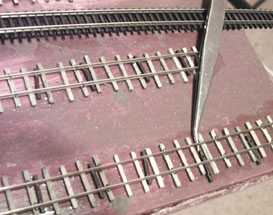 At
the top is a standard length of PECO Code 80 N scale flextrack. In the middle
is a length of track re-laid onto wooden sleepers with individual PECO plastic
sleepers spaced out to keep everything in gauge. In this instance, PECO N scale
trackpins were used to fasten the rails. Scale trackspikes are also available
with accurately shaped heads. However, at 2' viewing distance, very few people
can tell the difference. ALWAYS use a trackgauge to check the final alignment
and gauging. The lower track has been laid, the plastic trackspikes have been
melted away with a soldering iron, and the plastic sleepers are being pushed
out from underneath the rails with tweezers.
At
the top is a standard length of PECO Code 80 N scale flextrack. In the middle
is a length of track re-laid onto wooden sleepers with individual PECO plastic
sleepers spaced out to keep everything in gauge. In this instance, PECO N scale
trackpins were used to fasten the rails. Scale trackspikes are also available
with accurately shaped heads. However, at 2' viewing distance, very few people
can tell the difference. ALWAYS use a trackgauge to check the final alignment
and gauging. The lower track has been laid, the plastic trackspikes have been
melted away with a soldering iron, and the plastic sleepers are being pushed
out from underneath the rails with tweezers.
This track is laid directly on a sheet of 1/8" Foamcore and 1/2" extruded foam. The foam and Foamcore has been sealed with brown "No More Gaps", a latex based caulk.