 Planning
 Alternative
Scenery Techniques Concepts by Mark and Angela Fry
Alternative
Scenery Techniques Concepts by Mark and Angela Fry
First and foremost, I have to say that I owe much of the following to Mark and Angela Fry. All of these techniques have been developed by them, I just took them and ran with it. Mark & Ang, Thank You! Prof K
Through their modelling life, most modellers will find areas in which they enjoy, and others where they feel they lack. One of these areas for me was scenery. With the guidance of my close modelling friends Mark and Angela, I took on the challenge. First step in scenery is planning, so that's where we began.
Planning
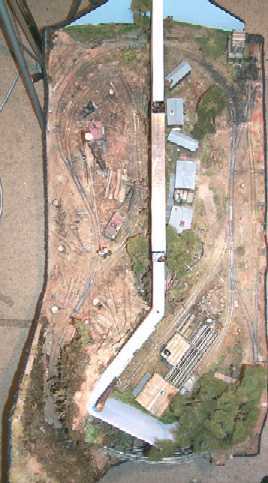
Often when planning our miniature empires, the first things we think about are trackplans, operation schemes, and favorite equipment to run. For Broughton Vale, operational aspects had to be balanced with the ability to sit back and enjoy watching the trains pass through picturesque, realistic scenes. With only 8 square feet to play with, any scenic area had to be well thought out, or the layout could very easily be overwhelmed.
The end result of many hours consulation and "armchair modelling" between John Cheek, Mark Fry, Bruce Parker and myself, was the following idea. Build two scenes with both operational and scenic interest, and one scene that will forfill the "Railfan" requirement. Curving trestles and deep cuttings have long been crowd pleasers, both on model layouts, and in real life. Check out the Cumbres & Toltec Scenic RR, the Durango & Silverton, the Georgetown Loop RR, or even our own Australian "Puffing Billy" and Zig Zag narrow gauge preserved railways. All of these full size operations boast small trains on big bridges as scenic drawcards. Using the turnback curve at the end of the oval as a standalone scene also broke up the "round and round" feeling typical of many small layouts.
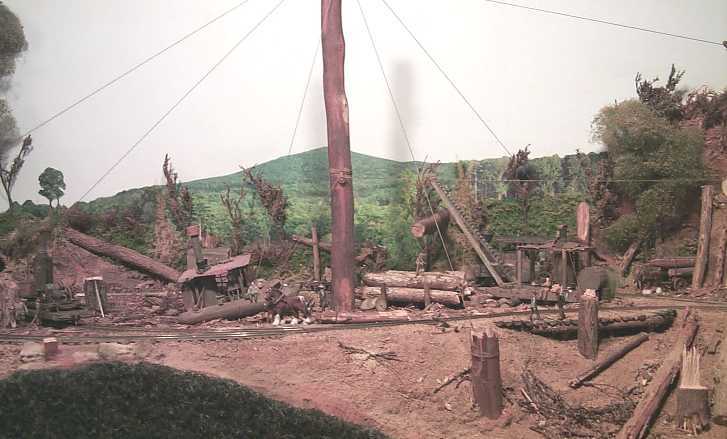
So, in total, Broughton Vale had three scenes planned. One 3' X 1' depicting Broughton Vale Sawmill, and log camp, one 3' X 1' covering the log loading action at Woodhill Mountain, and the Trestle over Broughton Creek in between.
Basic Landforms
The base of the layout is formed by four sheets of 2" thick extruded polystyrene. This not only provides a solid warp free base on which to lay track, it also make carving out below track level very easy. For all vertical scenery and landforms, fruit box foam was cut down into sheets and placed to form a profile outline of the required landform. They were then hotglued into position. Cardboard webbing was interleaved over the top of these scenery formers and secured with hotglue. The final landform surface was achieved by placing two layers of material kitchen towels over the cardboard formers, and "painting" it with a layer of brown latex caulking. This style of landform is much more flexible than plaster, and much lighter, which is always a consideration on portable layouts.
"Soft Rocks"
When it came time to do the rockwork behind the trestle scene at Broughton Creek, Mark stepped up with another plaster saving idea, "Soft Rocks". Soft Rocks are simply foam rubber blocks which are shaped, coated with a thin skin of acrylic latex caulking, and covered in dirt, scatter material, and just about anything else that looks to be about the right color and texture for sandstone.
"Pickling" Natural Materials
Having spent a little time building "Soft Rocks", it was time to get back to layout scenery, via the great outdoors. Australian scenery differs in it's color spectrum from US or European scenery, it seems to have an overall duller, almost brown base hue. Thus when it came time to select materials to use as scenery, it made sense to Mark and myself to go straight to the source. Mosses, lichens, and ferns were all obtained through local nurseries and preserved using another technique from Mark's scenery toolkit, "pickling". Using a radiator glycol/water mix as a preserving agent allows the plants to retain all of their natural colors and flexibility, and thus makes them perfect for scenery materials. The only thing to be careful of, (apart from not swallowing the glycol, and thoroughly washing your hands after handling it), is to keep the resulting scenery out of direct sun or Ultra Violet light. This is not just for glycol preserved plants, but any natural scenery materials. UV light will uniformly fade any plant colors.
"Layer on Layer" Scenery
Look carefully at any real bush setting, and you will realise that the scenery consists of many layers. From the dirt base, there is an understorey of leaf litter and deteriorating plant matter, a mid storey layer of fallen objects such as downed logs and half buried junk, and a surface layer of grasses and fallen objects. The latex caulking again came into play as the adhesive to keep the scenery materials where they were put on vertical and steep surfaces, such as in the cutting between Broughton Creek and Woodhill Mountain.
On the flatter surfaces the various layers were laid down as they would have been in life. A base of medium and fine dirt was poured onto the scenic surface, followed by a layer including larger rocks and downed logs. The final layer contained fine dirt, some ground up leaves to represent bark and wood litter, and homemade ground foam. Once all of this was positioned, the entire scene was saturated with isopropyl or rubbing alcohol, (many modellers use water with a few drops of detergent in, known as "Wet Water"!?! ), and 50/50 dilute PVA glue. The PVA is broken down by the isopropyl alcohol, and glued the entire stack of scenery materials together to the layout.
Easy Photo Backdrops
With most of the scenes on Broughton Vale being no more than 12" deep, backdrops are critical to the visual appearance of the apparent depth of the scene. By strange coincidence, this area of construction happened to take place around early June, when most of the stationary and cards & gift shops were selling their "current year" calendars for $1 apiece. $3 worth of "Australian Scenes" themed calendars, plus one of "Ultimate Golf Courses of the World" provided enough fodder to cut and splice backdrops for all three scenes on Broughton Vale. With a little patience, and the freedom to mix and match different pictures, a photo realistic backdrop is avauilable for very little effort. Check out the backdrop on the Woodhill Mountain scene above. It is composed of three separate sections, with some olive and candy apple green paint and some specially selected bushes disguising the joints. The centre section is from one of the "Australian" calendars, and the two end sections are from one picture in the "Golf" calendar.
All calendar photos to be used in the backdrops were sprayed outside with a healthy dose of matte fixative to dull the shine of the calendar paper. Once they were dry, the sky and any unusably sections were cut away. Some "jigsaw puzzle" style work was then engaged upon to determine the best combination of images. Once the final locations were established, their positions were marked with a pencil, and a very thin layer of PVA was used to attach the whole collage to the backdrop.
To merge the bottom joint between the photos and the 3D modelled scenery, the lower backdrop was painted with an appropriately mottled mixture of green paints, and glued over the top with a solid mass of foliage, ferns, lichens, and any spare foliage netting that was on hand.
For more information on Angela and Mark Fry's layout, "Swan Crossing", and their Alternative Scenery techniques, check out the articles in the June and August 1998 issues of Australian Model Railway Magazine, and the July 2000 Continental Modeller. A "How-to" on Soft Rocks can be found in the October '99 issue of A.M.R.M.