|
Clean Your CD-RW
This page and the information on it has been kindly given to
us and reproduced thanks to the Webmaster at the Yamaha
CDRW Info Site
!!! WARNING
!!!
This is done at your own risk
We will not
be held responsible if you damage
your CD Recorder by following
these steps
Do not apply power to the
CD Recorder with the top
casing off in case
of electric shock or the possibility of
short circuiting the CD Recorders electronics
Do not touch
any electrical components
inside with your fingers, static may
damage the CD Recorder (earth yourself to a Radiator
by
touching it every five minutes or wear an earth strap
to
dissipate any static electric from your body ).
This is for
the brave hearted....
You have been WARNED
!!! WARNING
!!!
Read the info here a few times before you
attempt this or print it out.
OK, you have had your CD Recorder for over a
year now, so this means that the 1 year Warranty has expired, run
out etc...
How do you keep it in working order at a low cost
? Well, one way is to stop dust entering the CD Recorder. Use the CD
Recorder in a dust free as possible room, I don't mean house it in a
Lab like Intel uses to make the PII / PIII CPU's, that would be
silly. Most PC's take in air via the front of the case due to the
fan(s) inside the PC which is then blown out the back. If you look
closely you will see small dust particles around the PC's drive bays
at the front, as well as around the CD Recorder. Treat the CD
Recorder with some respect as they cost money to replace, don't put
drinks on the tray, never leave the tray open for long periods of
time, saves the tray from being broken if knocked or walked into.
Keep all your CD's in a clean area, do not put mugs of coffee on
them, and then place it into the CD Recorder with liquid or sticky
sweets stuck to them.
The info that follows can be used for
all of the Yamaha CD Recorders, some will have more screws to remove
than others, this depends on the CD Recorder that you have, so
please look before you take it apart.
Opening the CD Recorder
You will need a Phillips screw driver, and a can of
compressed air, and some petroleum based grease (Vaseline jelly
works well here), and a paperclip that has been stretched out, one
or two cotton buds.
OK, this is were we get serious, time to
open that £150.00 - £400.00 CD Recorder and clean the dust out and
check that the rails that the lens carrier ( laser ) runs along are
greased.
Handle the CD Recorder with care....
Remove
any CD that you may have in the CD Recorder and close the
tray.
Shut down the PC.
Remove the CD Recorder from your PC,
take note of the location of all leads at the same
time.
Place the CD Recorder upside down onto a clean work
area free from ash trays and dust, this will allow you access to any
screws that may need to be undone / removed.
The picture above shows the location of the
screws for the CRW4416 & CRW6416 recorders that need to be
removed. Once you have done this, turn the recorder over.
Now
locate the clips as shown below.
Some CD Recorders may not have
these clips, but most do, as well as your standard CD ROM Player.
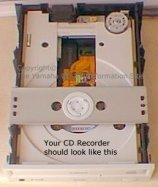
Once you have followed the instructions above,
take a look at the next picture.
Your CD Recorder should now look like this
next picture, don't do anything else until you have read what to do
next.
Please take note of the following pictures........
Warning coming up !
So, please take note of these two pictures and
the WARNINGS......

Click
Here to Continue (Part 2)
|


