Assembling the grinding kit.
(This page is under construction)
How I blundered into making a telescope
Assembling the grinding kit
The Dobsonian mount
(contains approximately 450Kb of pictures)
New work in progress (aperture fever !)
Links to Telescope Making web sites
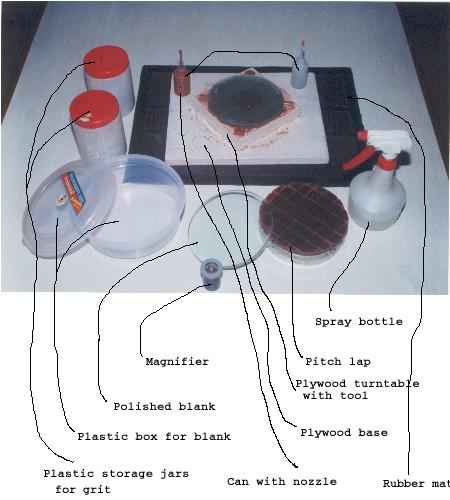
Parts needed
Glass blank.
Glass tool.
Grades of grit. I used silicon carbide, in the following sequence:
80, 120, 220, 400, 600, 1200.
Grinding platform (no barrels!).
Spray bottle, of the kind used for spraying plants.
Plastic storage boxes to store the grit.
Salt shakers to dispense the larger grits (80 and 120). A separate
one for each grade.
Small plastic containers with nozzles used to dispense the smaller
grades. A separate one for each grade. These should have caps to
keep the nozzle closed.
Plastic storage box for the tool and blank.
Magnifying lens.
A small funnel used to transfer grit from the storage box into the
dispenser. Should be made afresh by folding a sheet of paper whenever needed.
A metal bowl in which to melt the pitch.
A china clay heater with heating coil. Omit if you already have some
kind of electric heater.
A 6" stainless steel ring, of the kind which are kept below matkas,
the
earthenware water pots. This is used to make the pitch lap.
Pitch or coaltar.
Some of the parts are shown in the picture below.
Look, Ma, no barrels!
(or How to walk around the barrel when there is no barrel)
Take a neoprene or rubber mat. The kind that is used as a floor mat in
cars will do fine. Mine is about 20"x15". Get the one that does not have
grooves.
Place a smaller plywood block over it, say about 12"x12". Should be
about 3/4" to 1" thick. In the centre of this block screw in a thick bolt
about halfway through, projecting out about 1/4" to 1/2". This is the pivot
for the turntable on which will rest the tool and blank. The turntable
is nothing but another plywood block about twice as thick as the height
of the bolt above the base block with a blind hole in the centre, a little
deeper than the height of the projecting bolt. The turntable can be circular,
in which case you can use 3 cleats to hold the tool and mirror. My turntable
was a 1" thick square of side the same size as the diameter of my mirror
(6"x6"), and I used 4 cleats at the four corners. Simpler to cut than a
circle, you see. I don't have a lathe or a circle cutter or a drill press.
These dimensions are suitable for a 6" mirror. You may vary them for a
mirror of any other size.
Paint all the wooden parts with primer and oil-paint to make them waterproof.
This is all you need to grind. Place the rubber mat on any firm surface.
In the kitchen use the kitchen table. In the bathroom use the toilet seat
(with the cover closed, of course). Place the larger block on the mat,
and turntable on top of the base block, with the hole in the bottom going
into the bolt. Place tool and mirror in their respective positions, sit
on a stool opposite the whole thing, and grind away. Put as much pressure
as you need - the rubber mat holds the base block, and remains firm
without sliding all over the surface on which it rests. The absence of
grooves adds to the friction.
When work for the day is done, store the glass carefully, put away the
plywood on any convenient shelf, roll the barrel, err, I mean mat, away,
and you are ready to grind another day.
A typical wet.
Spray the tool with water.
Sprinkle the grit in an expanding spiral path, starting from the centre.
Use the salt shaker for the 80 or 120 grades. For the finer grades, the
grit will easily slide down the nozzle, provided it is dry.
Place the blank on the tool, gently, centre over centre, and slide
it a little without applying pressure, under its own weight. Rotate it
a little. Listen carefully for any "scritch" sound, which is louder than
it should be for this grade of grit. If present, lift the blank vertically,
wash off the grit and pour a fresh spiral.
Now move the blank to-and-fro and across the tool, in a zig-zag path,
gradually applying pressure, for the required overhang (normally one-third
of the diameter). The amount of pressure depends on the grit size. You
need to really push hard in the initial stages, when the blank is being
"hogged" out. In the finer grits, only the weight of the wrist is sufficient.
Rotate the tool and blank frequently in opposite directions.
Add water from the spray bottle as needed.
After a few minutes, the grinding sound will gradually diminish.
When the tool and blank are both covered with a uniform pasty coat
of sludge, all the grit is broken down. It is time to refresh the grit.
Rinse both in a bucket of water. Allow the sludge to settle down before
decanting the water. Pouring away the sludge with the water is a sure
and certain way of blocking the drains.
When does one stage of grinding end and another begin?
How do you decide that a particular stage of grinding with some grit size
is over and it is time to move on to a smaller grit size? This question
is
among the most puzzling faced by newcomers.
One way is to use a magnifying lens to locate, mark and keep
track of the most prominent pits on the blank at the start of a grit stage.
Look closely and remember the size of these pits. After a few wets, when
these pits have vanished, locate another set which you think are most prominent.
Compare the sizes of the two sets. Normally the second set will be smaller
in size than the first. Now continue the grinding until the second set
of pits have vanished. Locate a third set which you think are most prominent.
Compare the sizes of the second and third sets. These two sizes will
be more or less the same.
If this is not the case, continue grinding until you reach a stage
when the sizes of two such sets of prominent pits are the same. At this
stage you can move on to the next lower grit size in the grinding sequence.
How can this happen? The reason lies in the way the process of grinding
takes place.
Silicon carbide (or any other grinding abrasive) does not cut
glass, like a knife. It shatters, or fractures, the surface into
minute shards when subjected to pressure. The pits are created when the
microscopic glass pieces break off and mix with the grit (forming the sludge).
The average size of the pits depends on the size of the grit. This means
that smaller size grit creates smaller pits on the floor of the larger
pits, after removing the glass which formed the walls of the larger pits.
Eventually the larger pits of a previous grit size are all removed and
replaced with smaller pits. After a sufficiently long time, the grit
is merely removing pits of its own size and replacing them with a fresh
set of the same size. This is the time when further grinding with this
particular size of grit does not make the glass any smoother. Time to
move on to a smaller grit size.
Mistakes to avoid
Mark the back of the tool and blank with some paint or waterproof ink.
It is very easy to reverse the tool or blank in the initial stages
when the curvature of the surfaces is not apparent.
Early on during the hogging of the blank, in one of the wets I inadvertently
reversed the tool. Fortunately I detected this before starting the next
wet, so little or no damage was done.
At the end of grinding with one stage of grit, thoroughly clean the
wooden base and turntable with a brush and plenty of water.
If possible, repaint all the wooden parts to immobilise any particle
of grit before moving on to the next, smaller, grit size.
Keep the edges of the cleats smooth. File the corners round.
This will prevent a finger from getting cut or bruised when your
hand brushes or strikes the cleat during grinding, as it inevitably will.
When in contact with water for a long period, the skin gets soft and cuts
easily.
Bevel the edges of the tool and blank.
This prevents them from chipping.
Never, never allow the surfaces of the tool and blank to become
dry while grinding.
This may lead to the grit particles clumping together, and ploughing
a deep furrow on the blank. Worse, it may also lead to the tool and blank
seizing fast.
Do not pour the used grit down the drain when washing the blank and
tool.
This is a sure fire way to block the drain.
My Home page
Last updated: 1 May, 2004
Copyright (c) 2002-2004
Kartik Patel