Intro To The VFPUnit Workbench.
Please follow instructions verbatim, there is a lot of behavior packed into small examples.
You may copy and paste
 or Highlight and drag
 Sample Code into VFPUnit
Lets kick the tires and see how this thing works.
Open a new experiment.	
Do this by pressing  the 'Experiment' button on the 'Suites of Experiments' form.
 - If an experiment was already selected in the list box, it will be opened. -then press new on the experiment form.
 - If no experiment was selected, a new experiment will be opened.

Call it 'A' (or whatever you want) [the field next to the experiment button]
In the Test Code editbox, type in the following line, and then Press the 'Run' Button.
Note: you do -Not- have to save the experiment before running it!.
WAIT WIND 'Hello'
You should see the standard wait window in the upper right corner, waiting for a keypress from you.
This simple example points out a very important point, that is, that how this workbench operates is
entirely dependant upon what code you put in the test code edit box.
The Test Code entry area is where 90% of your time will be spent, creating objects, writing tests,
maybe some debugging, or just general mucking around.

I hope the prospect of typing in this puny edit box disappoints you, It did me.
We've come to expect syntax help, syntax coloring, formatting options, undo, intellisense,
 yada yada yada, .., when we are writing code.
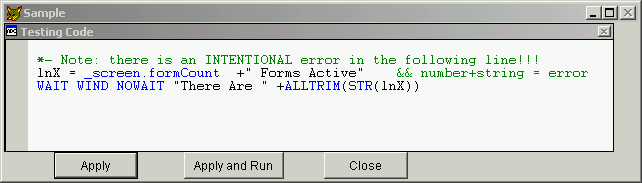
So, I added an alternate way of editing test code.
		
By pressing the 'Test Code' button on the experiment form, a copy of this editbox text is placed
in a temporary file, and opened in a separate window that lets us have all those goodies.
The important part to note here, is that the 'Apply' button on this editing window saves
the temporary file you are working on, back to the edit region of the experiment form.
 -it does not save the whole experiment.  (we have yet to save the experiment.., don't bother to yet)

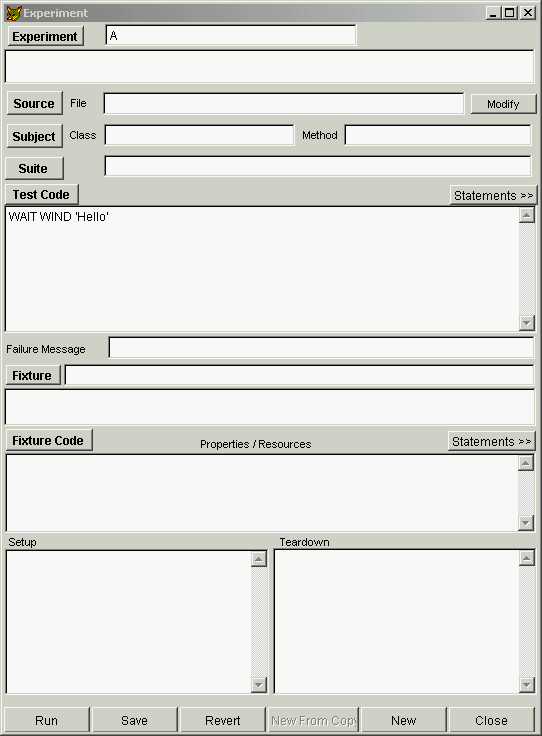
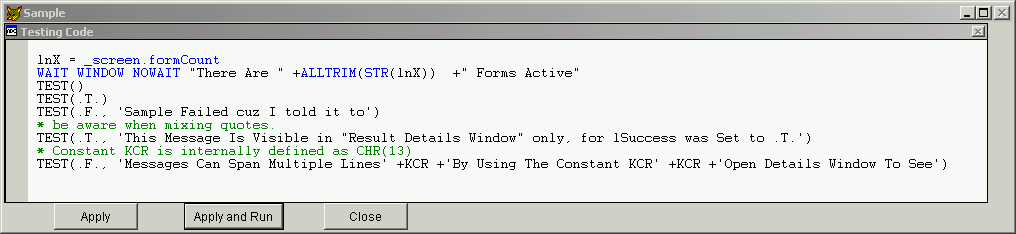
If you haven't pressed the Test Code edit button yet, do so now.
You should see a window titled 'Sample', and a region titled 'Testing Code'.
This is where we enter the steps needed to 'take a sample', or 'take a measurement'. i.e. the test code. Speaking of the Apply button on the 'Sample' window, -it is always enabled, see the notes for why if you care. 
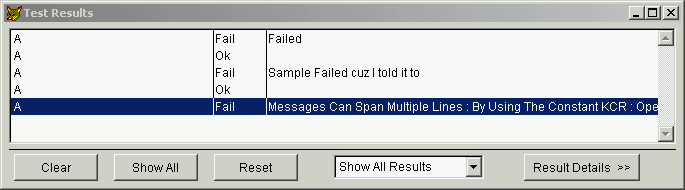
The 'Apply and Run' button saves the temp file, like the save button, and then runs the experiment. You'll use that button a lot. The 'Close' button exits without saving. 
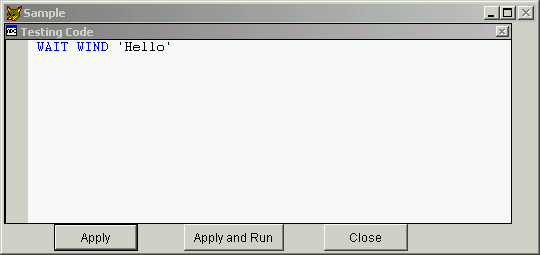
Remove the WAIT WIND 'Hello' command if you want, and enter this:
lnX = _screen
and then type a '.',
you should see intellisense activate the drop down list of properties and methods for the _screen object.
Choose formCount from the list for now.

Complete so that the code is:
*- Note: there is an INTENTIONAL error in the following line!!!
lnX = _screen.formCount  +" Forms Active"		&& number+string = error
WAIT WIND NOWAIT "There Are " +ALLTRIM(STR(lnX))
Press the 'Apply and Run' button.
Because we cannot concatenate character strings onto numbers, a 'Test Results' window should appear
to tell you that there was a SAMPLEING FAILURE: Operator/operand type mismatch.
This also 'cascaded' into the 'SAMPLEING FAILURE: Variable 'LNX' is not found.' error
'Results Detail' will toggle a window on and off that contains additional information for the selected Result. So will double clicking an item in the list box. 'Clear' clears the list box, but leaves the internal result list intact, 'Show all' will show all of the results, while 'Reset' will clear the internal list of results, and clear the list box. The 'Test Results Detail' window will always contain the details of the last -chosen- result, even after a 'reset'. It is not updated automatically when you 'Run', only when you select an item from the list box. The thing to note here is that, errors are treated like testing results. In other words, no more fear of the dreaded 'An Error Has Occurred, cancel, suspend, ignore' message box. Errors may cascade, so don't ever use live data (which you don't do anyway), but in general, you can fix those silly errors easier and faster by letting the workbench catch the errors. Press the 'Run' button back on the experiment form. Note how it is running the current code that was entered in the 'Sample' window. Make sure you see some errors in the 'Test Results' window, and correct the code to read: *- Hint: just highlight and drag '+" Forms Active"' down a line.
lnX = _screen.formCount
WAIT WINDOW NOWAIT "There Are " +ALLTRIM(STR(lnX))  +" Forms Active"
Press the 'Apply and Run' button.
If the code is correct, a wait window should have appeared in the upper right corner,
But, -Nothing happened in the 'Test Results' window!
		
Nothing -should- have happened, for there where no errors.
After a short time, It will become natural to expect to see results appearing in that window,
and I often catch myself looking for results when there should be none.

Press 'Clear' or 'Reset' of the Test Results often to avoid misinterpreting the results
when doing interactive coding.  {just a hint}.
Onward..,
TEST and MEASURE.  Are keywords whose purpose is to store a Result,
which is then displayed in the 'Test Results' window.

These two Keywords are identical in every way. I just couldn't decide which one is more appropriate...
I'm favoring TEST, for it is shorter, and easier to type, while MEASURE is more indicative of it's function.
From now on I'll use the keyword TEST, you can use either one interchangeably.
{this may be a moot point when you examine this, i may have made up my mind!}

TEST acts like a public function, that accepts up to 2 arguments (parameters).
TEST(lSuccess, [cFailMessage])
	1) lSuccess      a Boolean value.  often is an expression, whose result is a Boolean.
	2) cFailMessage  an optional message. often an expression that states expected vs. actual results.

Change the code to read:
lnX = _screen.formCount
WAIT WINDOW NOWAIT "There Are " +ALLTRIM(STR(lnX))  +" Forms Active"
TEST()
Press the 'Apply and Run' button.
a Test Result should have been added that simply states: 'Failed', since the lSuccess defaults to .F.

Exercise the different combinations of calling TEST.
{Purists would scold me for introducing the idea of having multiple Tests in an experiment, see notes for why.}
Enter in the following code.
lnX = _screen.formCount
WAIT WINDOW NOWAIT "There Are " +ALLTRIM(STR(lnX))  +" Forms Active"
TEST()
TEST(.T.)
TEST(.F., 'Sample Failed cuz I told it to')
* be aware when mixing quotes.
TEST(.T., 'This Message Is Visible in "Result Details Window" only, for lSuccess was Set to .T.')
* Constant KCR is internally defined as CHR(13)
TEST(.F., 'Messages Can Span Multiple Lines' +KCR +'By Using The Constant KCR' +KCR +'Open Details Window To See')	
Press the 'Reset' button on the Test Results screen to remove the clutter, and Press the 'Save and Run' button. You should see 5 new results in the test results window.
3 'Fails', and 2 'Ok's. Size the window to see all 5 if needed. Use the drop down list box on the test results form to filter the display of the results, by success or failure or all. Just one more thing, Switch to the experiment form, and in the 'Test Failure Message' field, enter in the text: "My Default Fail Message". Click the Run button, and note how the results message is now 'My Default Fail Message' for TESTs that did not have a fail message as the second argument.
This seems like a good place to save and start a new experiment.
Apply and then close the sample window.
		
On the experiment form, in the field marked 'Suite', type in the word "Tutorial".
This will create a 'Suite' named Tutorial, that we can use to organize a set of related experiments.
Whenever this field is enabled, you may enter a name for a new Suite.
You can always change the assigned Suite of an experiment by pressing the 'Suite' button adjacent to the entry field.

Press the 'Save' button on the experiment form.
Hope to have accomplished:
  seen major pieces of the workbench.
  how to make and edit test code.
  control the messages of results.
  have seen both exception errors and test results.
Next Previous Main

  Generated 03/11/02 01:49:41 PM
Hosted by www.Geocities.ws

1