| Telescopic
bones in Anim8or
Anim8or
doesn't have a feature for adjusting bone lengths while animating them
- and actually, you don't even need that, if you do the tricks described
in this article. The principle can be used as well with other bone-based
animating systems.
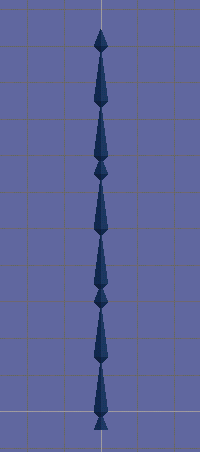
The example is a simple antenna. If you
are experienced with Anim8or you'll probably get the idea just from the
finished
animation and animation
with bones and experimenting with the complete Anim8or file.
Otherwise you should read the article...
Objects
The animation is built using pre-made objects
- spheres and cylinders - in the figure editor, so you don't have to build
any objects.
Figure |
| Figure is the key to the telescopic
behaviour. Instead of adjusting the length of an actual bone, there are
two extra bones that tilt to the side and form a kind of "scissors" that
can be used for length adjustment.
The first step in building the figure is
to create the bones. Just start from the root bone, and add bones with
somewhat correct length: two long bones (approx. 15 units), one short bone
(approx. 15 units), two long bones, one short bone, two long bones and
one short bone. The figure should look something like the picture on the
left. |
 |
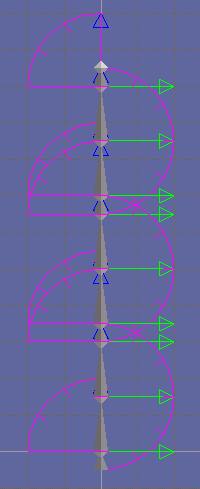 |
Next you should set up the
correct limits and lengths of each bone. It is important that the lengths
are accurate, or otherwise there will be small horizontal movement between
the parts of the telescope. So you should edit the bone properties by hand. |
| You can do it by
double-clicking each bone, and changing the variables in the dialog. The
length of all long bones should be 15.00 and the length of all short bones
should be 5.00. The other property that is set in this dialog is the Z-joint
limit. It enables the movement of the skeleton. For short bones
and lower bones of each pair of two long bones (bone01, bone04 and
bone07) it should be set to 0,0,90. For upper bones of each pair
of long bones (bone02, bone05 and bone08) it should be set to -180,0,0.
When you have adjusted all bones, select
them all by right clicking, toggle the visibility of joint limits on, and
your skeleton should look like the image on the left. |
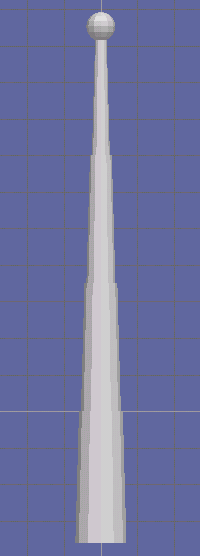
| Now you should
add some objects to your skeleton. Add the object only to the short bones,
the long bones are invisible extra bones that will rotate around when animated.
Use pre-made objects from "Build->Add Cylinder" and "Build->Add Sphere"
menus.
The lowest cylinder part should be attached
to the root bone, it will be static in the animation. So select the root
bone and generate a cylinder from "Build->Add Cylinder" menu. It doesn't
matter much what properties you give to it as you have to edit them anyway.
So when you have the cylinder there, double-click it and adjust the settings:
Location
Diameter
Length |
0.000, -36.000, 0.000
Start: 14.00 End: 12.00
36.00 |
Do the same to all short bones,
but change the diameters so that each bone will be 3 units smaller than
the previous one - diameters being Start: 11.00 End: 9.00, Start:
8.00 End: 6.00 and Start:: 5.00 End: 3.00.
Then create a sphere from "Build->Add Sphere"
menu to the topmost bone. Change its location to 0.000, 5.000, 0.000 and
diameter to 8.00, and you should have a figure similar to one on the right. |
 |
| Sequence
The last thing to do is to animate the
figure. This is relatively simple. You need just two keyframes, one for
each extreme position of telescopic animation. So in the sequence editor,
select all bones of your figure with right mouse clicks, and press the
key-button in the first frame of the animation. Then go to the middle frame
of the animation, and press the key-button again. Now the first and the
middle frame are identical, so you should start editing the keys in the
middle frame by entering new values - so make sure the darkened area in
the time line is over the middle frame. Expand the list of bones on the
bottom of the sequence-screen, and double-click over "bone01-Z". Enter
the new value of 90. Do the same for each bone, except for those bones
where the range is -180,0,0 use value of -180. This should eventually result
in a completely folded bone structure. Your first frame should look like
this
and your middle frame like this.
If you playback your animation, it should
look like this.
Scene
For making the final render, go to the
scene editor, set the scene length (from "Settings->Scene..." menu) to
the same as the sequence length (40 in this case), insert the figure into
the scene (from "Build->Add Figure..." menu), insert the animation for
the figure (from "Build->Add Sequence..." menu) set the camera and render
the animation. The result should look something like this.
|
Last updated
30th July 2000
|