The Playstation 2 Guide

Note: This guide has been put together for the lucky game fanatics who camped out the Japanese stores or paid their savings to scalpers to get a Japanese PlayStation 2 console. Be careful; Japan uses electricity in 100v/ 30a configuration and NOT in 220v/30a, as in european and some asian countries.Make sure you connect it through a "step-down" transformer before powering-up.
Setup & Display
The different ways to set up, connect and display the PS2.
Operation
How to safely turn on, reset, and power down the system.
Menu Screens
Turning the menus to English
Playing PlayStation (PSX) Games on PS2
PSX Games at high res + faster loading
DVD Playback
Watching a DVD movie on the PS2.
The Browser
Find out how to manage your memory cards and listen to audio CDs.
The Utility Disk
Find out what the the Utility Disk is all about.
SETUP AND DISPLAY
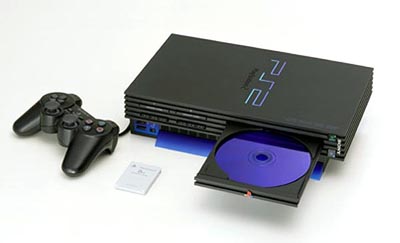
The PlayStation 2 can displayed either vertically or horizontally. Right out of the box, you can display it either way, but Sony does offer optional stands for each position. The horizontal stand is pretty pointless, but the vertical one is pretty necessary to maintain the systems balance. .As with the original PlayStation (and most consoles in general), there are a couple things you want to keep in mind:
Do not set the console on thick carpet. This can amplify the heat already generated by the system, which can cause it to overheat. Do not keep the system in a small alcove of an entertainment center where it won't get enough ventilation. Do not play for extended period of time. Try to take a hour break every few hours to allow the system to cool down. There have already been reports of PS2's having similar heat problems as the original PlayStation, but if you follow those three simple rules you should be fine.
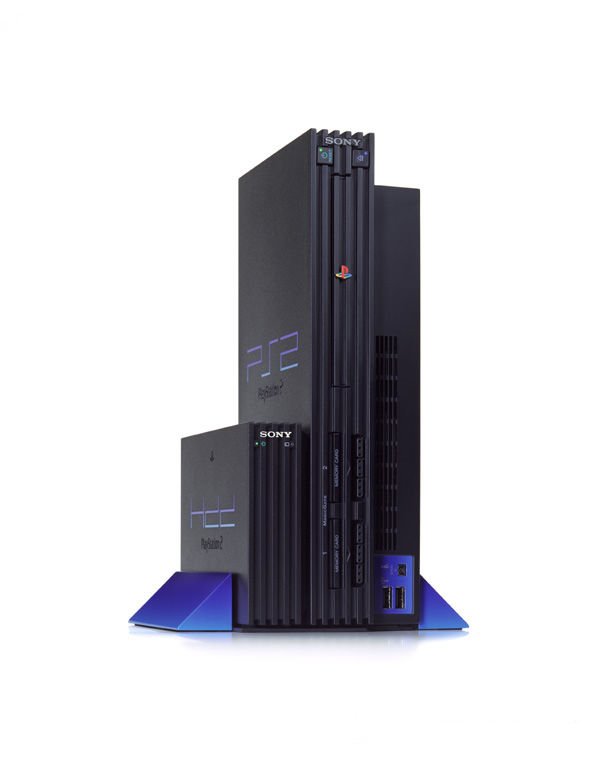
Use these next two images to familiarize yourself with this new entertainment powerhouse:
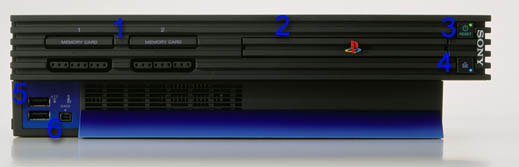
1. Memory Card and Controller Ports: These work exactly as they did on old PlayStation. Just put your memory card into the top slot, and your controller into the bottom.
2. CD/DVD Drive: By pressing the "Eject" button (#4) this tray will gently slide out allowing your to insert or remove your favorite game, movie or CD.
3. Reset Button: This is the magic button that controls your power of the PS2. One press will reset the system to the main menu, by holding it down you can put the system into "Sleep Mode". We will cover this more later in the guide.
4. Eject Button: By pressing this, you can open the CD/DVD drive tray to insert or take out a disc.
5. Two USB Ports: These two ports open up the PS2 to all sorts of new options such as keyboards, mice, and additional controllers.
6. i-Link Port: Many digital cameras and camcorders these days come equipped with i-Link compatibility. This little plug in will allow future compatibility with items such as those. Imagine putting yourself into the game using a image of your own face taken from a digital camera. That can be possible very soon using this port.
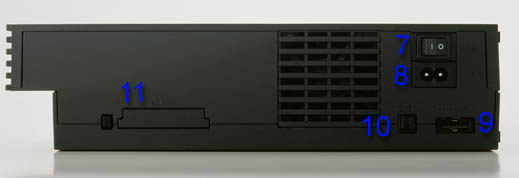
7. Main Power Button: This switch basically turns on and off the PS2. We will cover this more in depth later in the guide.
8. AC In: This is where you plug in the power cord.
9. AV Multi-Out: You connect all video cables (RFU, RCA, S-Video, Component) here.
10. Digital Out: You use this to connect your PS2 to a Dolby Digital/DTS receiver or other Digital-ready equipment.
11. Type III PCMCIA: This is where more future upgrades (such as a high-speed modem, or hard drive) will attach to the PS2.(Note:Only available for the Japanese PS2)
The PlayStation 2 can bee hooked up to almost every TV imaginable, with almost as many different connections. Your choices are:
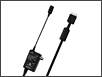 |
RFU: This is what you will need to use if your TV does not have RCA A/V (Red, Yellow, and White) jacks. To hook up your PS2 with this option, plug the rectangle-shaped plug (with the PlayStation logo on it) into the PS2 Multi-out input (it is right below the power input as shown in the image). Then take the other end, and plug it into the antenna plug on your TV (as shown in the image) |
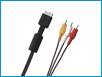 |
Composite: These are the cables that the PS2 comes with and are also probably the most common form of connection that people will use. As with RFU, plug the rectangle-shaped plug (with the PlayStation logo on it) into the PS2 Multi-out input (it is right below the power input as shown in the image). Then, take the other end and connect each plug to the appropriate colored input on your TV (as shown in the image). |
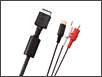 |
S-Video: S-Video is a step above Composite providing much better definition and color. Connect it to the PS2 the same way you connected the other two forms of video cords. Then connect the White and Red connectors into their appropriate inputs, and then connect the S-Video plug into the S-Video input on your TV (most TV’s have this right above the Red and White inputs). |
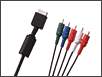 |
Component: Component video takes the PS2 experience to a whole new level. Most small TV’s don’t have Component inputs, but many higher end TV’s (such as Sony Vega/Wega’s over 32") do. If your TV does (it can be found out simply by looking at the back for inputs labeled "Component"), this is going to be the way you will want to play the system. You connect these to your system the same way as all other video cables. |
The PS2 also supports other forms of display (such as VGA-output), but these cables are yet to be available. Once they are, well will update this guide to cover them.
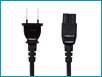 |
Power: The final step in hooking up your PlayStation 2 is giving the monster some power. Plug in the figure eight shaped connector to the power input of the system (its right above the AV Multi-out as shown in the image). Then plug the normal looking power plug into a wall outlet, surge protector, or power strip. |
Putting PS2 to sleep
No, I'm not talking about euthanasia, but rather powering the thing up, and safely shutting it down. This system is not like any other on the market when it comes to this aspect of the design. In this matter is more closely resembles a DVD player than a game console. There is a master power switch on the rear of the system, right above the power and video plugs. This basically turns on and off the system, but there is more to it than that. Once the switch is turned on, the light near the "Reset" button will turn red. The system is at that time in sleep mode (it's basically "off" right now, but power is still going into the system). To turn it on, press the "Reset" button to change the light to green and start the system boot up sequence. Pressing the "Reset" button once will reset the system back to the boot menu, while holding it down will put the system into sleep mode. It is a good idea to keep the system in sleep mode while not in use (current DVD players are like this when you turn them off). It's best to only hit the master power switch at the end of the night or when you will be away for a while (like at work).

Menu Screens
Let's turn the system menu screens into English. When you first access the system menu (by booting the system without a disc in it), you will be presented with Japanese menus. Well there is an easy way to fix this, if you just follow these simple instructions:
The first image shows you the main menu. Select the bottom option (which is System Configuration) to shift into the next series of menus. There are five cubes here, each one leading to another option. As shown in the second image, select the bottom cube (the blue color is showing that it is selected). This is the language option, which takes us to the next step.
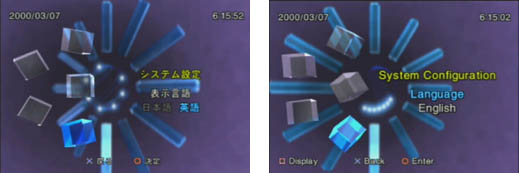
After selecting that option, you will be presented with two choices (the first image). Select the second one to change the menu screens into English. Unfortunately the memory card, CD audio, and DVD video options will still be in Japanese :-(
The menu options
The language menu is just one of the many features in the PS2's System Configuration menu. The following images will detail the rest of those features:

The first image shows the Clock Adjustment option. This is usually already set when you get your PS2 (a nice feature), but it is here where you can reset it if you ever need to. The second option sets the default size of the menus for your TV. You get two options, 4:3 (normal TV's) or 16:9 (widescreen TV's). Again, this only affects the menu screen size, but some games will make use of the extra screen space that a Widescreen TV provides.

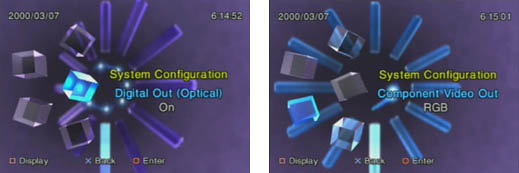
These next two menus are the activation for the Digital Out and Component Video Out ports on the PS2. Both of these are for those of you who have high-end home theater systems.
Playing PlayStation (PSX) Games
One of the coolest features of the PlayStation 2 is the ability to play all of your old PlayStation games on it. What isn't widely known (at least not until the PlayStation Festival in Japan) is that the PS2 can actually slightly improve the textures and load times of some PlayStation games. Now, it should be noted that not all PSX games are able to run with these enhancements. If you do encounter a problem with a PSX game while running one or both of the enhancements, simply turn it off from the menu as shown in the following screens:
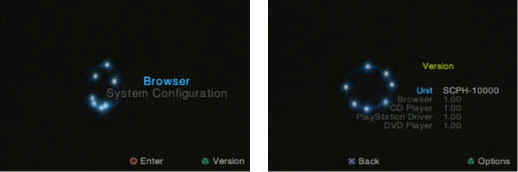
The first screen shows the main menu. While there, press Triangle to bring up the Version info screen. This screen shows the version numbers for the various functions within the system. Select "PlayStation Driver" and press the Triangle to bring up the following options:
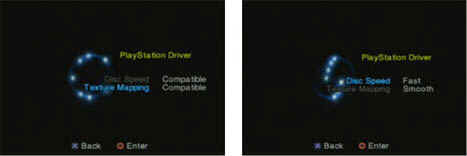
These last two screens show the two options you can set for PlayStation games:
Drive Speed sets how fast the drive reads the CDROM. Fast is the upgrade, while Compatible is normal speed. Some games (such as Final Fantasy VII and VIII) experience glitches when running under the Fast option as they were programmed with carefully calculated disc access. While it doesn't make a massive difference (the load times on games that work with this are only decreased by about two or three seconds), it is a very nice option. Texture Mapping smoothes out textures in the games that it is used on. Again, not all games will work with this since some used software tricks to enhance the textures in the game when running on the existing PlayStation.
Once you have your options set, the system will start up the game as normal. The system will save the driver settings, so when you start up the machine with a PSX game in the drive, you won't have to go to these menus to start it.

DVD Playback
Since the PlayStation 2 is also a DVD Movie player, it can play region-coded DVDs. For those of you who are new to DVD, here is a quick explanation of what this means.
When the DVD movie format was created, the big movie studios began to worry about releasing a movie in one country on DVD when it is just opening on screens in another. Also, the studio that distributes a movie can differ from country to country. So, the Region Coding was created.The way the PS2 works this out is by storing the DVD driver for the system on the 8MB Memory Card in a file that cannot be copied, deleted, or otherwise tampered with. Since the imported PS2 is from Japan, it can only play DVDs coded for Region 2.
Can one hack the Region lock-out?
There is a way that will allow you to run NTSC DVD's from nearly every region on your PS2. (There are some limitations though). First, it will only work with Version 1.0 of the DVD Driver (you can see that in the Version menu of the system). Also, not all DVD's will run with this code, while others will run with limited features (some menus may not load correctly is one example). The code is:
Get a regular old, NON-ANALOG PlayStation controller (the Sony one). Put it into Controller port 1. Load a DVD while holding "Up" on the controller until you see the DVD menu appear. Then, hit play.
We have tested this code and found that it works a good percentage of the time. Again, this will not work with any version of the DVD driver newer than 1.0, and it will not play every DVD. If you happen to import a DVD from Japan, or have a DVD that can be played in multiple regions, simply plug in your 8MB Memory Card that has the DVD driver file, and then insert your DVD movie. The system will boot it just like a game or music CD. Simply use the remote controller(that comes with SCPH-18000 model) or you can use your controller to navigate the DVD menus and control the movie just as if you had a remote. The controls are:
D-Pad: Moves the cursor to navigate menus.
Select: Brings up the on-screen commands. This is basically like having a
remote control on your TV screen. You can either use that or just use your
normal controller.
Start: Plays or pauses the video.
L1: Go back a chapter.
L2: Rewind
L3 (press left analog stick): Change the subtitles
R1: Go forward one chapter.
R2: Fast forward.
R3 (press right analog stick): Change the audio/language option.
Square: Go to DVD Title menu.
X: Cancel button.
O: Accept button.
Triangle: Go to the DVD Main menu.
The Browser
As with the PSX before it, the PS2 has the ability to play Audio CDs and manage your memory card files via on on-screen menu. In the case of the PS2, this menu is called the "Browser". From here you can copy or delete memory card files and listen to an audio CD. When you access this menu you will see exactly what media is currently in the system.

The Browser menu will show you exactly what you have in the system. PS2 Memory cards are black, while PSX cards are gray. There is even an icon for the Pocketstation! On the disc side Blue is a PS2 CD, Black is a PSX CD, while Audio CD's and DVD's are silver or gold.
Selecting an audio CD, will bring you to the playback menu:
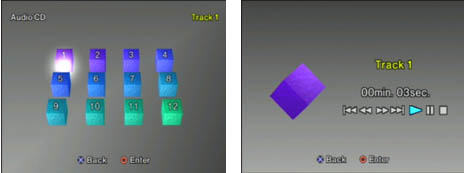
The fist image shows you where you can select your tracks. The next one shows you the Audio CD controls. It is laid out just like any other music player, and that is pretty much all there is to it. Moving on to the Memory card screen (simply select the memory card from the menu), you find one of the cooler new features of the PS2. Instead of just having a flat image to display a saved game or file, the PS2 displays them via a fully 3D (and sometimes animated) icon. These icons can also change depending on what you do in the game. For example, when you complete Ridge Racer V, its saved game icon turns from a little car to a 3D icon of Ai (the newest Ridge Racer babe).
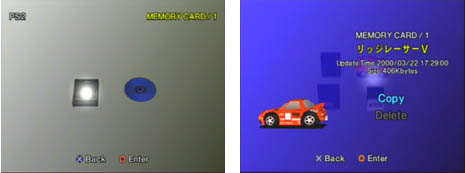
As you can see in the image, once you have a file selected you can easily copy it to another card or delete it.
The Utility Disk
Inside the PS2 box is a blue CD sleeve containing the Utility Disc. On this CD is a PS2 walkthrough (in Japanese) that is similar to this guide.
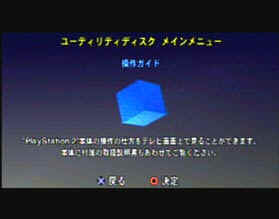
When you start up the system with the disc in the drive, you will be presented with this screen. Hit "X" to exit out, or "O" to continue to the next screens.
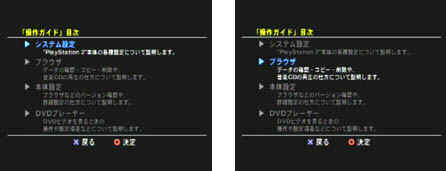
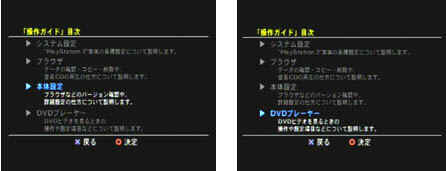
The top four screens show the main menu of the Utility disc. We went through all these menus for you, and their descriptions are below:
1.This is a walkthrough of the system menus (just like the one you are reading).
2.The second option is a description of the Browser menu, which we also cover in this guide.
3.Number three is an explanation of the Version screens that are accessed from the system's boot up menu.
4.The fourth option is probably the most important option on this disc menu. It is here that the back up DVD Driver is hidden. This driver is needed on your memory card in order to run a Region 2 DVD movie. It should be noted that this driver is already on the memory card that comes with the system. You only need to download the driver if your existing one becomes corrupted.
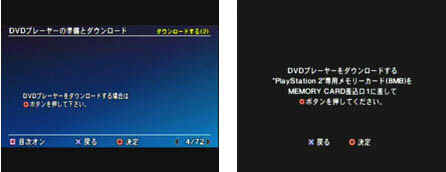
To access the driver, go into the menu, and then go forward to entry #4. Hit "O" to select it and then "O" again to begin the download. You will be prompted to select "yes" or "no" if you really want to download the Driver.
Lost or deleted your PS2's DVD drivers? Read this step-by-step reinstallation guide
The drivers, or software programs that allow the PS2’s DVD
drive to boot up, are located on the PS2’s memory card, and are very
easily deletable, especially if you have a card that gets corrupted
by saving Ridge Racer V data. Some were fortunate enough to get a
functional memory card, but they ended up having to reinstall the
drivers in order to play American DVDs on their system.
That’s all there is to it. Remember, unless you have a version
1.00 utility disc, the driver won’t be able to play American DVDs,
since Sony’s newer releases will have fixed the problem. To check
your version, press the triangle button on the PS2’s main screen
that comes up after you turn the system on.
Another very cool extra on the Utility disc is a
MPEG2 demo video hidden at the very end of the DVD section. To view it, go
forward to entry #72 and press "O". We snapped some images of this crystal clear
underwater scene for you:

For everyone that bought the first PS2 sets they were able to easily play multiregion DVD's. Sony have since started making PS2s with the new 1.01 DVD Rom which makes it impossible to play multiregion DVD's.
However, a number of hacks have been found on the internet!
I havent managed to try these hacks out but they may work:
METHOD 1
Load the DVD into the PlayStation 2. At the browser screen, select the CD icon then press and hold square and then circle until the DVD menu appears, holding both buttons all the time. Then there are two ways to play the movie; you can either select the play icon or the movie start icon which is in the middle to the far left.
METHOD 2
First of all, turn on the PS2 and select the browser option. Then insert a DVD disc and select the disc icon. Thirdly, press the circle key on the joypad and release it. At the same time, press the square and the triangle keys together. Finally, the DVD will works fine.
![]()
All names, logos etc. are trademarks of their respective companies.This website is not affiliated with Sony Computer Entertainment Inc.Compilation by Niel Scytherman (c)2001
