Taking a photograph consists of the following processes:
- shutter cocking and film transporting;
- exposure setting;
- diaphragm setting;
- viewing;
- focusing;
- shutter releasing.
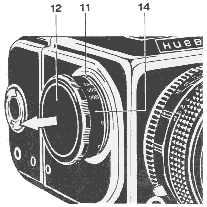
Cock the shutter and transport the film by turning knob 12 fully.
At
the
beginning of cocking the shutter it is normal to feel a slight increase
of the force needed to be applied
to the
knob.
When the shutter is being cocked:
- the film is automatically wound;
- the next picture number is set in window 27;
- the white signals are set in windows 26 and 39;
- the mirror is lowered to the operating position;
- the lens diaphragm aperture is fully opened.
Set the shutter speed only
when the shutter is cocked by knob 12.
Pull the
knob in the direction of the arrow and turn it in any direction until
your desired speed coincides on both scale 14 and with the index 11 on
the
camera
housing.
Pressing the knob back in will set the shutter mechanism at this speed.
Set the lens aperture by turning the ring with scale 6 until the chosen value coincides with index 5.
Open finder hood 10 for viewing by shifting button 19 in the
direction of the
arrow.
With repeated shifting of the button , the viewfinder
magnifying lens
is set to its operating position.
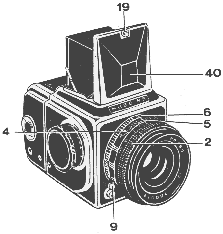
Focus the camera with the aid of the ground-glass surface , wedges or
with the aid of the lenses distance scale 2.
Focusing can be carried out only when the shutter
is cocked
as this is when the mirror is in it's working position and the
diaphragm is fully
opened.
The depth of field can be estimated with the aid of the distance scale and by means of the additional scale 4.
The depth of field can be visually checked by observing the image on
the ground-glass surface after pressing lever 9 fully downward. In this
case the lens is
stopped down
to its pre-set value.
When released , the lever automatically
returns to it's initial position and the diaphragm is once again fully
opened.
When you have settled on the composition of the photograph and all settings are correctly set , remove the magazine dark slide 29 and release the camera's shutter by pressing smoothly on the release button 17 as far as it will go.
When the camera shutter is being released:
- the mirror automatically swings to it's upper position;
- the diaphragm aperture closes down to it's pre-set value;
- the shutter opens for the pre-set duration exposing the film;
- the red signals are then set in windows 26 and 39.
For exposure times longer than 1/125 sec it is recommended use a
tripod.
When using exposure times from 1/8 to
1/2 sec
keep the shutter release button pressed down and only release it after
the operation of
the
shutter is complete.
Tripod sockets 23 in the camera are provided with a thread of 3/8" but
may
your's may be fitted with a 1/4" adaptor.
The camera's shutter can be released with the aid of a straight thread cable release , which is screwed into the threaded hole of release button 17.
When the shooting is over , fold down the finder hood securing it
with the lock 40.