|
On my website, I have put up games which I thought were important to me or that I played particularly well in. In the following game, I was happy because I played very well from the first move to the last. In going over it after the game both with friends and with the use of the computer, there was perhaps one or two moves where I could have made improvements, but I didn't make any moves which would cause me to go from winning to losing. In any case, I hope each of you get the opportunity to feel the joy after a game that I did after this one.
This game was played as part of the Online Chess League. Because players from around the globe participate, I was paired with an opponent from Australia. Because of the time differences, I ended up playing at 5 AM! However, it was worth getting up early.
Livithium (2012) - bscastro (1846) [B01]
ICC 60 15 Internet Chess Club, 22.02.2003
[Castro]
1.e4 d5 2.exd5 Nf6 3.Nf3 Ten minutes before the game, I looked at my opponent's history and saw one game with this line. I noticed that the player with Black pieces played the text move, where before I had always played 3...Bg4 in response to this. I quickly grabbed my book and saw that 3...Bg4 was thought to be inferior and that Black's best option was to go back into main line Qxd5 theory. I didn't really want to do this since I didn't know too much about that system, but I also felt uncomfortable playing into a line which I knew was theoretically inferior. Of course, at my level of play, theoretical nuances are too important, but still psychologically I think it would have put me at a disadvantage. So, I quickly looked over the game in his history (which he lost) for a couple minutes and tried to see the basics of his set-up. Since I play 1.e4 as White, I also had that knowledge to fall back on, so I felt a little better playing what I did. That game is appended a few moves below where it deviates from my game. 3...Qxd5 4.Nc3 Qa5 5.d4 c6 Diagram 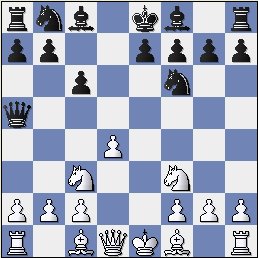
|
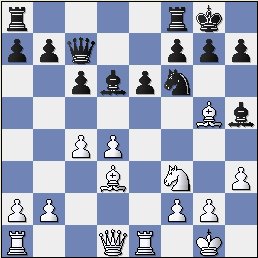
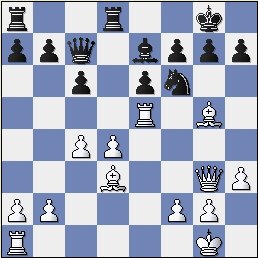
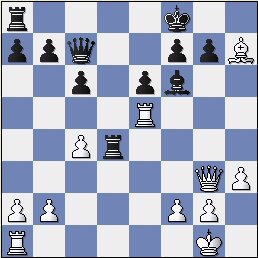
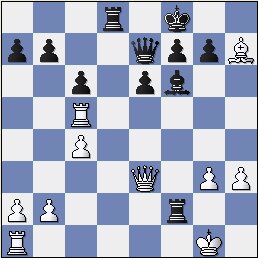
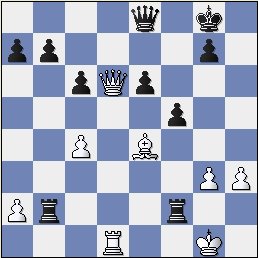
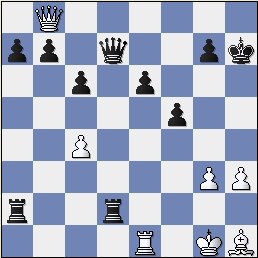
6.Bd3 [ This is the game I looked at 10 minutes before playing my opponent! Here it deviates from my game. 6.Bd2 Bg4 7.h3 Bh5 8.Be2 e6 9.0-0 Nbd7 10.Re1 h6 11.Ne4 Qc7 12.Ng3 Bg6 13.Bc4 0-0-0 14.Qc1 Nb6 15.Bb3 Be7 16.Bf4 Bd6 17.Bxd6 Rxd6 18.Ne5 Rhd8 19.c3 Nfd5 20.Bc2 Bxc2 21.Qxc2 f6 22.Ng6 Qf7 23.h4 f5 24.h5 f4 25.Ne4 R6d7 26.Nc5 Rc7 27.Rxe6 f3 28.Rae1 Nf4 29.Re7 Rxe7 30.Nxe7+ Kb8 31.Qe4 Ne2+ 32.Kf1 fxg2+ 33.Kxe2 Qc4+ 34.Kd2 Qf1 35.Qe5+ Ka8 36.Qc7 Rb8 37.Ne6 Qxe1+ 38.Kxe1 g1Q+ 39.Kd2 Qxf2+ 40.Kd3 Qg3+ White forfeits on time. 0-1 Livithium-e-hongisto/Internet Chess Club 2003/ (40)] 6...Bg4 7.h3 Bh5 8.0-0 e6 9.Bd2 Nbd7 10.Re1 Qc7 11.Ne4 I spent a few moments on this move. I was still waking up a little (it was about 5 AM when I played this game). However, as I looked at it more and more, I felt my position was okay. 11...Nxe4 12.Bxe4 Nf6 This was my idea behind Nxe4 to "gain" time by chasing the bishop back to d3 as White wouldn't really want to trade the light-square bishop for the knight in this position, which will likely open up for Black's two bishops. 13.Bd3 Bd6 14.c4 0-0 I considered castling queenside and start some type of flank attack. However, I think White's pressure on the queenside might have been stronger, so I castled here. If White had tried something like Bg5 earlier, I might have, enticing him to exchange and opening the g-file. 15.Bg5 Diagram I started to worry here for a moment as White will start to build a kingside attack, but after looking at it for a couple minutes, I thought I was okay.15...Be7 16.Re5 The threat is Bxf6 followed by Rxh5, forcing my next move. 16...Bxf3 [ 16...h6? 17.Bxf6 Bxf6 18.Rxh5+-; 16...Bg6 17.Bxg6 hxg6+/= Doesn't look very pleasing, so I pretty much discounted this quickly.] 17.Qxf3 This was a key moment. I spent about 10-15 minutes on this move. White has some pressure on the kingside, but he has a couple obstacles before he can make a direct attack on the king. In the meantime, Black's key defender, the f6 knight, is holding things together, keeping the queen off e4 and h4. Of course, White can capture the knight at any time, so Black has to make sure he has defenses to White's attacks on the king. 17...Rfd8 A solid move that makes a clear threat. White will not be able to advance this pawn safely. Also, more abstractly, it gave me some room for the king in case of kingside attacking complications. However, at the very least, White has to deal with this threat. [ 17...Qb6 was a move I considered for a long time. It attacks d4 and b2. However, it seemed a little too daring. After 5 minutes of consideration, I finally saw a line that seemed to be better for White, causing me to look for a better alternative. 18.d5! I was thinking at first that Black just wins a pawn, but then I saw this move. 18...cxd5 ( 18...Qxb2 I saw this while analyzing after the game.) 19.cxd5 Nxd5 20.Rxd5! exd5 21.Bxe7+/- White gets two pieces for the rook, and the two bishops will be deadly in the wide open position.] 18.Qg3 Diagram At first, I thought this move was kind of useless, thinking that my opponent was planning some sort of discovered attack and ignoring my threat. However, there didn't seem to be any constructive ways for White to do this. However, after looking at this move for a while, I saw that Black threatens Qh5, where g6 (blocking the mating threat) wins the knight on f6. [ During the game, I saw that taking on f6 right away was fine for Black. 18.Bxf6 Bxf6 19.Qh5 ( Fritz helped me with this analysis after the game: 19.Rh5 Rxd4 20.Bxh7+ Kf8= with similar ideas to the game, but in this case, White's rook is not in as much trouble.) 19...g6-/+] 18...Rxd4! I spent about 10 minutes on this move. I was proud of this move because I actually calculated the next few moves, seeing that I would come out with a slight advantage. 19.Bxf6 Going into a combination which I had seen to the end. 19...Bxf6 20.Bxh7+ Kf8!=/+ Diagram Here material is even, but there is a definite difference between White and Black. Black's a-pawn was exchanged for White's d-pawn. The d-pawn was more important in this case first because it helped control the center and had dynamic potential with a future d4-d5 push. In this case, the a-pawn was not so significant. In fact, by capturing it, White seems to have disrupted his piece coordination. The bishop can possibly be trapped and at the moment the rook is also en prise. Black has a slight by clear advantage. [ Hoping for 20...Kxh7? 21.Rh5+ Kg8 22.Qxc7+- Winning the queen.] 21.Qa3+ Qe7 [ 21...Be7 was also considered, but I liked some of the possibilities created by the text. 22.Qe3 Rad8=/+ seems solid as well.] 22.Rc5? This move doesn't really add anything to the position, and the rook's placement offers potential for future tactics. Maybe it was his attempt to avoid the Qxe7+ line and protect the c4 pawn. [ 22.Qxe7+? Kxe7! Black now threatens both the rook on e5 as well as g7-g6, trapping the bishop. 23.Re2 g6 24.Rae1 Rxc4 25.Bxg6 fxg6 26.Rxe6+ Kf7-/+ Black has won the bishop for two pawns and the dark-square bishop does a good job of keeping the doubled rooks off e7.] 22...Rd2! Black makes solid threats with each move, while White is forced to react, with each reaction helping Black to gain even more ground. Here Black threatens ...Bxb2. [ Maybe White was hoping for a blunder. 22...b6?! 23.Rxc6 Qxa3 24.bxa3 Rxc4! 25.Rxc4 Bxa1= But even here, Black looks okay.; Fritz showed me the following move. 22...Rh4! This threatens the bishop on h7 as well as clearing the d4 square for the bishop to attack the pinned rook. 23.Bc2 ( 23.Rd1 Rxh7-+) 23...Bd4 24.Rxc6 Qxa3 25.bxa3 bxc6 26.Rd1 c5-+] 23.Qe3 Threatening the rook and protecting the rook on c5, which is like an annoying little scab in Black's game. 23...Rad8 I stayed calm and doubled rooks on the file, almost always a good thing to do. 24.g3? Trying to block the b8-h2 diagonal, but it fails tactically. It's hard to find a good move for White in this position in any case. [ During the game, I saw a few good lines for Black here, for example 24.Ra5? might be played to try to move the rook to safety and attack the a2 pawn, but it fails to 24...Rd1+ 25.Rxd1 Rxd1+ 26.Kh2 Qc7+ 27.g3 Qxa5-+] 24...Rxf2!! Diagram Tactics, tactics, tactics! My first thought was to simply play ...Rxb2, winning more material, but I almost fell out of my chair when I saw the strength of ...Rxf2.25.Re5 [ 25.Qxf2 Bd4! 26.Qxd4 Rxd4-+; 25.Kxf2 Bd4 26.Qxd4 Rxd4-+] 25...Bxe5 I was tempted to look for a fancy crushing move, but then I came to my senses and cashed in on the exchange. I was pleased because I actually planned ahead and saw what would happen after this, so the next few moves were made fairly quickly. 26.Qxe5 Rdd2 It's almost always good to double on the 2nd (or 7th rank). Of course, I had to make sure White didn't have anything serious with the queen checks. [ 26...g6? was quickly seen to be a big mistake. 27.Qh8#] 27.Be4 Protecting g2. [ I didn't fear the queen check. 27.Qb8+ Qe8 28.Qxb7 g6-/+ Black will win even more material.] 27...Rxb2 28.Qb8+ Qe8 29.Qd6+ Kg8 30.Rd1 Not too tricky, but Black still has to be careful. 30...f5! Diagram Attacking the bishop, but more importantly, giving the king some breathing room. [ One example if Black falls asleep: 30...Rxa2 31.Qd8 Qxd8?? ( Of course, Black can avoid troubles here too, but just showing that one can always lose a won position if not careful. 31...Kf8 32.Qd6+ Qe7 33.Qd8+ Qe8 34.Qc7 ( 34.Qxe8+ Kxe8-+) 34...Rfd2-+) 32.Rxd8#] 31.Bh1 Rxa2 32.Qc7 Threatening a deadly pin with Rd8, but it is easily stopped. 32...Rfd2! 33.Re1 Qd7 34.Qb8+ Kh7 Diagram White resigns. I was very happy with this game. I didn't make any glaring inaccuracies during the game, but more importantly, I tried hard to calculate the consequences of all of my moves. 0-1
| |