Castro, B - Crafty 17.13
Endgame Practice, 13.03.2001
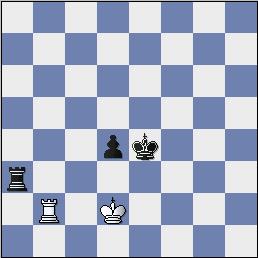
Diagram
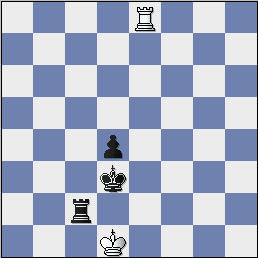
This position comes from an Endgame Study which I found on Chess Mentor (although the original position comes from another study). I set the clocks to 30 minutes and set the powerful chess engine Crafty as my opponent. The position is drawn theoretically. However, when studying endgames (as many other aspects of chess), we must understand the ideas! This was my reason for playing it against the computer, even though they are known for lacking endgame knowledge. My training method proved effective when the computer played a different move than the one I had learned when studying this position. Therefore, I had to "know" the ending instead of just playing moves I had memorized. 1.Rb8 Making the rook as active as possible. The basic idea behind this ending is to prevent the d-pawn from advancing. If the pawn does advance, the rook is as far as possible from the enemy king to launch a seemingly endless stream of checks.1...Ra2+ 2.Kd1 The best policy is often to retreat the king straight back. 2...Rf2 This is a different move than that of the study. However, this is where you see if you understand the ideas behind the ending. 3.Re8+ Kd3 4.Kc1 Now I'm back in familiar territory. The key is not to allow the d-pawn to advance. Although Black looks like he's got White in a dangerous position, there's really no way to make progress. 4...Rc2+ 5.Kd1 Diagram
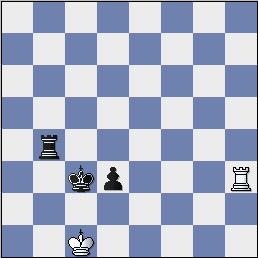
There's no mate, and Black can keep trying to check me as much as he wants.5...Rb2 Threatening mate. 6.Kc1 Rb4 The intention of this move is to provide a "bridge" against a check once the king comes out from cover of the pawn. 7.Rh8 No matter where the king goes, a check will keep the pawn from advancing. 7...Kc3 [7...Ke2 8.Rh2+ Kf3 9.Rh8 Ke3 (9...d3 10.Kd2 is clearly drawn.) 10.Re8+ Kd3 11.Rh8 and no progress can be made for Black.] 8.Rc8+ Transposing into a known drawn endgame. This is an important reason to study endings in general: you will recognize when a position is won, lost, or drawn, and know when to transpose from one ending to another. Also, knowing these basic endings by heart saves time on calculation. [Now a check along the h-file would be foolish. 8.Rh3+? d3! Diagram
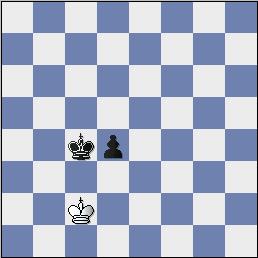
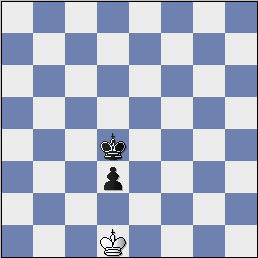
] 8...Rc4 9.Rxc4+ Kxc4 Now White can take the opposition, in an ending which universally known as drawn. Why is the endgame a theoretical draw? Because Black will never be able to control the queening square to advance his pawn. As you will see, attempts to do so result in stalemate.10.Kc2 Diagram
10...d3+ 11.Kd2 Kd4 12.Kd1 Diagram
12...Kd5 The computer tries to take the long opposition, although it doesn't really matter. It was interesting, because for the next few moves, Crafty calculated 30 moves (60 ply) deep into the position, finally admitting the position was drawn. 13.Kd2 Kc4 14.Kd1 [14.Kc1?? allows Black to take the opposition. 14...Kc3 15.Kd1 d2 "Squeezing" the king off the queening square. 16.Ke2 Kc2-+ Black queens the pawn.] 14...Kc3 15.Kc1 d2+ 16.Kd1 Kd3 Diagram
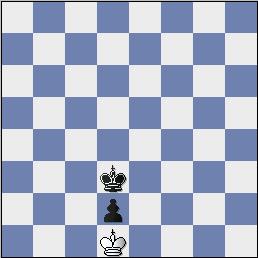
Stalemate. I enjoyed this exercise because it forced me to be an active participant in learning this ending. When learning the position through Chess Mentor, I learned the concepts behind the first position. However, in this mini-game, I had to improvise because Crafty did not play the moves I had learned. I was pleased when I saw that I could transpose into a simpler ending. I encourage you to try this exercise with positions you study in books, magazines, and software. I hope it will be as rewarding as it was for me. 1/2-1/2