Castro,B - Atkins,K [B01]
Patzer Challenge FICS (1), 05.06.2001
[Atkins,Kelly]
Here is the first game of the match. Since Kelly won the game, I had him comment on the game. The following are his words and analysis unless otherwise noted.
The Patzer Challenge Match was Bryan's idea and I readily agreed to play. This is my first match and I knew it would be a lot of fun and a very good learning experience. We're pretty evenly matched, so I thought it would make for a great, hard-fought contest. Bryan and I had only played once before, so neither of us knew that much about the other's style or repertoire. He did a better job of preparing and came through the opening with a small advantage. We each made a few minor errors, with Bryan able to achieve a probably won position at one point only to miss the best continuation. Finally everything settled down to a drawn position, only to have Bryan lose due to the type of silly blunder that's all too familiar to each of us. 1.e4 Castro: I will insert my comments to the game in this fashion. 1...d5 2.exd5 Nf6 Diagram
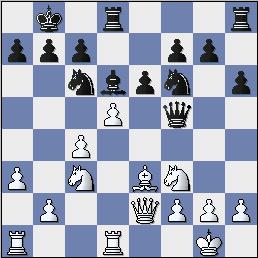
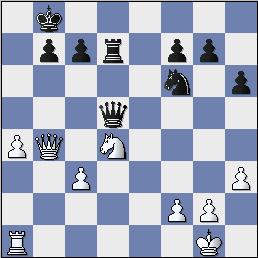
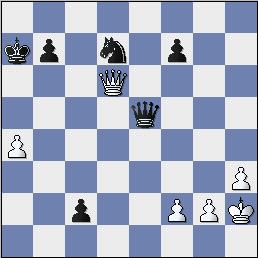
The 2...Nf6 variation of the Scandinavian Defense. Black delays grabbing the pawn in order to develop quickly and grab the initiative - essentially a gambit. Things can get tactical very quickly and White has to be careful. Bryan was well booked up on this line and played it very well, coming through the opening in good shape, never allowing me to gain any advantage orinitiative . 3.d4 Bg4 4.Be2 Bxe2 5.Qxe2 Qxd5 6.Nf3 Nc6 7.c4 Qf5 8.0-0 0-0-0 As black, in order to increase my chances of winning, I had to createimbalances in the position, thus the opposite-side castling. Plus, it immediately puts a rook on a semi-open file and threatens White's d-pawn. I was trying to turn this game into a tactical slugfest and induce some errors in White's position. 9.Be3 9.d5 was a little better, as it drives away the knight defending my king's position and splits my position to some extent. 9...e6 10.Nc3 Bd6 Bb4 was probably better here, but I was hoping to create an attack against White's king and didn't see any long-term purpose in putting the bishop on b4. 11.Rfd1 h6 This was to be the beginning of a pawn storm against White's king - the typical plan with opposite-side castling. However, I failed to follow through with this idea and never got the opportunity later. I was also thinking about g5 and then g4, driving the knight away from the protection of d4 and h2. 12.a3 Bryan prepares his own pawn storm apparently. 12...Kb8 Although Kb8 is fine, I faltered psychologically here. I reacted to my opponent's plan (the pawn storm I thought he was about to launch with b4) instead of continuing with my own k-side pawn storm with g5. 13.d5 Diagram An important point in the game. This move isn't bad, but releases a lot of the tension in the center and weakens White's control of it. White probably should have continued with 13.b4 following through on the idea of a pawn storm against my king, which was the continuation I most dreaded having to face. [ 13.b4 Castro: I also considered this variation which Kelly suggests. However, for some reason I did not like the idea of Black's getting behind my pieces somehow. Besides, I had my own plan based on freeing the dark-square bishop and aiming it at the Black king's position.] 13...exd5 14.cxd5 Ne7 Most computer programs still give White a very small advantage here, but I think Black has fully equalized. In fact, I like Black's position a little better. Black's king isn't quite as safe as White's, but the threat of a q-side pawn storm is gone and White has the isolani that may be hard to protect. I was happy with this position and looking for ways to start an attack against the White king. 15.Nb5 This caught me a little by surprise. I hadn't seriously considered it before, thinking there was nothing to worry about with it and that it just wasted time for White. Once played though, I realized that there were some serious threats here. 15...Nexd5?! A fairly weak move on my part. 15...Nc8 or b6 would have been better. I failed to consider Nc8 and ruled out b6 because of the weakness it would cause on the light squares around my king, especially since I no longer had a light-squared bishop. 16.Bxa7+ Ka8? An even weaker move to compound the previous one. I have no idea why I played this instead of 16...Kc8. 17.Nxd6? White returns the favor and lets me back into the game. With my king somewhat exposed and little available help from my other pieces, White needed to pour everything he had into attacking my king. 16.Qc4 would have given him a +/- advantage. [ 17.Qc4! Castro: This would have lead to a nice attack. However, I have to admit that I didn't even consider this move. I had eventual ideas of bringing the queen over to the queenside, but I didn't think it would be so early. 17...c6 18.Nxd6 Rxd6 19.Qa4 b5 20.Qa6 Nc7 21.Qa5 Rxd1+ 22.Rxd1 Nfd5 bringing pieces over to the defense. 23.Nd4+-] 17...Rxd6 18.Bc5?! Diagram This was a subtle mistake that swung the advantage back to me. Sometimes you can get so caught up in the heat of battle and the tactical exchanges, that's it's difficult to suddenly shift gears. White should have ended the tactics here and instead, simply regrouped and solidified his position with a clear advantage by playing Bd4 or Be3. Castro: I agree with Kelly's assessment. Our game is even here, and I should have been happy with that and looked for another plan. 18...Nc3! I thought fo r several minutes here, unable to decide between Nc3 and Nf4. I liked the idea of creating two isolanis to work against, but I went blind at this point and just couldn't seem to calculate. I was afraid that I was overlooking something and that White had some sort of nasty tactic that would simply cost me my knight. Nf4 seemed much safer, but I couldn't see what would happen after that. In the end, the two isolani's and the fact that cxc3 seemed forced despite my mental block, was why I chose Nc3. Castro: I almost fell out of my chair when I saw this move. 19.bxc3 Qxc5 20.Rxd6 Qxd6 21.Qc4 Rd8 22.h3 White can't take the f7 pawn due to 22...Qd1 and mate to follow. 22...Rd7 23.Nd4 Kb8 24.a4 24.Rb1 might have been a little better, activating the rook. The position is still quite even and is almost certainly a draw at this point. [ 24.Rb1 Qxa3 25.Qb5 b6 26.Nc6+= Castro] 24...Qd5 25.Qb4?? Diagram Castro: A simple blunder ruins a promising game. However, each mistake contains a lesson. With that in mind, I have much material to work with! Kelly does a good job of cleaning up.25...c5 26.Qa3 cxd4 27.Qf8+ Ka7 28.Qxg7 Qe5 29.Rd1 dxc3 30.Rxd7 Nxd7 31.Qxh6 Qe1+ 32.Kh2 c2 33.Qd6 Qe5+ Diagram Castro: With 1 game down, Kelly led the match 1-0. 0-1
Back to Patzer Challenge