Title Tutorial
Step 3. Adding A Title
The next step in finishing off our picture is to add a title. The nice part about this section is that it will be done on a separate layer from the rest of the work, as will the logo. This means that once you figure out how you want to position your title you can do all your title's in the same location, without having to worry about if you've set it up right. Do it right once, and it will take care of itself!
The first thing we'll do is start by grabbing the text tool and clicking on the image somewhere. The actual place isn't important, we'll take care of positioning later. Right now we just need to get the text editing box up.

The big T is the text tool.
Once the text box comes up, the first thing you'll want to do is type in your title. After you do, highlight it and we'll begin working on how we want it to look.
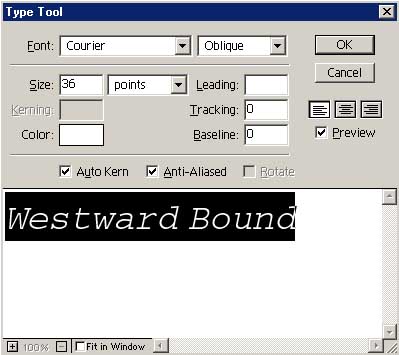
So what IS all this stuff? Here's your definitions!
Font: Controls how the letters will look. Sans Serif fonts mean the letters don't have the little tails on the end, like you can see on the "d" and the "s" here.
The next box to the right of the Font box controls effects that are applied to what you type. Bold, Italic, Oblique (tilted letters), Regular (default) and various combinations of the above are available.
Size: This controls the size that the print will appear at. It is a measurement in points. Here we are using 36 point print. The drop down box with the word points in it has another option labeled "pixels" if you want to measure your print in pixels instead. Most of the time the size is based on how it looks with everything else, rather than on a specific size.
Kerning: Controls the amount of space between the letters. This box will be grayed out when the Auto Kern box below is checked.
Color: Controls what color the text appears as. Obviously white text will not show up on a white background, so choose your color wisely. This option will not display in the text box, but it will show up in the main window. All text typed in the text box is black for easy visibility.
Anti-Aliased: Checking this allows the computer to smooth the edges of the letters.
The three boxes below the Cancel button allow you to align your text to the left margin, center it, or align to the right margin. The preview button allows you to look at your text in the main window to see how it looks. Clicking it off will revert the main window to the state it was before you started editing the text. This is not permanent, just recheck the checkbox and your text will show up again. Again, this option will not display in the text box.
The zoom controls in the lower left are self explanatory, they only work inside the text box.
The Fit in Window checkbox will tell the computer to automatically zoom out to keep all the text within the visible space of the window. This does not change the size of the words.
When you're finished making your text look like you want it to, just hit the OK button and you'll be returned to the main screen. Your title will be sitting there waiting for you, and most likely, not where you want it! Run your cursor up to the Move tool at the top of the tool bar and click it.
![]()
The black arrowhead with the move cursor next to it is your move tool.
The next thing to check and see is if you are editing your text layer. Go up to the Window menu and drop it down. The option you are looking for is called Show Layers. Click it.
If instead you see an option labeled Hide Layers, it means your Layers palette is already open. In this case leave the menu without doing anything thing and look around your screen. You should see a palette that looks like this, and the tab name will be Layers.
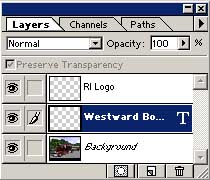
Here, the Text layer is highlighted in blue. You can also tell if a layer has text on it by the large "T" that appears on the right side of the name. The text that you typed will appear as the name of the layer. If your text layer is not already highlighted, click it to do so. Then you can use the Move tool to move your title text where ever you want.
Quick note: You can click and drag anywhere on the text layer to move the text around.
Quick note #2: If doing so causes you to select another layer, go to the Window menu, click Show Options, and uncheck the box labeled Auto Select Layer.
If you want to change the text in the future, simply reclick on the text layer and click on your text with the Text tool and you will be able to edit the text.
That's all there is to it! Now we've got our border in place, and our title, all that is left is to put in a signature or logo. This is even easier than the title was! Let's go add a logo!