Since the KT frame did not have the hole drilled for the ejector pin, I decided to leave this operation till last. The ejector pin is supposed to be 1/16" in diameter, so I used the next smallest bit I have. I clamped the frame down on a couple of 1-2-3 blocks, using brass shims to protect the polished frame from the clamping surfaces. I positioned the drill bit for the location of the hole by eyeball. I drilled a tiny pilot hole with my center drill, and then began drilling. When I broke through the frame into the ejector leg hole, I was worried that the bit would walk off its path and follow the ejector leg hole, so I put the ejector in place and held it there while I completed drilling. This was completed without incident, so after degreasing the area and applying some Loctite to the ejector legs, I tapped the pin into place.
One complaint I have about this frame was that the ejector leg holes were drilled off-center. The result is that the ejector is slightly crooked on the frame. I had to dress the sides of the ejector before it would no longer rub the surfaces of the slide when cycling.
Finishing Touches
I had ordered a new stainless steel magazine catch. The old Sistema take-off I was using had some awful burrs inside the spring lock channel, which resulted in a very rough feel. Besides, I had a few other "white" parts such as the grip screws, trigger, hammer, etc., and I think these will provide a nice contrast against the blued frame and slide.
The thumb safety and slide release are quite stiff. I know they will loosen up some with use, but I'm going to go ahead and clip off a coil or two off the plunger spring.
I need to put it back together and test fire it to make sure everything is working correctly.
Test Firing
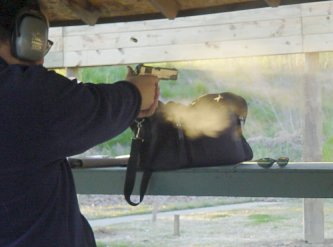
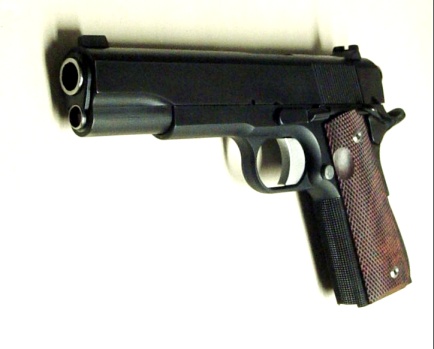
Test firing went well. I put about 200 rounds through it. The Springfield barrel impressed me; it was easy to make one ragged hole in the X ring at 7 yards. The sights shoot right to point of aim. Reliability was 100% with my reloads (230 gr. RN and SWC). I might have to tweak the rear sight just a hair to the left. I found I really liked the checkering. It provided a great grip, and wasn't as sharp as I feared it would be.
Pre-bluing
After doing my usual post-shoot cleaning, I disassembled the gun and used brake cleaner to get rid of any last dirt and oil residue. I touched up the polished frame where the slide release had been rubbing, and used a file to dress down the slide release so it wouldn't happen again.
Bluing
I mixed up a fresh batch of homemade bluing salts. Then I fired up my propane turkey cooker and waited for the temp to come up to 285 degrees. Instead of the 1 gallon of water, I added only 3/4 gallon this time. The salts got up to the proper temp significantly quicker with this method. Since the solution will not reach the target temperature with too much water in it, excess water must boil off first.
I threaded some steel wire through the firing pin hole in the slide and out the muzzle. This was used to lower the slide into the bath. I suspended the frame similarly by fastening wire to the slide release hole and one of the grip screw bushing holes. The parts began to blue immediately but I left them in for about 20 minutes to obtain a solid coat. I took the small parts such as grip safety, thumb safety, slide release, etc., and strung them on a piece of wire to keep them from getting lost in the bath.
After about 20 minutes I removed the parts from the bath and rinsed them off. The bluing solution forms a soapy coating on the parts as they cool. There was a little smut on the parts, visible as dull rusty spots. Most of this was removed with a damp paper towel, and the rest was removed with some very fine metal polish such as Flitz.
For some reason I could not get a good blue on both the frame and slide. I removed the blue with muriatic acid and tried again, and finally got the slide looking OK, but not perfect. But the slide simply would not cooperate. It had some purple streaks and blotches on the polished surfaces. The sandblasted areas were fine, but the flats looked pretty rough.
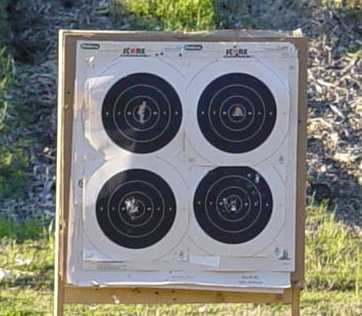
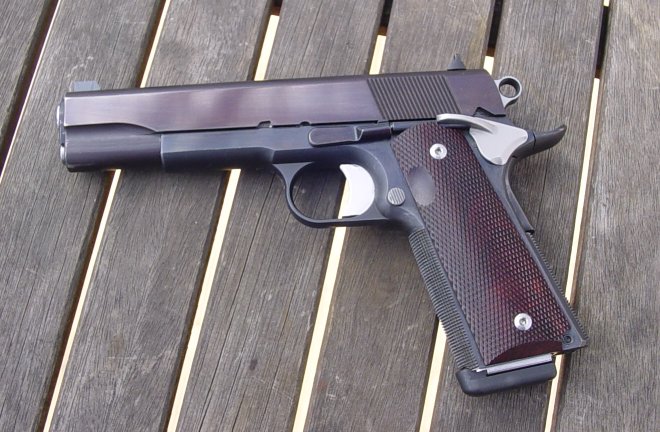
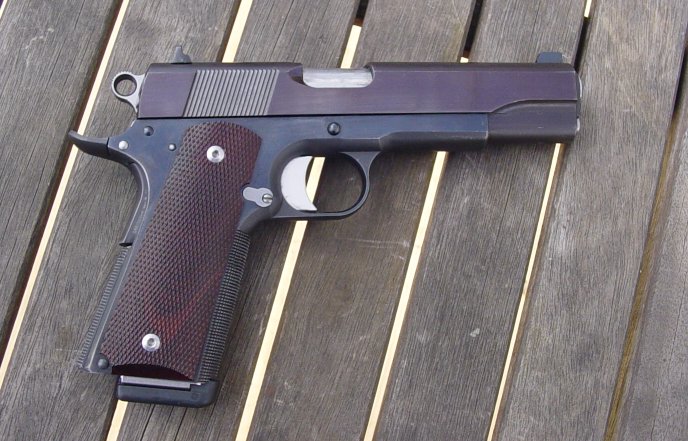
After everything was rinsed down and cleaned, I sprayed everything with a light coat of CLP. I paid special attention to the crevices such as where the front sight joins the slide, and the rear sight dovetail. Since it can be difficult to get all the bluing salts out of there, these ares are prone to rust unless carefully oiled. I reassembled the gun and took some photos. The target in the photo was shot at 15 yards offhand.
The blue job will continue to "cure" for a few days afterward. Excess oxidation will appear as the oil loosens it, and can be wiped off with a rag. After a few days (or even weeks) the surface oxidation will be all gone. Interior areas may acquire a slightly rusty look, but the rust can be removed to show the blue underneath. It's important to keep the gun well oiled for the next week or two. But I am going to have to do something eventually, I can't live with this finish long.
Bluing Part II
Well, a week or two went by, and I decided to try to reblue the slide. After doing some research on Brownell's site I think I found the problem. Or problems, as the case may be.
I believe the braze material was interfering with the bluing salts. There was probably some copper in the braze, and it takes only a tiny amount of copper to ruin a bath.
I probably wasn't rinsing the slide off enough. Brownell's recommends against using TSP for a degreaser, so the next time I used two kinds of brake cleaner, followed it up with liquid Dawn detergent, and rinsed it well.
The bath must be boiling vigorously at 292 degrees. I know this wasn't always the case on my first attempt, so I added more water for the second try.
The part must not touch the sides or bottom of the tank, or you'll get red areas. So I was careful to submerge the slide only enough to cover it.
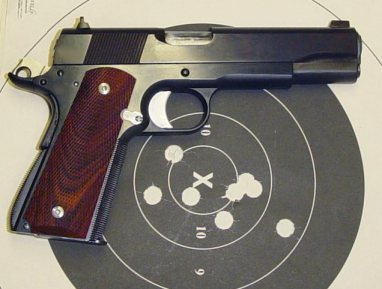
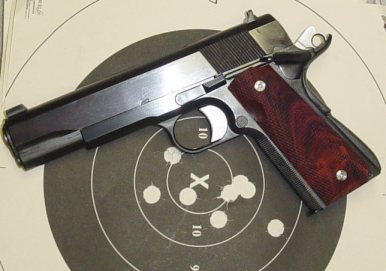
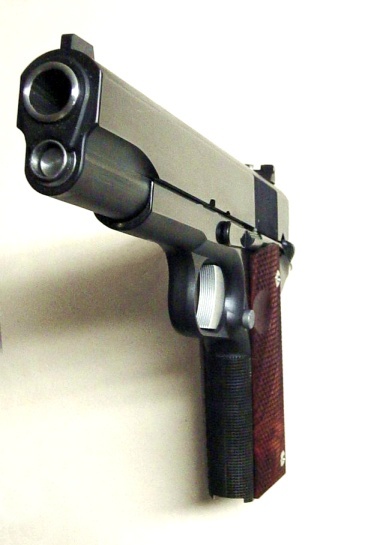
I left it in about 25 minutes, and it came out much better. In fact, it came out perfect. No splotches, no streaks whatsoever. It even surpasses my previous two blue jobs (Colt and Browning HP) in quality. There was very little smut on it as well, something that I'm not accustomed to. I rinsed the slide off, and polished off the smut and oxidation with a little MetalGlo polish (about the consistency of toothpaste), and applied oil. Reassembled, and took more photos.
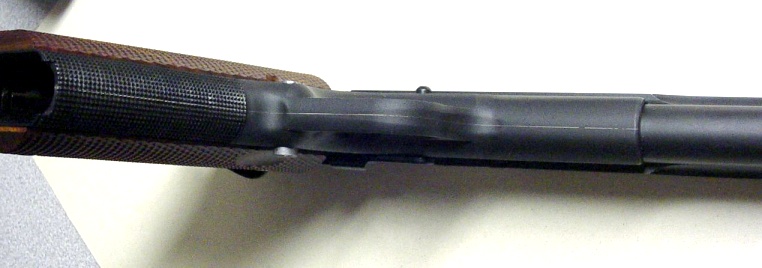
In the photo below, you can see the braze line that is still visible. It isn't as prominent as I expected, and I probably won't bother to conceal it, though a black Sharpie or some Aluma-Black would no doubt do the trick.
Project Completed...
Well, I suppose this is the end of my little adventure. In conclusion, I'm very happy with the way the gun turned out, and extremely happy with the way it performs. After I put about 1000 more rounds through it, I'll be ready to trust it for self-defense. There was more work than I expected in this project, since I expected the KT frame to be a little closer to being "ready to go." Not that I'm complaining, partly because I'm doing this for enjoyment and partly because I have the satisfaction of showing off my extensive work on this gun.
The Bottom Line - Parts List and Cost
I put together a list of parts and tools, showing the cost of everything I needed to finish the project. I didn't include the cost of my mill and lathe in this project, or stuff like my drill bits. Either you already have them or you don't; everything I used was general purpose tooling that I already had, except for the slitting saw. I included the Brownell's part numbers for anyone who's interested in buying similar parts/tools. Check it out here.
Update: 9/20/06
It's been a few years since the intial build, so I'd thought post a brief update on this gun.
So far the gun's held up well. No problems on the KT frame at all. It appears a bit softer than most of my factory 1911s but that hasn't been a problem at this point. As you can tell from the photos, the blue job has performed as expected, which is to say, pretty good. I haven't logged the round count on this gun but I'd estimate around 2000 so far.
Issues
The only issue I've had to fix is the tendency of this gun to throw brass in my face. I tightened the tension on the extractor and it's been smooth sailing since then.
Modifications
I performed a trigger job about a year ago using the Ed Brown sear jig. Now it breaks at around 4 # and it's a joy to shoot. I also replaced the thumb safety with a stainless steel part I had lying around, because I liked the shape of the paddle a bit more.
I'd like to serrate the front sight because it can catch quite a bit of glare under normal lighting conditions.
<== Prev Page