|
Last Page Update:
April 25, 2001
Contact
Copyright Information
Main Page
Structure of the Red Kaganate
Gatherings, Events, . . .
Historic Steppes Tribes
Legends of the Nomads
Flags and other Identifiers
Clothing and Apearance
Food and related Matters
Armour
Archery
Weapons and Combat
Public Forum
Resource Links
Email:
[email protected]
Editor:
Norman J. Finkelshteyn
|
Making a Lamellar Harness
By Norman J. Finkelshteyn
|
DISCLAIMER: This is a brief overview that assumes a set of skills on the part of the reader. There is no guarantee of results. The use of tools can be dangerous. The armour arrived at as the end result of this process is solely meant as an aproximation of a historical artifact. The armour can not be guaranteed for any use, including but not limited to use for protection in sports. Proceed at your own risk and don't blame others.
|
See Armour and Warriors of the Silk Road for details of historical context.
The Author is a working armourer.
He can be contacted for purchase of armour at [email protected].
Materials:
Plate Materials:
Leather � Vegetable (also called �Oak�) Tanned. 8 ounce or thicker. 8 ounce leather is the thickness of a heavy belt. At the lower thicknesses (up to 12 or 14 ounce), you may decide that the leather needs to be hardened. See How to Harden Leather for the process.
Metal � 18 or 20 guage steel is sufficient. 16 guage would create a defense that is heavier than necessary. Remember, plates are narrow and will overlap by approximately half an inch on each side, as well as top and bottom. I believe that 18 guage brass or bronze would also be sufficient.
Lacing Material � I use a leather thong like those normally used to lace boot moccasins.
Very Basic Tools:
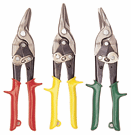 �Aviation Snips� (shown at the left) are a good all around cutting tool that can be used for either metal or leather.
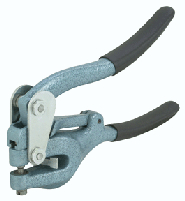
A �Roper Whitney Junior� punch or generic equivalent (shown at the right) is unsurpassed for making holes in either metal or leather.
A file will be needed to debur the edges of metal plates, while sand-paper is sufficient for cleaning up the cut edges of leather.
A vice is advisable when filing metal.
The Plates:
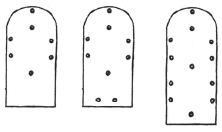 The illustration shows three plates with slightly differing sets of holes. They are basically the same with respect to how they will be laced, and are also the basic pattern of almost all lamellar plates, no matter how different they may look at a first glance. The curve at the top is an optional decorative feature that is quite common in the archaeological finds.
I have found that a width of 1.5�, with a height of 3� for the smaller and 3.5� to 4� for the larger pattern plates, is a good size for approximating the dimension of a majority of lamellar plate finds.
Holes are 5/32� diameter. Paired holes are 1/2� apart. Those near the edge of the plate are 1/4" away from the edge. The rest is approximation and experience.
You will note that there are 7 holes that are common to all three patterns. These are the basic set of holes needed for the �international� pattern of lacing lamellar.
Putting it together:
Plates are first laced tightly into horizontal strips (or bands).
These horizontal bands are then laced loosely to make the vertical structure.
The intent is to have the �solid� horizontal bands move independently, folding into each other as the body moves.
Horizontal Lacing:
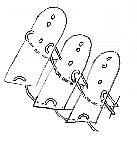 For the �Seven-Hole� pattern, one lace will be used.
Use the paired holes at the sides of the plate.
Refer to the schematic drawing at the right.
Stop-knot the end of the lace. If you have the patience, put a stop-knot either after each pair of plates or after some standard number of plates.
- Start the lace at the upper hole of the left pair of holes of the first plate. Pull it from the back of the plate forward.
- Then, from the front of the first plate, insert the lace into the lower hole of the same (left) pair of holes and pull to the back.
- Take a second plate and again insert the lace into the upper hole of the left pair of holes, from the back forward.
- Back to the first plate -- insert the lace into the upper hole of the right pair of holes, from the back forward.
- Then, from the front of the first plate, insert the lace into the lower hole of the same (right) pair of holes and pull to the back.
- Now, from the front of the second plate, continue the lace into the lower hole of the left pair of holes.
- Pull the lace tight and, if you wish, tie it off.
Take a third plate and again insert the lace into the upper hole of the left pair of holes, from the back forward.
- Back to the second plate -- insert the lace into the upper hole of the right pair of holes, from the back forward.
- Then, from the front of the second plate, insert the lace into the lower hole of the same (right) pair of holes and pull to the back.
- Now, from the front of the third plate, continue the lace into the lower hole of the left pair of holes.
- Pull the lace tight and, if you wish, tie it off.
- Continue until you have a strip as long as needed.
- For the pattern with two pairs of holes at each side (like the �Twelve-Hole� plate illustrated) a second lace will be put through the second pair of holes in an identical fashion to the first described above.
- For the �Nine-Hole� pattern illustrated, as well as the �Twelve-Hole� pattern, and any other pattern with holes at the bottom, another lace will be put through the bottom holes (Figure 1 illustrates how this would be done for the �Nine-Hole� pattern).
- To avoid complications, pull all horizontal laces at the same time.
Vertical Lacing:
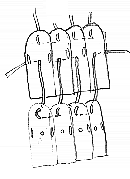 Refer to the schematic drawing on the right.
Vertical lacing is the same for all plate patterns illustrated.
Use the paired holes at the top center (referred from here on as �top holes�) and the single hole at the approximate center (referred from here on as �center hole�) of the plate.
Stop-knot the end of the lace. If you have the patience, put a stop-knot either after each pair of plates or after some standard number of plates.
- Take two horizontal strips (�bands�). Arrange them as an upper and a lower.
- Start the lace at the center hole of the first plate of the upper band. Pull it from the back of the plate forward.
- Go to the first plate of the lower band, use the upper hole of the top holes. Again, pull the lace from the back of the plate forward.
- Now, from the front of the first plate of the lower band, continue the lace into the lower hole of the top holes towards the back.
- Go to the second plate of the lower band. From the back forward, insert the lace into the lower hole of the top holes of that second plate.
- Now, from the front of the second plate of the lower band, continue the lace into the upper hole of the top holes towards the back.
- Return to the upper band and move to the second plate of the upper band. Insert the lace from the front of the center hole of the second plate of the upper band and pull to the back.
- Tie off the lace if you wish.
- Move to the third plate of the upper band. Pull the lace from the back of the center hole of the third plate of the upper band, forward.
- Go to the third plate of the lower band, use the upper hole of the top holes. Again, pull the lace from the back of the plate forward.
- Now, from the front of the third plate of the lower band, continue the lace into the lower hole of the top holes towards the back.
- Go to the fourth plate of the lower band. From the back forward, insert the lace into the lower hole of the top holes of that fourth plate.
- Now, from the front of the fourth plate of the lower band, continue the lace into the upper hole of the top holes towards the back.
- Return to the upper band and move to the fourth plate of the upper band. Insert the lace from the front of the center hole of the fourth plate of the upper band and pull to the back.
- Tie off the lace if you wish.
- Continue the process until the two bands are fully connected.
- Take a third band and connect to the first two in the same manner.
- Continue until you have all necessary bands connected.
Wearing it:
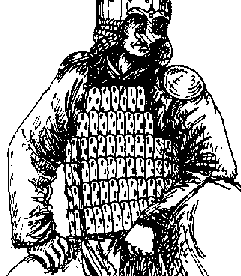 Vest:
Vest:
At its simplest � Make a section of lamellar with the horizontal bands of a length slightly larger than the girth of the wearer�s torso and use enough bands so that the vertical measure is the length from the armpit to the waist. Lace or rivet shoulder straps and buckles to the top band. Lace or rivet straps and buckles to opposite sides of this �girdle�.
Add to this basic vest smaller panels of lamellar at the chest and back to increase fit detail.
Upper arm and thigh defenses:
Simple rectangles of lamellar. The vertical is the length of the arm bone or thigh.
Fasten the arm defense to the shoulder strap.
Fasten the thigh defense �skirt� to either the bottom of the vest or a separate belt.
Strap loosely at a few points of the arm or thigh.
Forearm and lower leg defenses:
Again, simple rectangles. Narrower plates may be needed. Strap the lamellar tightly to the arm or leg as a bracer.
An alternative full-arm defense is a one-piece rectangle with a vertical length the length of the arm. Strap loosely at several points on the arm to create a loose lamellar sleeve.
|
 �Aviation Snips� (shown at the left) are a good all around cutting tool that can be used for either metal or leather.

 The illustration shows three plates with slightly differing sets of holes. They are basically the same with respect to how they will be laced, and are also the basic pattern of almost all lamellar plates, no matter how different they may look at a first glance. The curve at the top is an optional decorative feature that is quite common in the archaeological finds.
 For the �Seven-Hole� pattern, one lace will be used.
 Refer to the schematic drawing on the right.
 Vest:
Vest: