 |
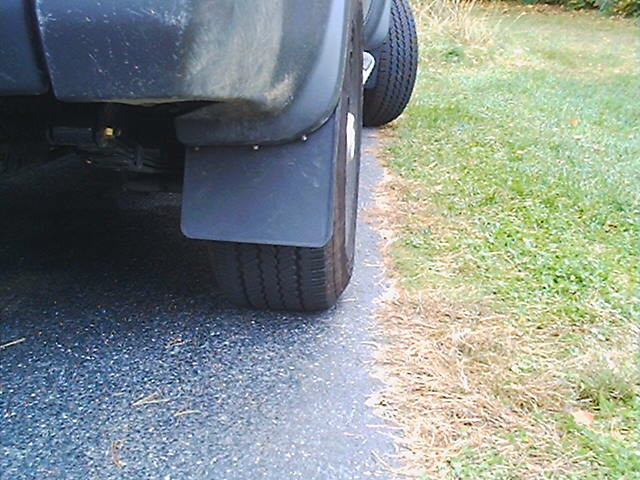
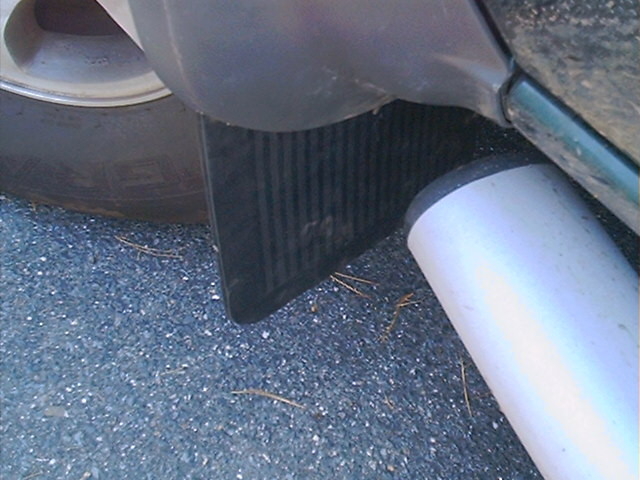
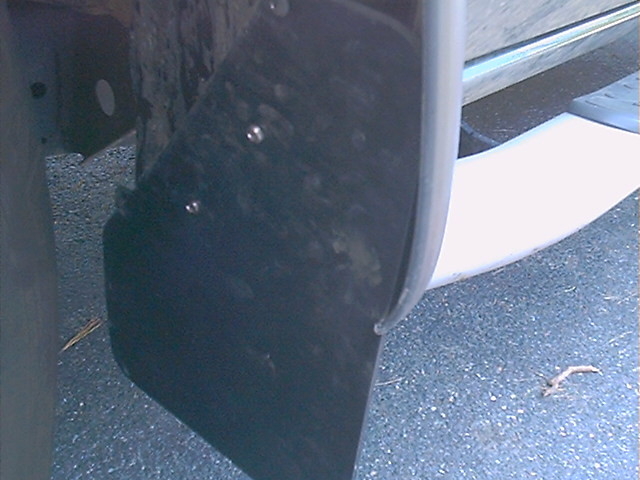
| What happens to a truck when you take the splashguards off? Well, it gets dirty, but the paint can get chipped, salt can get thrown into the underbody more easily, and (in some places) you can get a ticket. Unfortunately, the stock Xterra mudflaps are made of hard plastic, and they are not suitable for offroading. Of course, you could try, but get hung up on a rock, and you could end up investing in new body moldings for your X. I want to protect my X, and since I feel it is a pain to take the stock splashguards on and off, I replaced my stock mud flaps with soft rubber splashguards. These splashguards are very flexible, and don't need to be removed (if they get removed while offroading, well, you'd be replacing the molding anyway). To fit the splashguards to Rockaholic (My X), I had to do a little trimming to fit the front guards, and then I had to build a mounting bracket for the rear flaps. To build the bracket, I purchased a 6' long piece of 1/4" angled aluminum, 8 - 10mm nuts, and 8 flat machine screws. I also needed the following items to make the brackets and to install the splashguards: a 10mm wrench, a 10mm socket and ratchet, a phillips head screwdriver, a short-handled phillips head screwdriver, a grindstone, a permanent marker, a hacksaw, a 1/4" drill bit, a 1/8" drill bit, a 1/16" drill bit, a drill, a vise, and scissors. First, I had to remove the factory splashguards, and I used the 10mm wrench, the socket and ratchet and screwdriver to remove them. I had done this long before I began to build the bracket, so all I needed to do at this point was to get the screws and nuts from the factory guards. Getting the guards off was "easy" as long as you have an angled screwdriver to get at the screws (which, at the time, I did not have with me). I mounted the front mudflaps first, since I did not need to deal with the bracket that I had to build to the rear flaps. However, I did need to trim the wheel well molding. I sized up the mudflaps with the molding on Rockaholic, and then marked where I needed to cut. I decided to trim back a bit farther than I really needed to, since I did not want to re-cut when I upgrade to 31" tires. With my flaps, I needed to cut just to the outside of the last hole on the moldings, and then I cut across from the inside, to just about flush with the upper part of the body molding. I used a hacksaw to trim the molding, and I left the molding on for stability. Click here to see how much I trimmed. I then removed the 3 screws on the front molding to remove it. I needed the shortened screwdriver to remove the middle screw because of the limited room (you can turn the wheels to avoid this here, but for the rear wheels, you will need this). When you remove this molding, you will have to pull the bottom a bit, and then slide the top back since the molding is attached similarly to the rear lights (see owner's manual if you are not familar). After removing the molding, I lined up the mudflap, and used the 1/8" drill bit to score a hole in the mudflap to line up with the middle screw hole. I worked the stock mounting screw through the mudflap in preparation of the molding remounting. I then switched to the 1/4" drill bit and drilled to holes through the inner molding lip and the mudflap. I used 2 stock screws from the stock mudflaps to secure the flap to the molding. I used the ratchet and socket with the screwdriver to tighten the screw. Then, I had to trim some of the wheel well splashguard (The piece of flimsy plasting lining the top of the front wheel wells) to make room for the nuts. (Note here, I aligned all the screw heads so that they would be towards the wheel. This will increase the amount of clearance I have for my tires) I used the scissors to cut out a small strip, which would be covered by the mudflaps anyway. I then reattached the molding, repeated the process for the other side, and the front flaps were done. I then began work on the brackets for the mudflaps. Click here to see the bracket in various states. I made a 3 piece bracket for each side. I measured and cut a 6" piece (for the 2 inside holes), a 1.25" piece (for the middle hole), and 1" piece (for the outer most hole) of angled aluminum for each side. I used a marker to get the measurements right, and then used the hacksaw to cut the metal. I used the grinder to smooth the edges (Partially for the look, mostly so that I wouldn't accidentally cut myself on the metal). I then had to drill holes in the brackets. I centered the holes for the 1.25" and 1" pieces. You may wish to drill one hole near the edge to avoid having the screws interfering with one another, but not on both sides (otherwise the bracket will stick out too far). I then placed the 6" piece on the molding for the rear well, and used the marker to align the holes properly. I then drilled those holes, and offset the flap holes to the inside of the bracket by ~1/4". After drilling the holes, I removed the rear side body moldings. To remove the rear moldings, you will need to unscrew 6 screws, and also lift the metal tab underneath the taillight (requiring 2 more screws to be unscrewed). 3 screws are located in the wheel well, one is one the bottom by the tail pipe (and same placement on other side), and two are located on the back, below the taillight screws. The screws on the bottom have a housing that you will also need to remove as well; otherwise it may break when you remove the molding. The first thing I should have done was drill my "molding access holes". This is accomplished by using a drill bit that is the same diameter of the screwdriver you will be using (conveniently 1/4" in my case), and drill in a straight line up through the existing mudflap holes into the upper molding lip. This will allow you to easily attach the brackets to the molding itself. Of course, I attempted to attach the bracket first, and decided after struggling for ~10 minutes to drill access holes. I then attached the brackets to the molding. I inserted my screwdriver into the access hole, lined the driver up with the screw, and used the ratchet and socket to tighten. After attaching the brackets, I lined up the mudflap like I did with the front (using the lower screw to attach the top of the mudflap), and used the 1/8" drill bit to score a hole in the mudflap to line up with the hole. I then worked the screw into the mudflap to get the alignment right. I then used the smallest drill bit I had (1/16") and a bit of eyeballing to punch a hole in the mudflap that was aligned with the holes in the bracket. The idea is to determine where the bracket will be attached; so when I did hit metal (a total of 5 times) I tried again. I would use the 1/4" bit after getting a good 1/16" hole to make sure the flap hole lined up properly (taking this back off and re-drilling the holes would be a pain. I did this for all 3 parts of each bracket. I then removed the bracket from the molding and attached the bracket to the mudflap. Make sure that the bracket is attached to the side you want facing out. Otherwise, you will have to pull the bracket back off to remount the mudflap, which requires removal of the molding. After attaching the bracket to the mudflap, I had to reattach the bracket to the molding. Once again, I inserted my screwdriver into the "molding access holes" and (somewhat blindly) lined the screwdriver up with the screw, and then tightened the nut. This attaches the mudflap to the X. I would reattach the molding, making sure to close the clip, replace the taillight, and then repeat the process for the other rear side molding. Pictures of the final product are at the bottom of this page. I will put better ones up when I get the chance. If you are the observant type, you would have noticed that the ground changes between the shots, going from gravel/sand to hardtop. Now, you may be wondering what really happened. I actually trimmed the wheel well and built the brackets on one day, and then I installed the flaps on another. I did this because I planned to do this in one afternoon and I had to utilize the grinder and vise at my father's shop. First problem...my dremel was on loan, and I couldn't get it back. This meant I would be spending more time cutting metal, so I decided to trim the moldings and make the brackets before I took the moldings off and got stuck trying to reattach them in the dark. Second problem...I was creating this from scratch, so some of the alignment for the bracket was trial and error. I had more than one piece of Aluminum be either too long, or too short, or crack while it was being drilled. I started with a 6' piece of aluminum to make a 1'5" bracket (total length), but I only have ~2'6" of aluminum remaining. |
|
 |
 |