This is a rough web page. Pictures may be large, text may be sloippy. New entries are at the top.
If you have any questions, ideas or suggestions, feel free to email me at: [email protected]
return to main webpage
return to main caprice page http://www.geocities.com/jon7190/Capricehomepage.html
4/13/02
Bought a new daily driver. It's a 1985 Oldsmobile Custom Cruiser. This replaces my former 84 Ford Country Squire and 84 Olds 88 (best of both worlds). Car is 1.5 owner (son inherited it from dad last year), 107k, LA area car. Has neither rust or significant sun damage. Most all options including power seat, cruise, F41 suspension, guage package, fiber optic light monitor. Doesn't need much work. Biggest plan is to install a great stereo.
set up a new webpage
for it:
03/19
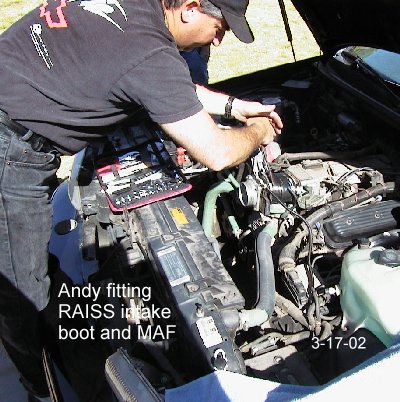
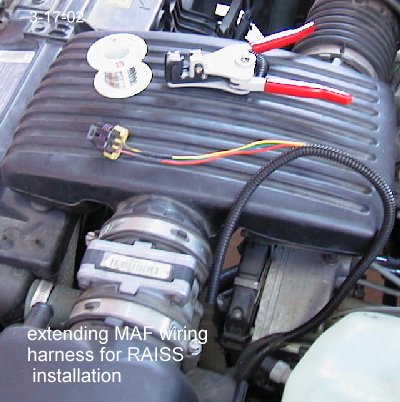
The AZISSO impala club had a mod day get together and we did a couple cool things to the car.
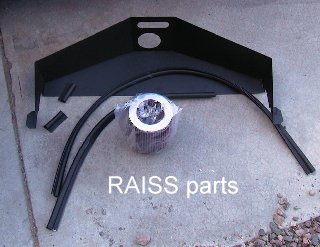
Biggest thing is we put Mike and Andy's new RAISS intake system in. This is similar in concept to the no-longer-available SSRI, but differs quite a bit in execution. Bigest difference is it's powdercoated metal instead of plastic. I like the look. They're also working on making matching fuel rail covers, which will look cool too. I haven't driven the car much yet, but it does have a more powerful feel, especially in mid to high speeds.
We also did the stealth brake bolt mod. This changes the front/rear brake proportioning to take advantage fo the rear discs. Again, haven't driven alot yet, but it feels a bit flatter and better on hard stops.
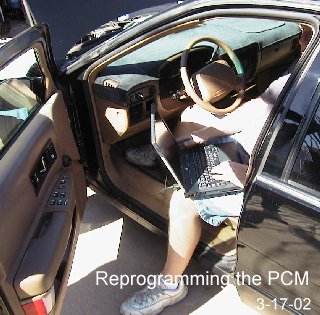
Mike also helped me with some PCM programing.
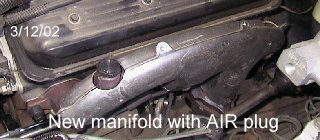
Did the AIR pump delete previously. The part number for the 94 style
bolts is 10104561. TSB is 01-06-04-011.
3/15/02
Good news and bad news. Good is that the mechanic only cost me $232 to remove the bolt. The bad news is that the mechanic said that the casting on the head is bad and that he's unable to tap the hole without the metal "crumbling". He said he couldn't tap it for a new bolt. We ended up leaving it without the rear bolt, hoping that with the improved gasket, it would still hold air. The bottom line is that the whole bolt-removing operation is now superfluous and I could have saved money and aggrivation if I'd just left it in in the first place. The worst part is that now it's leaking coolant from the bolt hole! Their stopgap idea to put GM cooling sealant additive in didn't work. I'll take it back next week of them to seal the hole.
3/13/02
Did the steering box hex bolt tightening. It actually worked. Steering feels significantly better now.
3/12/02
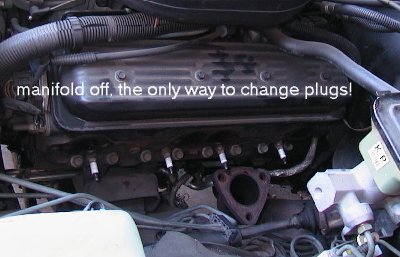
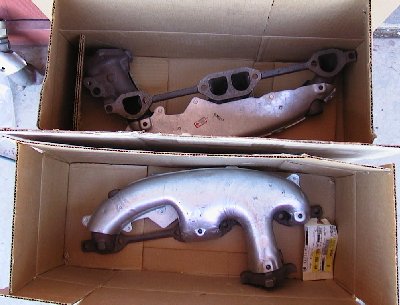

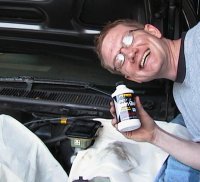
After putting it off for a long time, I'm finally tackling the exhaust manifold project. My 95 LT1 has the classic passenger side rear broken bolt. I bought new exhaust manifolds off ebay for a very good price, not knowing if mine were cracked, just that they were leaking and had at least one broken bolt. My plan was to take the manifolds off, change the spark plugs and wires and if I was lucky, the bolt would be sticking out and I could remove it myself.
No such luck. The bolt was broken flush with the block. I installed the new driver side manifold complete with new style gaskets and supposedly new improved bolts. I desided to reinstall the old pass manifold and take it to a mechanic to remove the bolt and install the new manifold. Drilling, tapping, welding are all things well beyond my mechanical experience. It was worth it to me to pay somebody who knows what he's doing.
The mechanic spent some time on it today with a drill and was very discouraging about his progess. He's talking about taking the head off. This sounds drastic to me. I've read a couple reports of people using welding or EZout.
Doing a little research (which I should have done before), I found one page that a guy had success taking it to a marine mechanic, who was very good with rusted broken bolts. An intriguing idea. Another page suggested getting SLP headers that don't use the rearmost hole. I haven't really wanted to go to headers and I'm sure they would be expensive for good ones.
A separate issue is that the manifolds I got differ from the original
in that the AIRpump tubing hole is a different size. They are an exact
match otherwise. What's up with that? The parts were CHP surplus. My only
idea is that they are actually Camaro parts, or maybe it's a California
emissions thing. I wasn't aware that California cars were any different.
12/30/01
Finished the new website. It's still it's still a little rough, but check it out http://www.geocities.com/jon7190/Capricehomepage.html
10/20
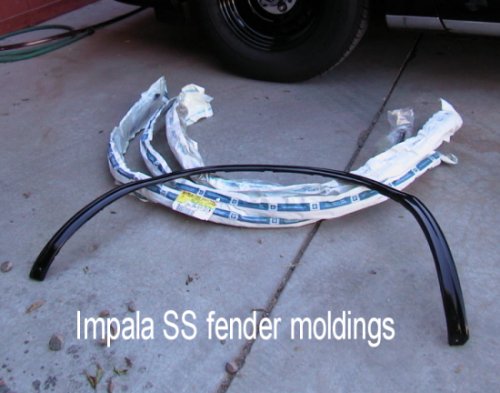
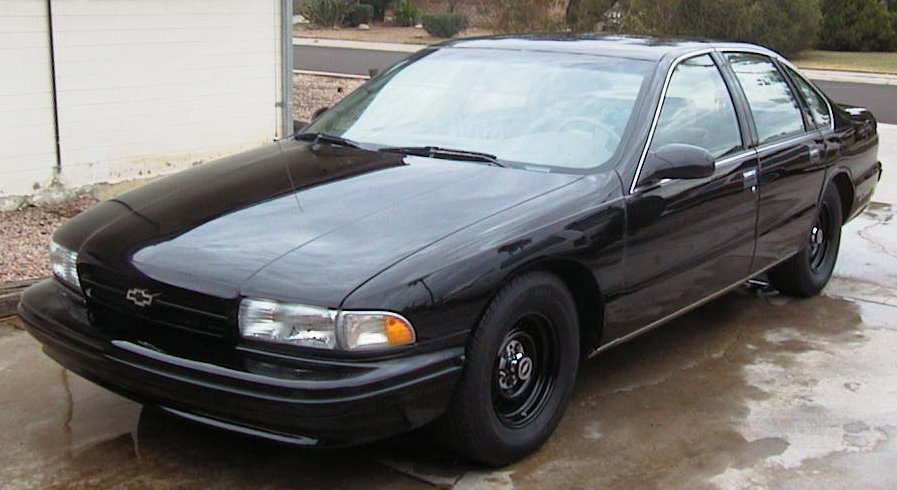
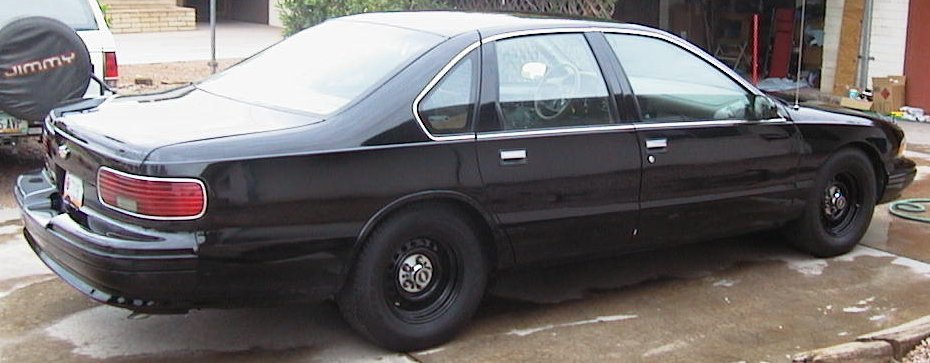
Finally got the Impala SS fender trim pieces and front bumper insert, the car is offically cosmetically finished! All the basic improvement items have been done. The only things left that I want/need to do is new exhaust manifilds, mufflers and intake. I'll be making up a full webpage soon. For now, here are some pictures:
9/18
Just returned from my road trip from Az to TX and back. This is the first trip I've taken in my 95 9C1, and the first significant amount of miles I've put on it. I'd only put less that 1k on it since I got it in Dec. I've been slowly fixing it up and not driving it much in the process. It was kind of a shake down cruise and I wasn't 100% confident.
I'm glad to report it did very well. In about 2500 mi I didn't have to add any oil. The dipstick is still only halfway down the notches, and it still looks clean (changed oil right before trip). The factory cruise I added worked flawlessly. The dynamat, buick frame brace and new tires made the car nice and quiet. New suspension was very smooth and tight, though the steering still needs to be tightened up some.
The only problem was with the old AC drain tube. A well-known b-body problem, which of course I didn't bother to fix before, since I never noticed a problem. My problem was that the water was dripping onto the stereo power wire I have running from the battery and into the firewall in the passenger footwell area. The water then ran down the wire and into the footwell. I only noticed it after arriving in TX and seeing a stain on the floormat. Insulation under the carpet absolutely soaked. No stain on the carpet itself, but somehow it soaked through to the mat. Anyway, I rigged a tube to take the water below the wire. I've got the carpet pulled back and drying out now!
Gas mileage was decent. Going out it averaged 24mpg at 75-80. One person. Coming back I had another person and luggage, same speeds, I got 22mpg every tankful. Interestingly, I drove by myself from Austin the Dallas at night, no AC, speed high 60's and it got 30mpg. Maybe my figuring is off somewhere, but I tried to always top it off to the same point.
Once again, I'm confirmed in my belief that you really couldn't want a better highway car that our b-bodies.
July-August
I havn't updated the page lately because I've been taking a sort of summer break from working on the car. This is partly due to its being humid, monsoon summertime in Arizona and I just don't enjoy getting over heated working on my car outside. Also, my CD deck, which I dropped off in early July to be repaired in "7-10 days" is going to be gone indefinitely. Shortly after I dropped it off, Sony decided to close most of their local repair facilities (including the one here) and shipped my stereo to CA with an ETA of "4-5 weeks". This is very annoying since the car is virtually finished, but still sitting with the dash panel off awaiting its CD player. So, I took the opportunity to take a summer break and will finish the last few details and make a regular web page on the car when the CD player comes back to me (someday).
7/1
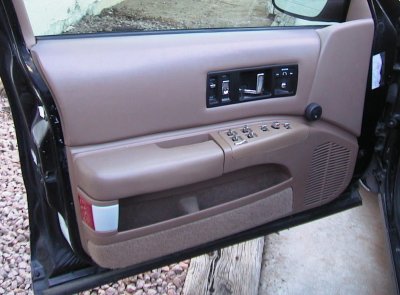
Painted door panel control panels. Window controls are interior color, lock controls are black. Also put on door courtesy lights, which required no additional wiring. This is all Impala SS style, except that I don't have the upper door pull handles.

6/22-24
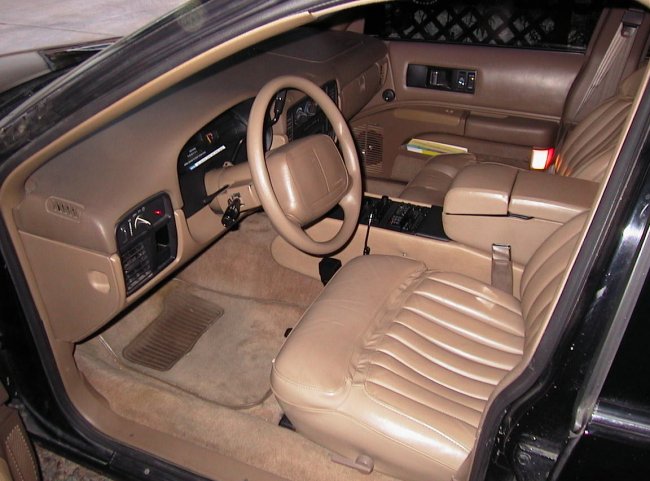
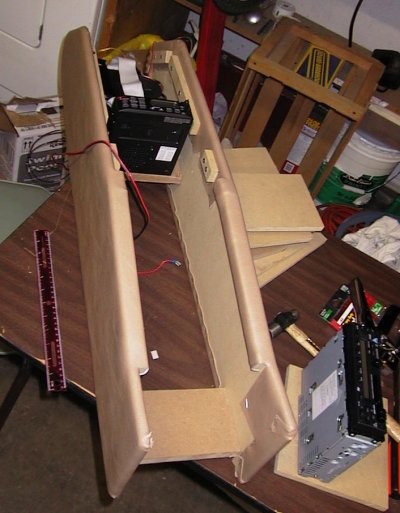
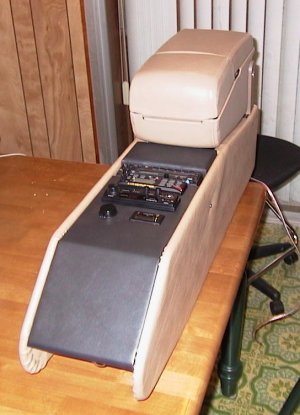
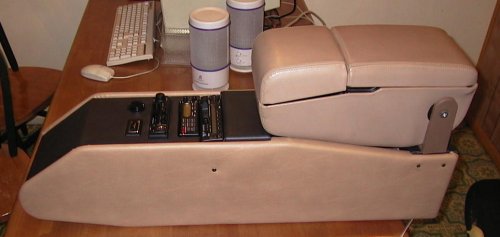
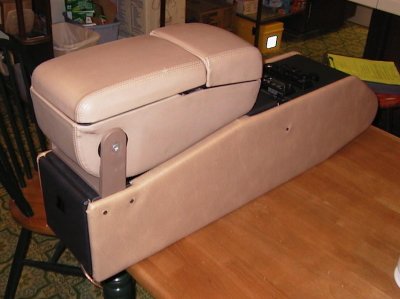
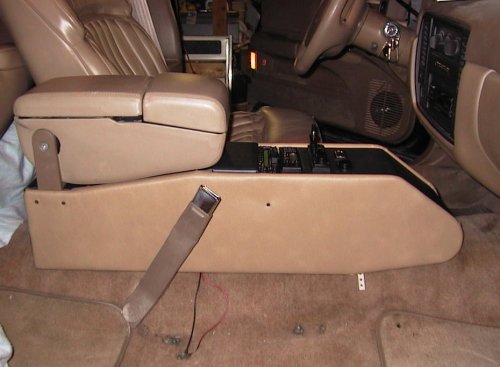
Finished center console. Finished installing interior. Bummer is that my CD player is defective and won't eject CD. Gotta take it out and get it fixed!

6/15-17
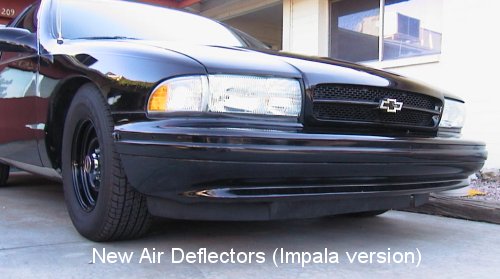
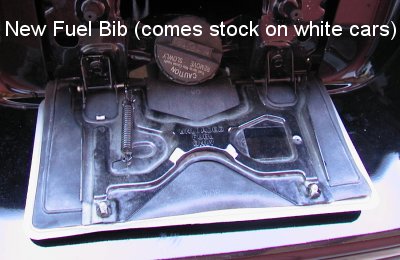
Continuing work on center console. Also put on new fuel bib and air deflectors (the car was missing one on the drivers side). Decided to go with the civi/Impala ones. The 9C1 version are designed to increase air to the brakes, while the civi ones I believe are designed more for aerodynamics. Since I don't do alot of heavy duty braking, I went with the civi's. Also gives it a more Impala look, in keeping with my semi-cloned theme.
6/11
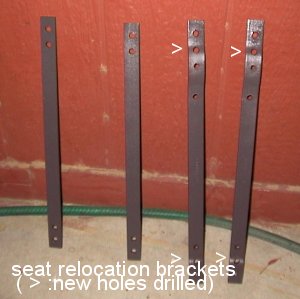
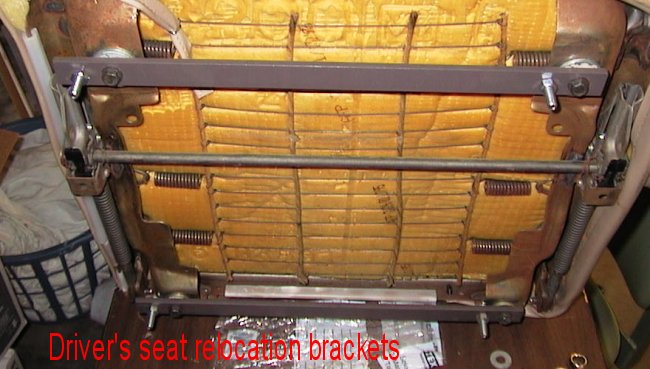
Relocated seats. Changed stock 9C1 passenger seat relocation from 2 inches to 1 inch. Made brackets for driver's seat for 1 inch outboard relocation. B-bodies with power seats all seem to have the problem of the seat being just a bit off center, to the right, from the steering wheel. My 9C1 with manual seat didn't have this problem. The driver seat is now perfectly centered with the wheel.
6/10
Got most of the interior installed. Waiting to install front door panels til I get the door courtesy lights in the mail. Working on the center console.
5/29
Installed dual swithcable dome lights in trunk. These really light it up. Also gives flexibility, since they have on/off switches (note the picture: trunk is open but lights are off). If I want to have the trunk open for an extended time during the daytime, I can turn it off and it won't wear the battery down. The left one is connected to the mercury switch, the right hard wired.
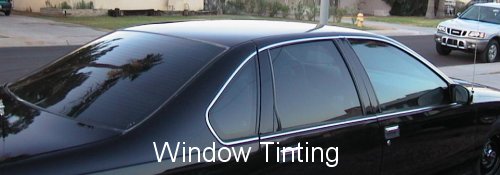
Windows tinted.

5/25-27
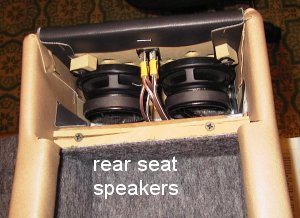
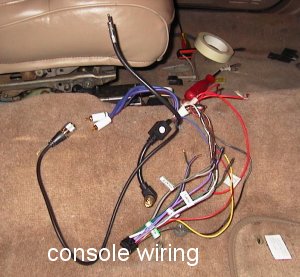
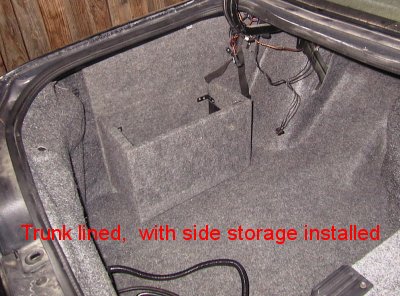
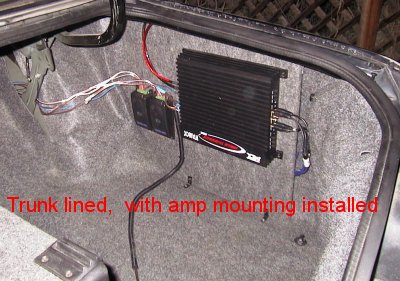
Wiring continues. Wired rearview mirror map lights. Installed stereo, except for tweeters which have to wait for the door panels to go back on, which has to wait for window tinting. Finished trunk with civi Caprice trunk liner and homemade side panels saved from my 94. As luck would have it the fabric is almost a perfect match.
Installed new front seats-preliminary. I'm going to move the pass seat left 1 inch (from the cop repositioning 2 in right- net 1 in right of stock) and the driver seat left 1 inch. An odd thing about this car which I don't think was the case on the 94 is the steering wheel is not centered on the seat, it's just a little bit left of center. I adjusted the column the little bit that it can be adjusted and it's still off. Moving the seat left will also give more room for the center console. I'm surprised by the feel of the Roadmaster seats. They're quite firm and sporty feeling. Much firmer than the 9C1 seats and not your typical Buick luxobarge laziboy sort of seat. I'm hoping they aren't too firm because I know that the 9C1's are very comfortable for long drives.
Posted current exterior photos under 5/2-3

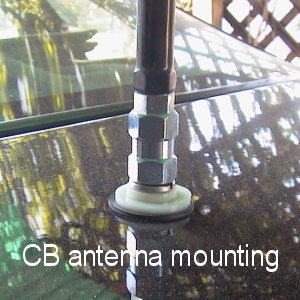
5/20
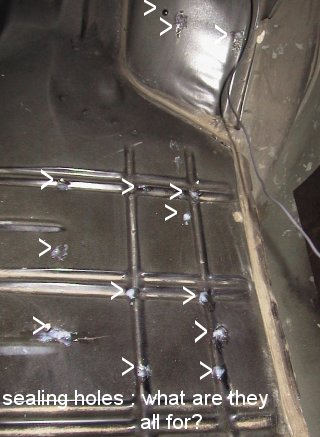
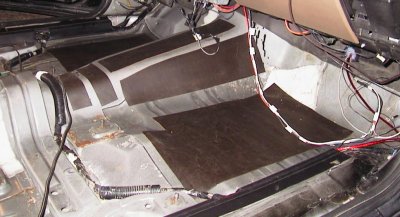
Lots of misc things. Mounted CB antenna (left one cop hole in the trunk for this). Ran all the stereo and other wiring to go under the carpet. Took all the carpet out (the new carpet and the old rubber mats) and dynamatted the floor, roof, and sides of the trunk. Reinstalled carpet - I was going to leave the rubber mat undeer the carpet to add extra sound deadening, but the carpet didn't fit real well. So I compromised and just left in the rear section, since the fit isn't as noticable in the back. Plugged all the cop holes from equipment they took out with silicone sealer. (20 in the trunk alone. They must have had a dispatch center back there)
The dynamat is a vibration dampener. As I understand it, the goeal is not to cover every square inch of an area, but only the most resonant, vibrating areas. I tapped around each area, and whatever had the loudes, deepest sound, I covered. This is usually the center of areas, furthest from support.
5/19
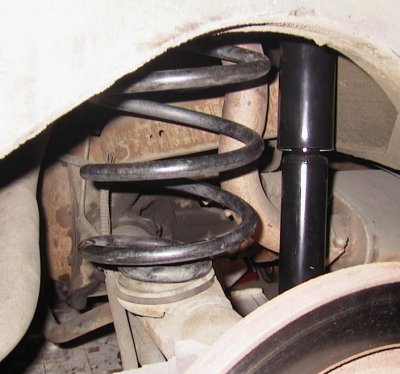
After dragging my feet for a couple weeks, I finally got some new shocks and installed them. I really didn't want to do the rears, but it wasn't TOO bad since I know what I'm doing now. I wasn't happy with the police-spec Sensatrac (5906/5966ST). They were too stiff for my tastes. I decided to skip the sensatracs and just go low-tech with some regular gas shocks. I got the civi caprice spec Monroe Roadwarrior (5801/5802NA). Thinking about the type of driving I do, I decided that ride comfort really took priority over handling. Living in Phoenix, there are no s-curves, sweeping turns or winding country roads. Just lots of straight streets with 90deg turns speed limited by traffic. I do however go on some long distance trips, so highway ride is important. I'm really happy with the ride now. It's smooth, controlled and I think handles well with polyurethane bushings, Impala springs and firehawk SS20 tires.
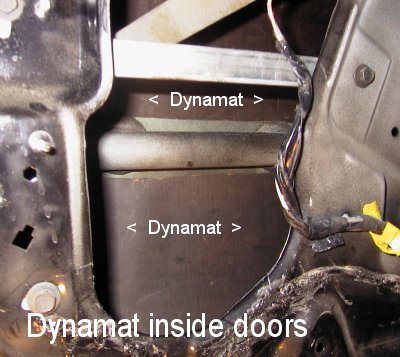
Also finished putting in dynamat in rear doors.
5/12
Working on doors in preparation for speaker install and replacing doorpanels.
This consists of tightening things to eliminate rattles and prevent future
rattles. Also putting dynamat inside doors for sound insulation. This dynamat
has the added benefit of giving the doors a more solid "thunk" when closing.
My car has the 6N1 option that unlocks the doors when you open the handle.
This is a cop car thing, the normal GM way is to have to unlock the door
before you can open it. I found that alot of rattle seems to be coming
from the lock module. I don't believe this was the case on my 94,
which didn't have this option. What I did was to wrap tape and velcro strip
around the lock rods where they are near the module. This pushes them out
a little and keeps them from rattling around. This seemed to do the trick.
I also wedged some styrofoam cubes between the window rails and outer sheetmetal
to keep them from rattling. This was a rattle source on my 94.
5/8
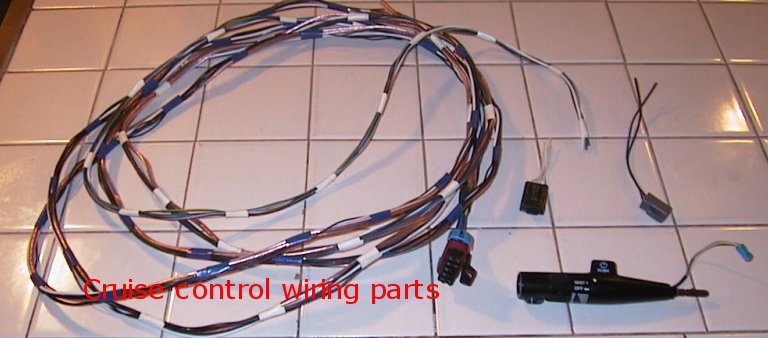
I have cruise control! I'm feeling very psyched about it, too! I got it all spliced in yesterday and finally got the last part to plug it into the fuse box today. It was a nerve racking experience taking it for a test cruise, because I was very nervous it wouldn't work. However, when I got to 60mph, set it and let go of the gas, it was such a rush when it held steady! One click up it went to 61 mph, two clicks down it went to 59. Couldn't be better.
I wrote the project up on a webpage for the benefit of anyone else doing this.
5/4-6
Took the car to the track finally, where it's best of two runs was 15.85@ 88mph. This is alittle slower than my 94 was at 15.35@90mph. Of course that was in December on a cold night. Also it was running hot and I discovered that it has the common problem of the second fan not kicking on even with AC, so I'll have to look into that. (6/16 update: It's actually the Primary - pass side fan that doesn't work. I tested the current at the fan and it gets current so I concluded it just needs a new fan motor. A fix I'll do soon, like before I finally start driving it much)
This weekend I've been installing the alarm. It's a CrimeGuard 328i which I got from Crutchfield. Installation wasn't too hard, but it was alot of work and spending alot of time under the dash in very tight spaces. It seems like a pretty good alarm with alot of programable features. It also gives me remote door unlock, which is really cool.
I've also started getting into the cruise control install. This is a factory system, the parts for which I've assembled from various junkyard cars. I'm photographing as I go along and will be writing the whole process up on a separate webpage.
5/2-3
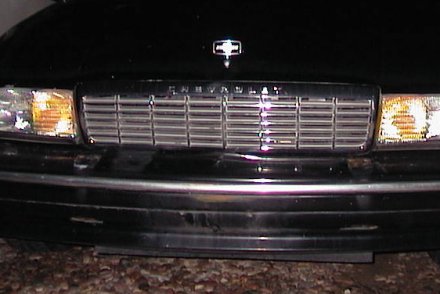
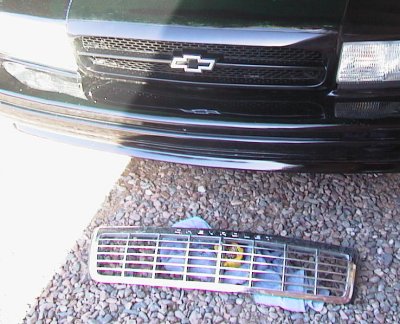
Had the car colorsanded and polished by a detailer and I'm glad to say that the car is finally looking very sharp. It's starting to look really awesome and I'm starting to hold my chin a little higher when I drive it! I put on the window trim and the SS grille. I put on the lower door chome on one side only. This is so when I have the rest of the trim all on, I can decide whether I like it better black down there. If I decide so, I'll paint the pieces black. I still have to paint the wheel opening trim and put on the SS door spears and Caprice SS scripts.
At this point I'd say I'm moderately satisfied with my MAACO paint job. The body work they did looks great. The body work I did doesn't show through too bad. Now that it's sanded, it does look sharp and not obviously inferior to factory or expensive paint. What I'm not satisfied with is the overspray they got on the window controls, and to date they've dragged their feet and basically blown off the idea of replacing the parts or refunding the value. Unfortunately, they seem to be comfortable having an unhappy customer, so there's not much I can do.
I'm thinking of maybe painting the window panels interior color a la the Impala SS. If I can get the right color and come up with a decal solution, I just may do this.
5/1
I'm not real happy with the Police spec sensatracs. They're too firm and the ride feels jouncy. I feel like those low riders driving around with the air springs pumped up the way they kind of jiggle down the road. Of course its not that bad, but I put my old shocks on the front and it's alot better. So I think I'll exchange the police shocks for Impala or regular Caprice ones. The only thing is I really dont want to change the rear shocks! The hardest thing about changing the front shocks is taking off the wheel, but what a hassle those rear ones are.
I am happy with the SS springs. The height is aggressive, without being impractically low. Just right, I think. The only factor is that I still have the interior out, so hopefully that won't lower it much.
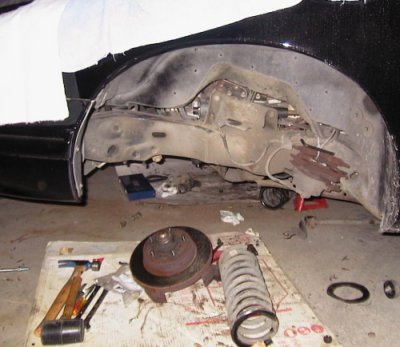
4/23-26
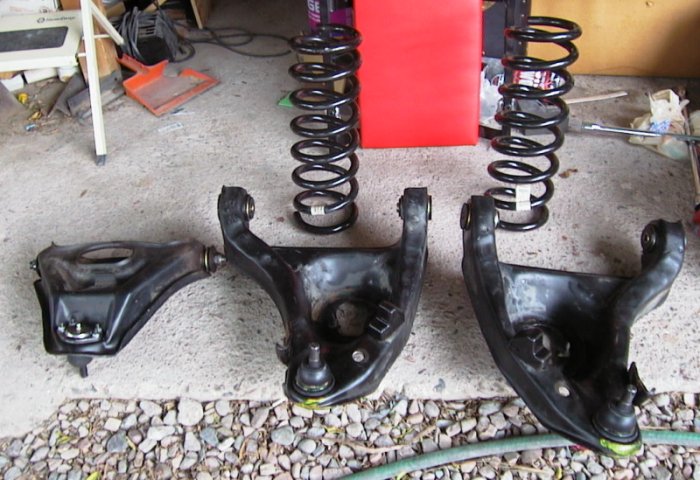
Finished putting the front suspension together. I haven't drivien it yet, but the initial impression is that these Impala SS springs are about as low as I'd want to go. The scary thing about this suspension project is that I'm putting all this work/money in and don't know exactly what I'll end up with. I'm jsut taking an educated guess about the spring/shock combo. I put the new front tires in the trunk and put two spare tires on it to drive to the alignment shop tomorrow so as not to mess up my new tires. I'm taking it to an alignment specialty shop and having the more precise specs found on b-body.net.
Surprisingly, the rear shocks were I think by far the biggest pain of the whole project. The upper nuts are REALLY tough to access. A 9C1 list member suggested the simple and brilliant idea to remove the springs before removing the shocks, which transformed the job from impossible to merely very difficult. Going from underneath the car with the springs in is an excellent way to drive oneself insane!
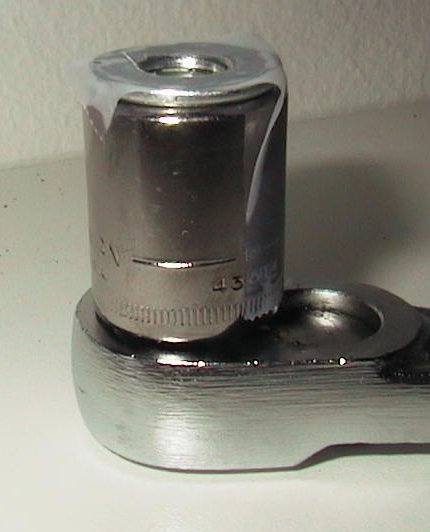
I still spent alot of time and frustration trying to thread the nut onto the bolt for the new shocks. The exhaust is in just the wrong place for trying to reach your hand in there! I finally came up with a system. I scotch taped the new nut into a socket and cut out a hole for the bolt. Then I could reach the driver around as needed to place the nut and it also kept me from loosing my grip on the nut when tightening. Once it's tight, move the driver around til the tape breaks.
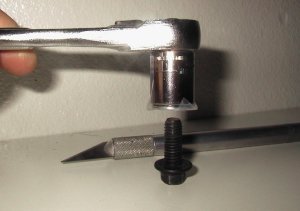
Initially my socket and driver was too tall to fit over the inner shock nut. Fortunately, this problem was solved by just switching from a 3/8 socket to a 1/4.
NEW SUSPENSION COSTS:
1. Rebuild kit from Performance Suspension in Phoenix $290 w/tax- Federal Mogol parts (which they swear is the same thing as MOOG) and Energy Bushings
2. Monroe Sensatrac police-spec shocks $98 w/tax (25% off sale at Checker)
3. 1996 Impala SS springs from Ebay $76 plus shipping
4. New spring cushions from local dealer, 2 front, 2 rear $30 - The old ones in back were still in decent shape, so I put 2 between each spring and the axle. In the FSM the lower cushions are only specified for the wagon, though my car had them. I put the extra one in for a modicrum of extra height and vibration insulation. The spring still seats very firmly.
5. Extra upper balljoint from NAPA $15. (see debacle described below)
6. Sweat, knuckle skin and a whole lot of time $0
7. That satisfying feeling of improving your car yourself, priceless.
(as the mastercard ad says)
4/22
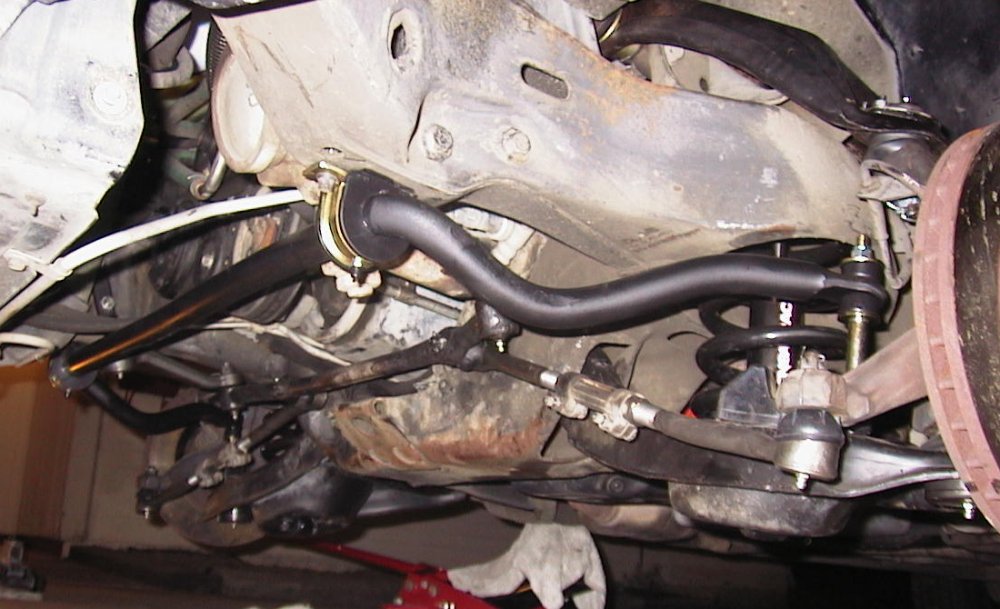
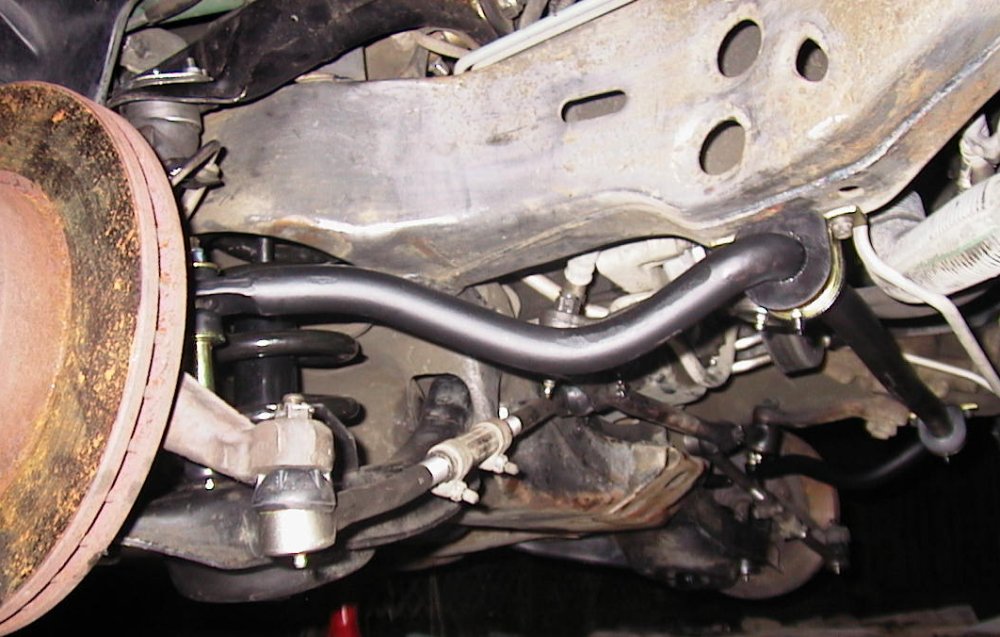
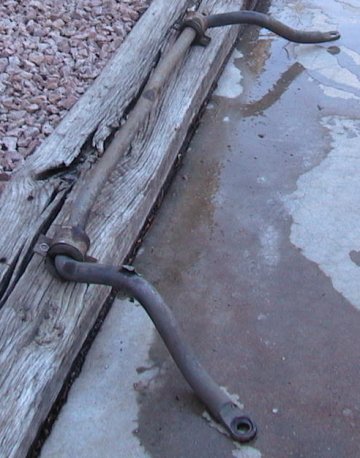
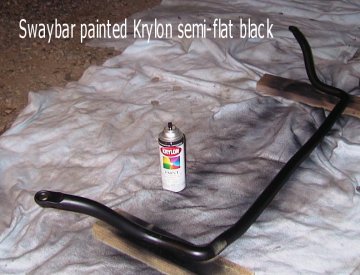
Finally some good news from underneath my car. Armed with the correct torque values, the balljoints were a breeze. The tricky part was attaching the lower CA's to the car. Using the no-spring-compressor method, the new bushings didn;t want to slide into the chassis points as easily as they came out. It took alot of creative lifting, prying and wacking to get them in place. But what a great feeling when it was done! I also put in the new idler arm. Now I just have to put on the new tie rods and the sway bar.
4/21
More problems in Suspension Rebuild Land. The upper ball joints I got didn't come with instructions, so I turn to my trusty FSM which says to tighten the stud bolt to 125ft/lb. I get to about 100 and it stips out. So I think maybe it's defective and I return it. I'm a little more careful this time, but it strips again! So I go get a different brand of balljoints and they do come with instructions. These say to tighten to 65ft/lb. Big difference! So now I'm disillusioned that my FSM is not perfect. And I still don't have my suspension back together!
I compared the 9C1 springs to the SS springs I'm putting in and was surprised how much difference there is. The 9C1 has 2 more twists, an inch higher and 5 more pounds. I'm hoping the SS's aren't too low or soft.
 reconditoned suspension
parts ready to go back in
reconditoned suspension
parts ready to go back in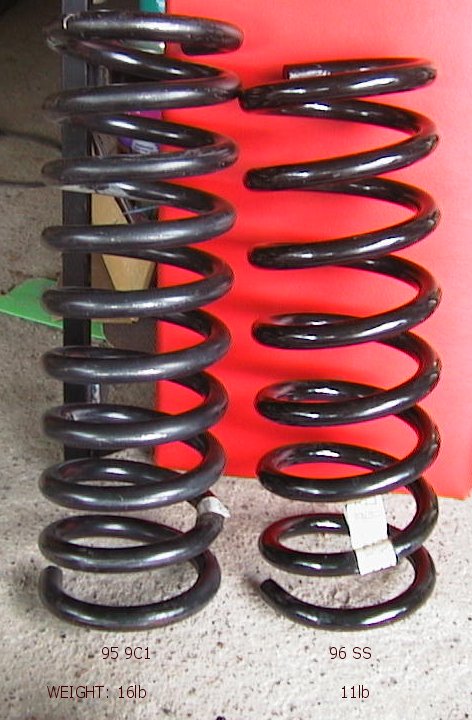 old
and new springs. The 9C1 springs are ALOT burlier.
old
and new springs. The 9C1 springs are ALOT burlier.
4/15
I thought I could finish the front suspension this weekend, but was derailed when I discovered that I got the BIG lower balljoints instead of the correct small bballjoints (build date 5/11/95). So looks like my car will remain on jackstands for another week!
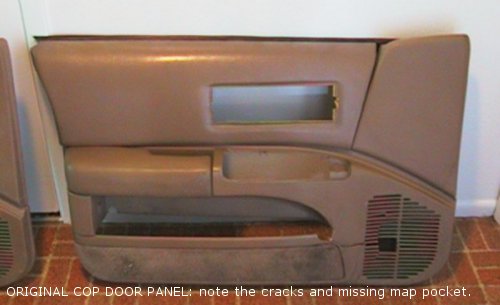
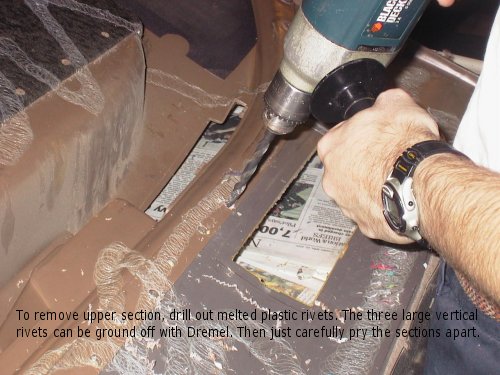
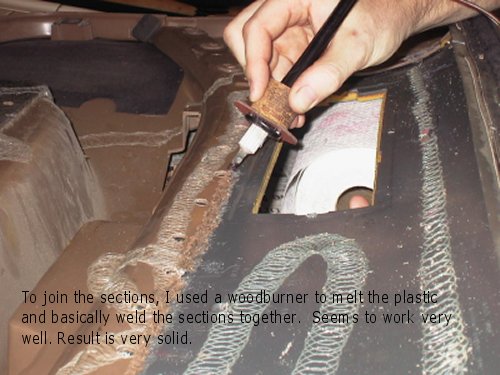
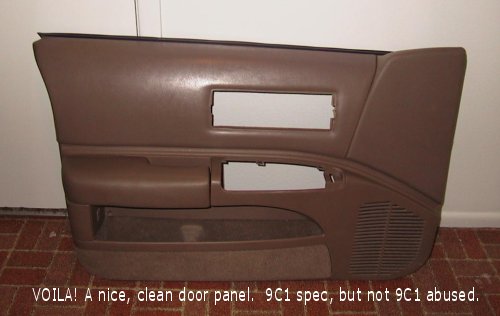
What I did do this weekend is to fix up my driver side door panel. The lower plastic part of the original panel is cracked and generally beyond repair. I got a nice panel of a junkyard civvie car, but it has the cloth upper instead of the 9C1 vinyl. So the operation to swap the vinyl onto the good panel was a success! See the pictures below.

4/13
In the midst of suspension upgrade. I'm doing a complete rebuild and putting in SS springs and new shocks.
Today I finished tearing the suspension out. It was kind of fun, lots of prying apart and whacking with a BFH. I took the CA's to a machine shop to let them replace the bushings and lower balljoints.
Notes: Shock removal kit makes front shocks very easy to remove
Take off intermediate steering shaft for L upper CA
Haynes method for breaking loose upper taper.
Lower taper much easier if you take the lower CA and spidle off the car.
Works with a pickle fork.
Upper balljoints easier to remove if you take the CA off first.
Springs come out easy without a compressor. Found the method on B-Body.net
4/8
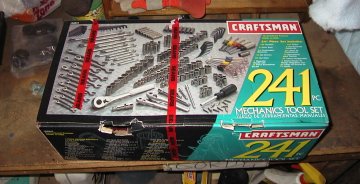
As Click and Clack say, every project is just an opportunity to buy a new tool. With this project of rebuilding the suspension, and it's being my birthday, it was an opportunity to buy 243 new tools. I've been thinking of getting a real wrench set for awhile to replace my mix and match selection of cheap tools, but finally decided that this project would be tough enough without worrying about having the right tools. So it was off to Sears, the guy's toy store!
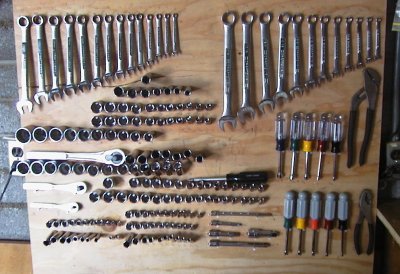 This is the board I got to mount things in an organized way.
Makes it very easy to find the right tool.
This is the board I got to mount things in an organized way.
Makes it very easy to find the right tool.
4/7
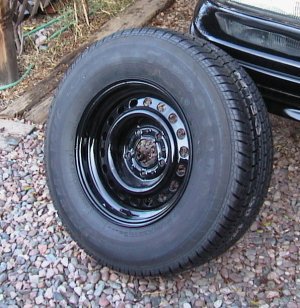
I got the wheels painted, new Firestone Firehawk SS20 235/70/15 tires.
While all the wheels were off, I bleed and replaced the brake fluid.
 That's my friend steve. He really likes the brake fluid.
3/17-3/23
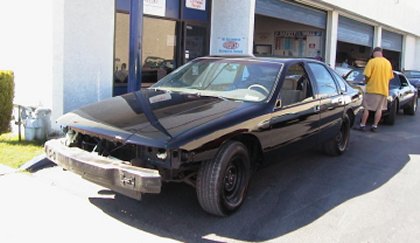
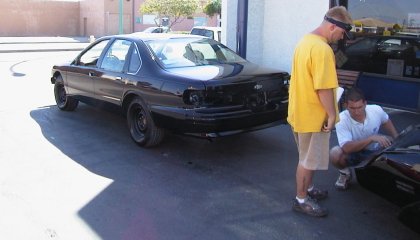
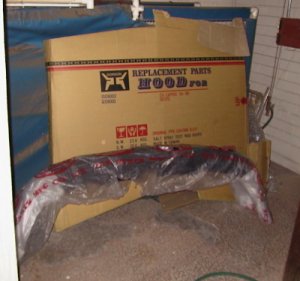
Finished bodywork and dropped off at body shop. Removed all the trim I could. Also all window/door weatherstripping. The only things I couldn't get were the quarter windows (more trouble than they're worth to remove, I think), the rear bowtie (I'm keeping it and didn't want to mess with the rivets) and the rear door handles(those are just about impossible!). I left the new front bumper off so they could paint that separate and I wouldn't have to worry about them overspraying all over the front end. I defintely dont' trust MAACO in the overspray dept.
Body work they did was: fill spotlight cutout, fill two roof holes, hood emblem hole, trunk chrome strip holes. align front fender from old repair. block sand L rear fender old repair area, blocksand my repairs on R rear fender and R front door.
Their hole filling looked real good, can't tell where any of the holes were. The only problem was with the cutout repair. A: they forgot to paint the jamb side, B: when they sprayed primer for the repair, they forgot to mask anything and get primer all over the window and the control panels for the windows and locks. ( I took the door panel itself off a while ago). They'll paint the cutout backside, and they claim they can fix the overspray, and if not, they say they'll replace the controls.
I looked at the car when they finished the bodywork and prep, and they did do a thorough job of sanding the entire car.
The paint itself looks pretty good. A few noticably dust spots. My only worry is a orange peel texture over most of the car. I'm having it colorsanded in a couple weeks, which they say will take care of that. Other problems were since they didn't do jambs, they missed a strip of white along the rain gutter. They also painted the black plastic triangle on the rear window on one side, and masked (poorly) the other side. (I knew I should have masked those myself!). These two problems they say they will fix. Also got alot of bleed through on the frnot and rear rubber window surrounds. These I'm hoping can be scraped clean.
A minor item of annoyance, I masked the exhaust on the rear of the car from just behind the rear wheels to the tips. They actually removed the masking on the rear most section and sprayed my tips a nice glossy black. Arggh! Fortunately they didn't remove the resonator masking and I've already sanded down the tips and they are looking nice.
Bottom line, they did a seviceable job but the attention to detail leaves alot to be desired. Total came to $910. If they fix the problems, the paint comes smooth with sanding and I don't encounter problems down the road, I'll be a satisfied customer. That's alot of ifs, we'll see....
Body costs:
Do-it-yourself supplies $100 aprox
Hood and front bumper cover $191
Paint, hole filling and minor bodywork $960
Color sanding $120
Grille, sidescripts, door guards $150 aprox
2/20-3/16
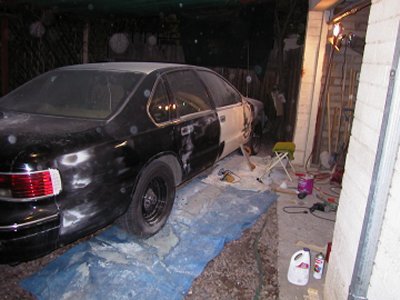
I spent about two weeks doing bodywork myself on the car. There were lots of small dents all over the car. No dowbt this was a well used city car! I wondered on a lot of the dents how in the world they got some of them. A cop car must take some weird and unique abuse. I've become somewhat proficient with the hammer, dolly, and bondo. Some dents came out better than others. Some I never did get quite right, after going over several times, and decided to cut my losses. This car will never be perfect, since it has a couple reapirs from the past which are imperfect and would take ALOT of work to make totally right. My goal is presentable, with any flaws being pretty subtle.
02/20
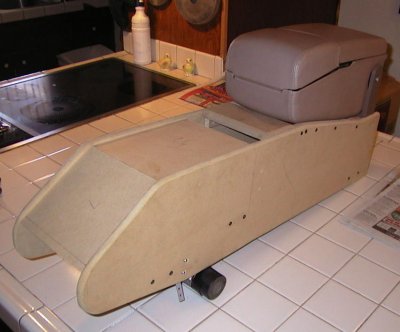
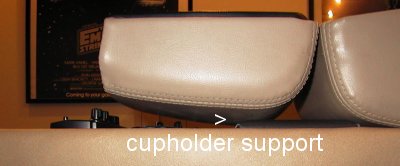
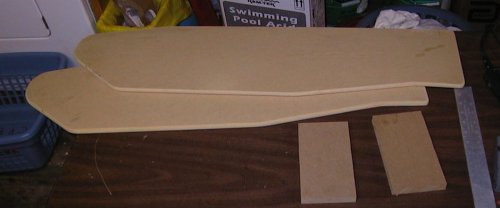
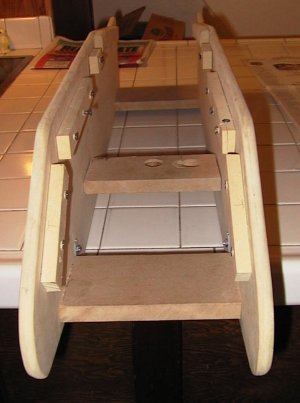
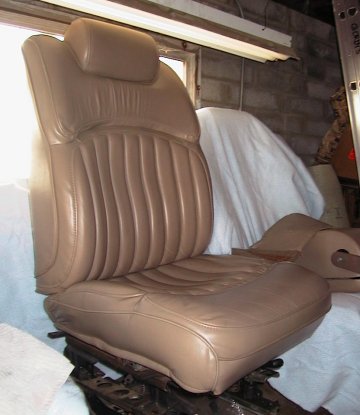
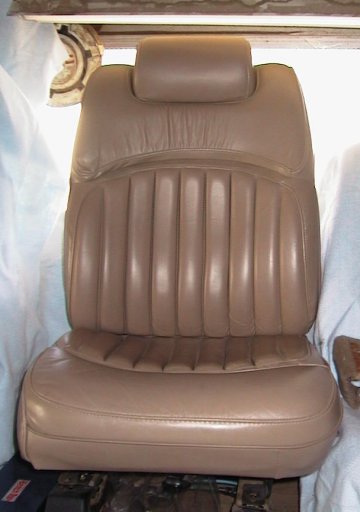
Got the Roadmaster drivers seat back from the upholstery shop. It was a 60/40 bench, but now is buckets! I'll be making a custom center console which will use the nice Roadmaster armrest.
I've finally gotten started on the body. I decided to go with the self-bodywork/Maaco paint route. This weekend I'll start the hammering and putty work. I'll also be replaceing the front bumper skin and hood. The shop will patch the antenna holes and do any body stuff I can't get.
I've also finished compiling all the parts I'll need for stock cruise control, including connectors. I'm pretty sure I'll be able to splice this system in. I'll tackle during the interior reassembly process (which will be after the body process)
02/02-09
Well, I'm finally back to work on the car. No big advances, just needed research, aquisitions and repairs.
I believe I've solved the transmission questions outlined on 01/01. The funky smell, I'm told by an impartial mechanic, is normal for Dextran 3 fluid. The leak was the manual shaft seal, which I replaced myself, along with the fluid and filter. It shifts very well and my mind is much at ease!
I also flushed the cooling system and cleaned out the resevoir. I had a time getting the resevoir hoses hooked up so they don't leak. It seems to be tight now. The only vexing thing is the low coolant sensor light wouldn't go off for a couple days. It finally went off, but now doesn't light up when you turn the ignition on. My 94 doesn't light up with the ignition either. The manual says it should, so I dobn't know what's up with that.
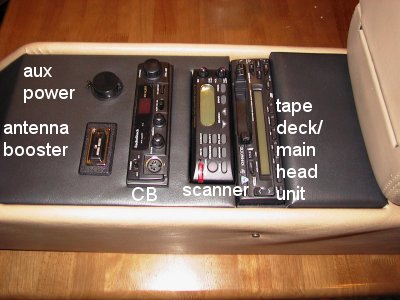
I've been researching and deciding on stereo components. I settled on a Kenwood tape deck to mount in the center console and a Sony add-on CD that plays throught the CD changer input on the tape deck. It should be a really cool arraingement. Other wise I'll use the MTX amp and CDT speakers out of my 94. I put the stock speakers with no amp back in the 94, as well as removed the CB I modified to fit in the center console. This will go in the 95 as well as an inexpensive scanner.
I bought a set of 96 SS springs on ebay. This is what I wanted, to lower it and soften it up just a bit. This car rides very high and in the back, at least, feels alot stiffer that my 94. I'll also replace the bushings and ball joints and maybe do the new longer rear control arms.
The RM drivers seat is at an upholstery shop to be modified into a bucket seat. This I was told would take about a week. It's been over 3 weeks and at two weeks they hadn't started yet. I'm not in a hurry at this point, but I'm still thinking about retrieving it and taking it someplace else.
I'm in the decision process on paint and body work. This will not be cheap or easy! The body has a ton of small dents and imperfections including two major repairs I didn't originally know about. I have to decide how much the car is worth investing in. Obviously any restoration is going to be a money pit, but I don't want to put TOO much into it. The car is totally rustfree and mechanically sold, but with imperfect body repairs it's never going to be as good as new, So how much is it worth?
The cheap approach is to do most of the dent repair and body prep myself and get a budget minded but competent shop to do the remaining hole patches and paint for $1-2K. I've never done body work, but I've been researching it and I think I can do the hammer, bondo and sanding work. The other end would be to get it all done professionally for probably $3500-4500. The fact that it's a black car and thus very unforgiving of imperfections leans me towards the latter option.
01/12 - ?
Been occupied by an unexpected move. Should be back on track within a couple weeks, though.
01/06
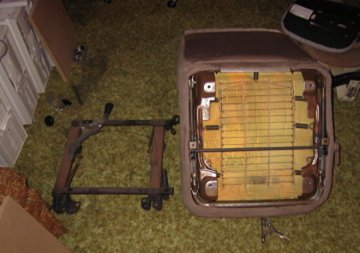
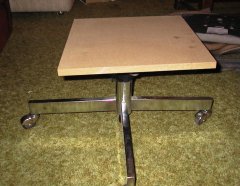
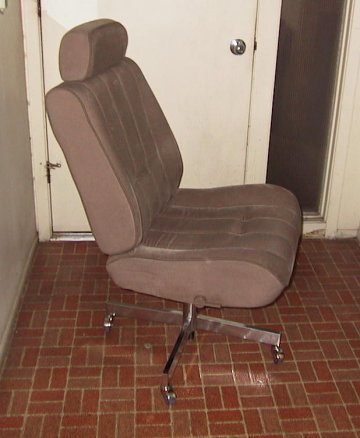
Side project: I decided to use my old seats to make some 9C1-themed
furniture, specifically a desk chair! This was pretty easy. 1. First
take the seat out and remove the rails from the seat. 2. get an expendible
desk chair with wheels and remove the seat from the base. The lower the
base goes the better, since the 9C1 seat is much thicker than the usual
seat bottom. 3. cut a strong piece of wood to 15.5'' X 16.5"
4. secure the wood to the seat and the base to the wood. Now you have a
unique, comfortable 9C1 desk chair!
01/05
Went to the self-serve junkyard looking for power seat switch to use on the power passenger RM seat. No luck, but I did find the front half of a 91-up Olds 98 with an intact cruise contol stalk. This is really surprising to me, since the pick- your-own-part yards around here rarely have cars newer than late 80's and they're very picked over. I couldn't get a late model yard to sell me a stalk, they just want to sell the whole steering column. I tested it out in my 94 w/ cruise and it works. So I now have the major components needed for cruise, I just need a couple new connectors and a homemade wiring harness. Easier said than done!
Also got a compact spare and jack
01/01/01
Cleaned headliner
Removed door edge guards - This was easier than I thought it would
be. If you use a heat gun like the FSM recommends, the glue softens right
up and comes off cleanly. No hassle at all.
I cleaned the outside of the tranny pan, have been looking for leaks
patterns and I have a theory about the transmission. The fluid level
is high, which I think is creating extra pressure and causing the leak,
which appears to be coming from the forward edge of the pan seal. The only
thing that still disturbs me is the funky fluid smell. The next step will
be to change the fluid, filter and gasket, putting the right amount of
fluid in and see if that solves the problem.
12/30
Stripped the interior of all the parts that will need to be removed. Just left what I need to drive it. While it's stripped, I'll do body work and paint, window tint, stereo install, and of course clean and refurbish all the panels that will go back in. I also found that restoring the function of rear door latches, locks, windows and dome light switches is super easy (once you have the door panel off, that is). GM thoughtfully made them easy to fix. I haven't tried the front dome light switches yet.
I'd been planning on putting some extra insulation on the floor, but I think what I'll do is simply leave the rubber mats and their insulation under the new carpet. I may remove the mats and leave the insulation. See how the carpet fits.
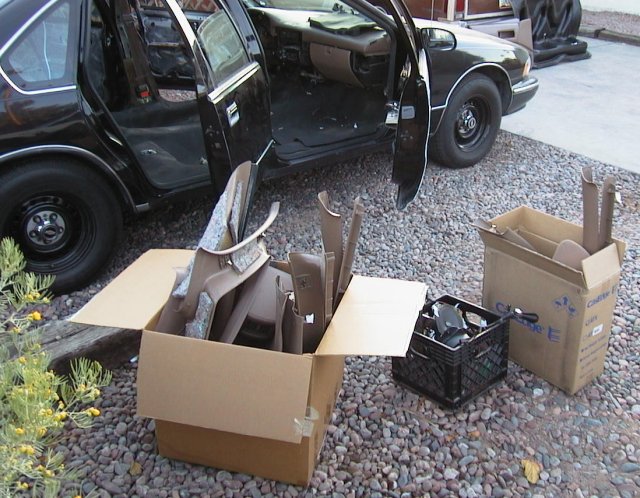 interior panels boxed
up and awaiting cleaning (eventually)
interior panels boxed
up and awaiting cleaning (eventually)
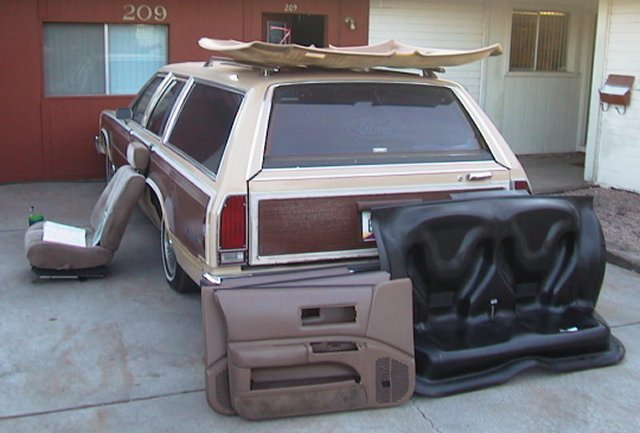 bye,bye prisoner
back seat!
bye,bye prisoner
back seat!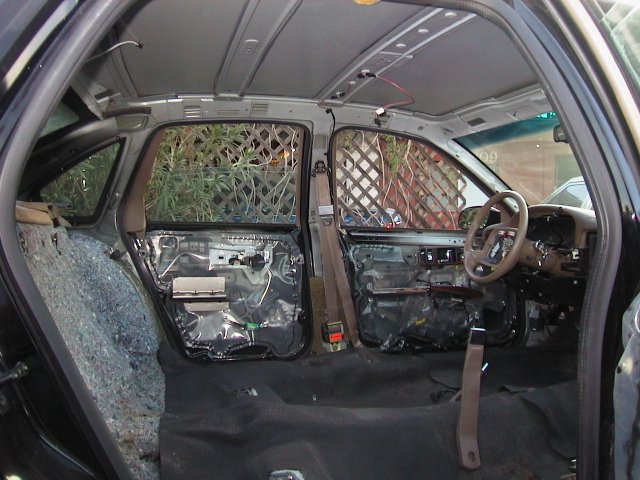 stripped interior!
Still striped, but drivable. New carpet installed temporarily,
since I couldn't think of a better place to store it
12/29
Steam cleaned the junkyard carpet and floor mats. They were quite dirty with some stains, but minimal wear. They came pretty clean. Not perfect, but about what you'd expect on a nice civie car with 90k. That's fine with me, since I've never been real particular about carpet. As long as it's presentable. Life's get's harder when you're worried about the place where your feet go. I discovered it's alot easier to clean the carpet when it's out of the car!
12/28
Had my way with a nice 95 civie caprice. Got almost all the interior parts I need plus cruise control module. $400
Parts bought (problems with my original parts): lower dash (holes, worn, broken ashtray), driver door panel (cracked and abused), carpet with snap in mats (rubber mats), full trunk liner, trunk light (missing), A pillar (spotlight hole), b-pillar (worn), rocker trim both sides (worn), headlight panel (holes), sun visor (scuffs), E/M-trip switch (worn, intermittent light), insulation behind rear seat (missing), dome light relay (missing due to 7Y6), Rear door ashtray (missing). owners manual (missing), all seat belts (drivers worn, missing rear along with the seat itself. has special prisoner seat belts)
Only thing I need is the upper dash panel. Mine is in good condition, but has equipment holes. I may just go with a nice dash mat. I'll see.
So far lots of money spent, lots of cleaning to do.
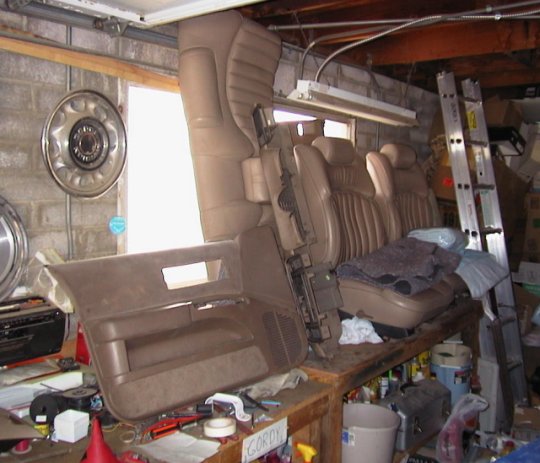 some of the new parts,
amidst the general clutter of the storage/work shed
some of the new parts,
amidst the general clutter of the storage/work shed
12/27
Got a full set of leather seats from a 95 Roadmaster, along with the nifty map light/ rearview mirror These are power driver and passenger with manual seat backs. No lumbar or heat, yes storage armrest. $350. A little dried out, but no cracking. I talked to the managers at two mall leather shops, who tell me they should be rehabilitatable as long as they aren't cracked. I hope so, because these are sweet seats!
12/19-26
In search of interior parts. Called ALL phx area junkyards, checked out leads. Pretty slim pickins. My advantage is that it's a tan interior, while every 9C1 in phx area pd's is blue interior. So most of the blue cars were picked over (by Taxi people I presume) for the commonly bad parts. One yard said they had a standing order from a Saudi Arabian guy to buy all blue interiors they get!
12/15-22/2000
Fluid changes, general going over of the car.
put in extra GM radio, since it is radio delete (has antenna, speakers and wiring though). No car should be without a radio!
Changed the rear end fluid, put the Felpro gasket in (original style was on the car). very minimal residue in the fluid, gears dont look worn. Good signs I guess.
Flushed the coolant, including removing the knock sensors and resevoir. I think I may have messed up the level sensor in the resevoir cleaning it out, as it reads low coolant now even though it's not!
Put 1 qt tranny fluid in the oil for 25 miles before change. This is when the change oil light came on. I think it senses oil quality, so it must have been grabbing some junk!
Lot's of weird mods done by the PD. Driver door power lock dc'd (to avoid lock outs?). trunk light removed. E/M switch wire cut (so officers don't get confused by metric?!) Horn didn't work. I worked my way back from the fuse through the FSM diagnostic flow chart til I removed the airbag to find they cut down the contact points on the back of the airbag. It had to be intenional, but I have no idea why!
Discovered the tranny leaks and has an odd odor to the fluid. Fluid looks normal but dirty. Seems to shift fine. It has a very plainly labeled remanufactured Goodrench tranny and only 90k. I'm hoping this isn't too major!
12/12/2000
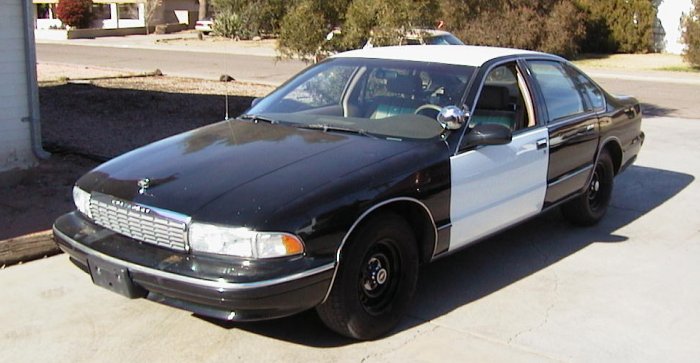
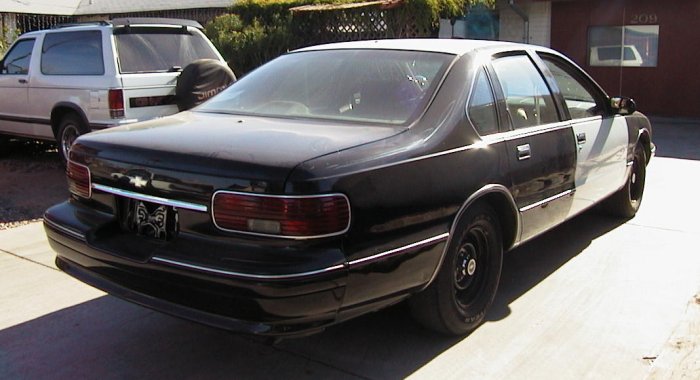
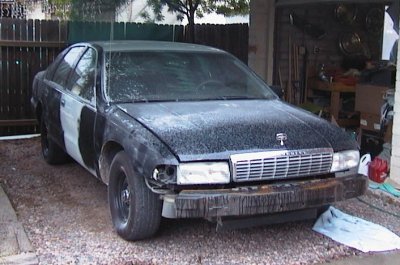
Bought 95 9C1 from Aaron Edwards in Phoenix, AZ. The car is from Fremont, CA which is in the San Francisco Bay area.
Highlights:
90000 miles
black and white (black base with white front doors and roof. All Jambs,
trunk, etc are black, which is a big plus since I'm planning to paint it
black)
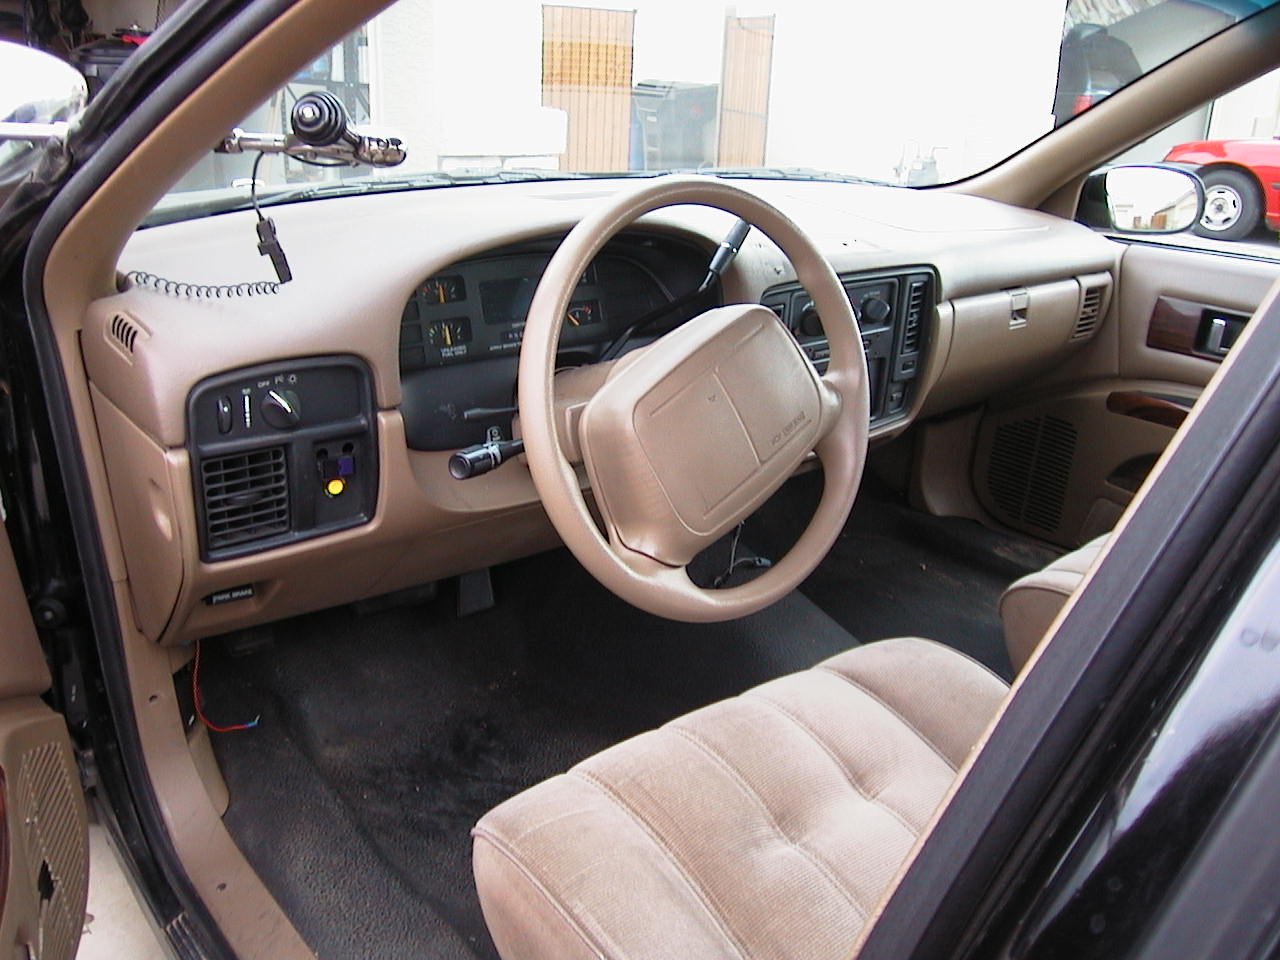
tan interior
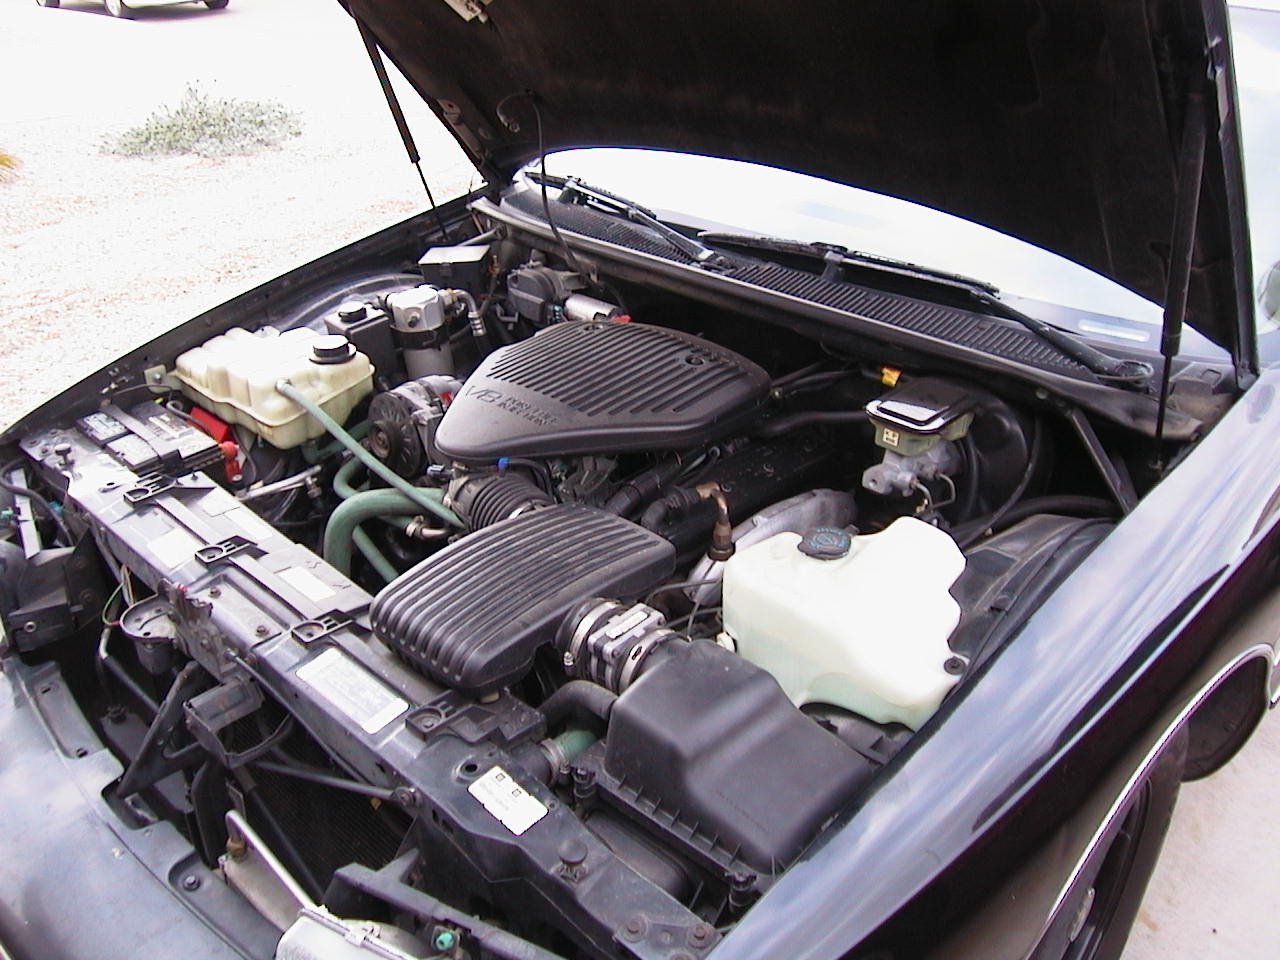
LT1
zero rust
minimal dents and dings in the body
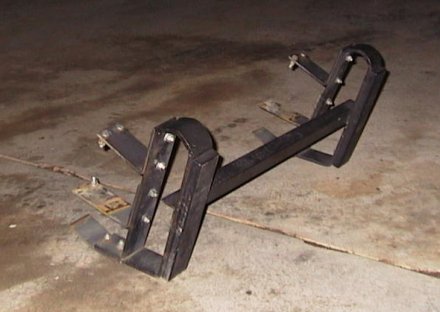
pushbars
driver spot
2 antenna holes and one big lightbar hole
rough interior (but it has a new steering wheel at least!)
power driver seat
prisoner rear seat
Goals and philosophy:
My goal is to restore this car into my personal ultimate 9C1. I envsion a car with perfect body, high quality black paint, some SS trim (but keep the cop wheels), restored interior with new seats, custom center console, high end stereo, cruise control, rebuilt suspension with SS springs, intake and exhaust mods, anything else cool I can think of (and can afford!)
This car will be a CAPRICE SS, rather than an Impala SS clone. I want
as much comfort and performance as an Impala (or more), but not trying
to fool anyone. All mods and repairs will be high quality or stock, nothing
too extreme. This way the car will have a high resale value to anyone who
either wants a nice Caprice or a car to do a full-on Impala clone.