 |
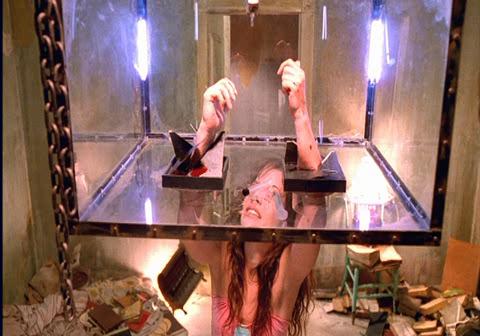 |
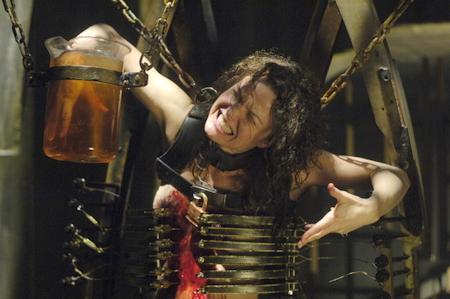
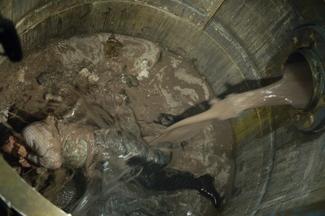
| The Razor Box Trap This trap involves a glass container which was suspended from the ceiling. Inside the box is an antidote which is accessible by two holes underneath the box that are big enough to fit one's arms through. Once they put their arms through, however, they realize that the corners of the holes are fitted with blades that will bend up if something is inserted and if the person tries to take their hands out, the blades will go into their skin, and the harder they pull, the deeper the blades go in. Addison fell victim to this trap. At first, she only inserted one hand, and may have been able to push open the blades and free herself (cylinders extending downward from the holes in the box would have made this extremely difficult), but the plunger to the needle was stuck to the bottom. When she pulled the needle up, the antidote inside spilled. Panicking, she reached her other hand inside to grab it, trapping herself. As she tried to pull out her arms the blades began to cut up her arms. It is unknown if she survived. However, due to the nerve agent that had already killed Laura, and the fact that Addison had lost so much blood from the blades, it is highly unlikely that she lived. It is later revealed in a featurette on the construction of the trap for the set that if the victim were to walk to the other side of the box, they would see a lock with a key sticking out of it, which in turn would have unlocked the box and allowed them to access the antidote without harm. Although Addison fell victim to this trap, it was intended for Gus. Original Idea: Before deciding to place Addison in the Razor Box Trap, the creators and writers discussed on a commentary for Saw II that they had originally intended for Addison to end up in a different trap, which was similar to a waffle iron. It would clamp down on Addison�s hands when she reached for an antidote, and burn them until released. The only way to unlock it would be to apply pressure to the top, which would have to be done by her head, as both of her hands would be trapped. By pressing her face against the top, she would open the mechanism up, freeing her hands and escaping at the price of burning and scarring her face. |
| The Rack Trap (a.k.a: The Twisting Crucifix)
Timothy Young (Mpho Koaho) wakes up in the Rack.Jeff stumbled upon this trap after saving the judge's life from the Intestine Pool. Timothy, the victim in the trap, turns out to be the man responsible for the death of Jeff's son. The victim's head is held in place by a rotating lock, while the arms and legs are held in place by spikes through the hands and feet. Each section begins rotating around 180 degrees, one by one, taking his arms, legs, and head along with it and breaking the bones. Jigsaw states on Tim's tape that this trap is a particular favorite of his, calling it "The Rack." The only way to free Tim was to obtain a key that was attached to a shotgun's trigger; if the key was taken, the shotgun would go off and shoot Jeff. The key is also needed to leave the room and continue through to the next room. Tim's arms and legs are rotated one by one, and the bones break, some jabbing straight through his flesh in the process. As the judge watches Tim's bones slowly break one by one, Jeff manages to untie the key from the shotgun, holding onto the cord long enough to move his own body out of the line of fire. As he lets go, the cord sets off the gun, instead shooting the judge in the head and killing him. Jeff rushes over to Tim just as his head begins to rotate; however, he fails to locate the key-hole in time, and Tim's neck is fatally broken. The gears slow down after Tim's head twists around 180 degrees. In an article talking about the traps of Saw III, the directors commented that each end twisted one degree for every second that went by]. After Jeff leaves, he finds the last piece of the photograph, showing him and his family. He also finds the last piece of the gun, and assembles it. Original Ideas: Before settling on the final version of the Rack, the creators and writers of Saw III went through a couple different versions of game. One of them had Timothy strapped down to a table that would fold on its hinges, bending his body with it and breaking his back. It was remodeled into the shape of a cross, but would still bend along hinges that would break Timothy's body until they decided they wanted the individual limbs being twisted instead. |
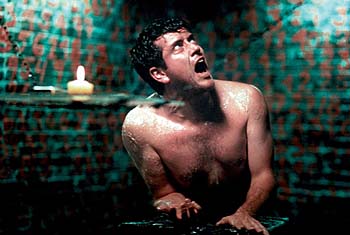
| The Freezer Room (a.k.a: The Ice Shower)
Danica (Debra Lynne McCabe) is frozen in the Ice Shower.Danica Scott is suspended by her arms in a walk-in freezer, where two vertical poles spray her naked body with cold water, again and again. Jeff is forced to decide whether or not to help her. Danica was the one witness to the death of Jeff's son, and she fled the scene, giving Jeff the choice to save her or let her freeze to death. In this trap, behind freezing cold pipes, there is a key that Jeff can reach if he gets close enough to them by pressing his face against it. By doing this, however, the skin on his cheek sticks to the pipe and he has to rip it off. Whether or not he were to save Danica, he would still need the key to unlock the next room to escape the freezer room. Danica freezes to death before Jeff can save her, quickly becoming encased in ice. Jeff leaves as more water sprays, building up the ice on her further. After leaving the freezer room, Jeff finds a bullet, and a scrap of a photo to go with the first one he found before the ice shower. This trap is similar to an act of torture given by the infamous Elizabeth B�thory. Original Ideas: Before settling on the final version of the Freezer Room, the creators and writers of Saw III went through a few different versions of game, with only minor changes. Originally, the victim was going to be a male police officer, but they decided against it, instead going with the idea of a female witness. Instead of being completely naked, Danica was going to be in a T-shirt and panties, but they figured having her being sprayed would make the shirt stick to her body and become too sexual, so they decided to put her in nude instead. |
 |
 |
| The Classroom Trap (a.k.a: The Body Chains)
This trap features Troy, who finds himself in an empty school classroom. A television screen turns on and Billy appears on it. He reveals that Troy has been in and out of prisons for quite some time. If he wishes to live, he must break free of the chains before the timer stops. If time runs out, a bomb, sitting next to a jar of nails, will detonate. The chains are hooked through his skin in various places, including his mandible, shoulders, arms, hands, obliques, legs, and Achilles tendons. When the television screen turns off, he begins to painfully rip the chain rings from his skin. Troy manages to pull off all of the chains, except for the one attached to his mandible. The chain is looped around his mandible and it does not seem possible for Troy to rip his own mandible off in time. He is not able to, and is killed when the timer triggers the bomb. It is later revealed by Kerry, as she's studying his nail-ridden corspe, that there was no escape route for Troy, as the door to the room had been welded shut. Also, as the final chain is attached through his mandible, the strongest bone of the face, there would be no way for him to remove it with just his bare hands. This is the first of Amanda's inescapable traps. Also it is seen that the far part of the room contained unharmed furniture. This shows that if Troy had escaped in time, he could have moved to the other part of the classroom and survived the explosion. Original Ideas: Before settling on the final version of the Classroom Trap, the creators and writers of Saw III went through a couple different versions of game. One of them had Troy suspended above the floor of the classroom by large meathooks. They decided against this, as they figured it would be too difficult. A second version had the hooks going through his eyelids, his fingernails, and his teeth. This accounts for two of the promotional posters for the film, one showing a mouth missing numerous teeth, and another showing three teeth dangling from wires. |
 |
 |
| The Angel Trap (a.k.a: The Ribcage Harness)
Kerry in the Angel Trap reaching for the key.Kerry wakes up hanging from the ceiling in a contraption which consists of leather harness and chains strapped around her body. Upon further examination of her harness, she finds that a device has been placed on her torso and is hooked into her ribcage by needles. Each set of needles is attached to one of two metal arms behind her that, for the time being, remain folded. Hanging next to her is a jar filled with acid into which a key is dropped in as she wakes up. A TV turns on in front of her, delivering Kerry her instructions. Billy informs Kerry that she is "dead on the inside" and that is why she seems to enjoy working in situations with death. He also tells her that the harness will rip out her ribcage if she does not escape from the trap. Billy tells her that she has one minute to retrieve the key from the jar after the video ends before the key is dissolved by the acid and before the timer on the device runs out. After hesitation, Kerry plunges her hand into the jar and severely burns it, but fails to get the key. Screaming in pain, she plunges her hand in a second time and successfully grabs the key. She pulls out her bloodied, severely corroded hand, unlocks the harness, and tries to pull off the trap, only to be horrified that it will not budge. The trap was never intended to be escapable. This is the second of Amanda's inescapable traps. As Kerry realizes that it is impossible to get out of, Amanda saunters into the room. This is the last thing Kerry sees before the two arms attached to the harness arch upwards like a pair of wings (hence the name of the trap), pulling each side of the harness with them, causing the needles embedded in her torso to rip both sides of her ribcage out in opposite directions. She collapses and dies in the leather straps as her internal organs are exposed, causing them to fall out onto the floor. Original Idea: According to producers Mark Burg and Oren Koules, they had originally discussed Kerry's arms and legs being pulled in four different directions as her trap, but instead settled on her ribcage being torn apart. |
 |
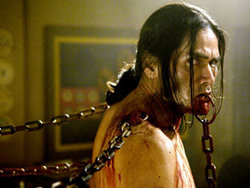
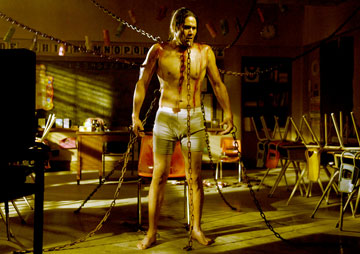
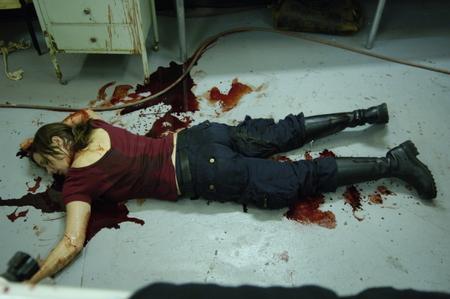
| The Shotgun Collar Amanda places a collar equipped with loaded shotgun shells onto Lynn. The hammers behind each shell are clicked back, and the collar responds with Jigsaw's heart rate. If he flatlines, or if Lynn moves out of range, the shells will explode, killing her instantly. Lynn is forced to operate on Jigsaw to keep him alive long enough for Jeff to complete his series of confrontations in the warehouse. When he does, Jigsaw orders Amanda to remove the collar from Lynn, as she has completed her task; however, Amanda refuses. It is possible that this trap was unescapable, due to the fact that the trap was made by Amanda. This could also be backed up in a deleted scene, in which Lynn manages to get the key from Amanda, only to find that it does not seem to fit in the lock. Jigsaw gets killed by Jeff before the collar is removed, and the shells explode, blowing Lynn's face and head away. |
| The Intestine Pool
Upon entering a room, Jeff hears the voice of a man screaming for help. As he searches around for the man, a large silo in the middle of the room begins to emit a loud, pulsating buzz. Jeff climbs up a ladder to see a man attached to the bottom of the silo by a metal brace holding his neck. As he screams for help, Jeff plays a tape. Jigsaw tells him that when the judge presiding over his son's murder trial sentenced the murderer so lightly, his (Jeff's) soul never recovered. He now has the power to sentence the man's soul straight to hell, or he can choose to forgive. As the tape player ends, a series of large, interlocking saws in an adjoining silo begin to whirl and buzz. Hanging from a conveyor like bar comes out a dead, rotten pig filled with maggots. The pig is dropped into the silo with the saw blades and ground up, leaving the large amount of thick grey liquid remains to pour down a chute into the silo with the judge, hitting him in the face and gradually filling the silo. More dead pigs are pulled in on the rotating chain and dropped, one after the other, into the saws. Soon enough, enough pigs have been liquified to fill the silo nearly enough to drown Judge Halden. In order to save him, Jeff must find the key to the judge's neck brace. The key is in an incinerator, along with all of his son's possessions (photographs, stuffed animals). In order to retrieve the key, he must ignite the incinerator to burn everything, leaving only the key remaining. Jeff does so reluctantly, and retrieves the key. The key is also needed to leave the silo and move on to the next room. The judge manages to escape thanks to Jeff's help, but is later accidentally shot in the head after following Jeff into another trap. After the two of them leave, Jeff finds a third shred of the photo, and a gun magazine. Original Ideas: Before settling on the final version of the Intestine Pool, the creators and writers of Saw III went through a couple different versions of game. One of them had Judge Halden suspended above a meat grinder. As he was lowered down into it, Jeff would have to dive into a "soup" (probably reffering to the ground up pigs that were instead poured onto the Judge) to retrieve the key. It was changed again until it resembled the final version, with the exception that Jeff wouldn't have to burn his son's possessions, but simply step down into the silo to free the judge. |
 |
| Detective Matthews' Test
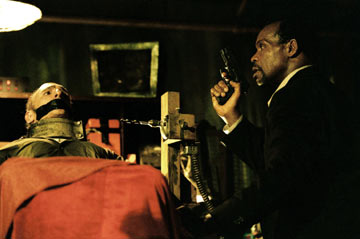
After having his son Daniel kidnapped and placed in the Nerve Gas house by Jigsaw, Detective Eric Matthews discovers Jigsaw's lair, and with the S.W.A.T. team, he tries to convince Jigsaw to give up the whereabouts of the house. Jigsaw proposes a deal, stating that all Matthews has to do is listen, and he will get his son back. Though Detective Mathews does listen for while, he eventually tires of Jigsaw's game and instead resorts to brutality. After beating Jigsaw to within an inch of his life, Jigsaw ends the game, and takes Matthews to the house. The detective enters the house, only to find that his son is not there. After entering the bathroom, Eric is attacked by Amanda, disguised in a pig mask, as she leaps out and jabs a syringe into the detective, drugging him. When he awakes, he is chained to a pipe. Amanda shows up in the doorway, and shuts it, leaving him in the dark with the dead bodies of Xavier, Zep, Adam, and Dr. Gordon's decaying sawed-off foot. However, it is discovered in the third movie that Eric managed to escape into the hallway after breaking his foot, almost severing it off by using the toilet tank cover. When he escapes, however, he confronts Amanda in the hallway. The two of them have a fight, and Amanda begins to believe that Eric has not learned anything from his trap. After kicking him in his broken foot, she decides to leave him to die in the hallway. While Amanda is walking away from Matthews, he begins to taunt and mock her. Amanda, in turn, turned back and walked back over to Matthews, later implying that she murdered him. However, Jigsaw instead believed that she left him for dead. |
| Jeff's Tests |
 |
 |
| The Confrontation
Upon completion of the tests, Jeff exits the abandoned plant and enters Jigsaw's lair. During this confrontation, Jigsaw gives him the choice of killing him and taking revenge, or making the ultimate choice of forgiveness. However, unknown to Jeff, the choice of killing Jigsaw would ultimately kill his wife Lynn as well, as his death would activate the shotgun collar. This choice was the true aim of Jeff's trap. He ends up killing Jigsaw by slicing his neck with an electric circular saw, and the movie ends with Jigsaw playing a final tape before he dies. The tape informs Jeff that Jigsaw was the one responsible for the loss of Jeff's child -- daughter Corbett, who was locked away with a limited air supply. The tape also leaves the possibility of a pre-arranged game that Jigsaw left for Jeff prior to his death with the tape's final line, "and if you want to get her back, you'll have to play a game." Original Ideas: Before settling on the final version of the Confrontation, the creators and writers of Saw III shot a couple different versions, all resulting in Jigsaw's death at the hands of Jeff. The only differences were the weapons of choice, among them the original circular saw blade that Jeff picked up before finding the high power saw. |
 |
| Amanda's Test
After becoming Jigsaw's apprentice, Amanda begins to crack under the pressure. She soon becomes a killer, making traps that have no possibility of escape, such as the Body Chains and the Ribcage Harness. Jigsaw realizes this, and decides to give her another test to prove that she is willing and able to continue on his work after his death. After having her kidnap his next players (Lynn and Jeff), Jigsaw begins testing her patience and temper, gradually building up her stress as Lynn is forced to assist him. When Jeff completes his test, Jigsaw tells Amanda to take off Lynn's shotgun collar, but she refuses. He asks again, telling her that her life rests in Lynn's hands. She instead snaps and shoots Lynn, just as Jeff enters the room. It turns out that Jeff is Lynn's husband, and now equipped with a loaded gun, he shoots Amanda in the neck. She dies of bloodloss while Jigsaw reveals that it was her test all along. |
 |
 |
 |
 |
 |
 |
 |
 |
 |
 |
 |
 |
 |
 |
| Knife Chair
A man named Cecil was trapped in what was referred to first in an interview as the Knife Chair. Eight blades were positioned to enclose the front and sides of his head, with a small panel in front of him. His feet were bound to the floor, and his arms were bound to the armrests, with blades jutting upwards into his forearms. Jigsaw, who was present in the room, instructed Cecil in what to do, telling him that to release himself from the chair, he had to force his face through the blades to push the panel, matching his "internal ugliness" by scarring his face. Cecil, after sitting and screaming for help, began pushing his face through while Jigsaw watched. The chair eventually collapsed, and Cecil stood up. Threatening to kill John, he lunged at him, but John side-stepped, causing Cecil to fall into a pile of hanging razor wire where John left him to die(A hint towards the Razor Wire Maze). This was revealed to be Jigsaw's first created trap. It is not clear whether the chair collapsed because Cecil completed his test or whether the chair simply gave way, as the restraints were still on his arms and legs. |
 |
| Mausoleum trap
A man, Trevor, woke up on the floor of a mausoleum with a locked collar around his neck, attached to a chain. He began to panic when he realized that his eyes had been sewn shut, rendering him blind. He started pulling on the chain to try to release himself, waking up a second man, Art, on the other side of the room. Art realized he was shackled by a similar collar to the opposite end of the same chain. Art's mouth had been sewn shut, rendering him mute. Between the two of them was a winding drum, with a trigger-tab in place inside a large cylinder that the chain passed through. During the ensuing struggle, Trevor knocked over a chair with multiple instruments on it, including a hammer and some hooks. As he began pulling on the chain, drawing Art closer to the machine, the tab was pulled out, activating the device. The cylinder began to rotate, slowly reeling in the chain and pulling both men closer together. They both pulled back and forth on the chain, each getting closer to the machine, though the lack of communication made it impossible for them to work together on solving the puzzle. Art spotted a key on the back of Trevor's collar and realized that it might open the one around his own neck. As he made his way over, he armed himself with the hammer to protect himself before the two men started fighting. Trevor swung a hook wildly, eventually stabbing Art in the leg, however Art was able to get the key. As he attempted to unlock his collar, Trevor attacked again, and Art was forced to kill him by smashing his head in with the hammer. Finally, Art fumbled to try to open the lock on his collar. He managed to remove it, and screamed, ripping his mouth open. During a flashback later in the movie, Art subsequently found a file folder elsewhere in the mausoleum, with "THE KEY TO YOUR FREEDOM" written on its cover. Sitting atop the folder was a tape recorder, which delivered a congratulatory message to Art. |
| Jeff woke up in an empty shipping crate that was elevated on a pair of forklift prongs. Upon escaping, he had to walk through the abandoned Gideon meat-packaging plant that contained the victims of the Freezer Room, Pig Vat, and the Rack. Each person in each trap was directly or indirectly involved in his son's death or the trial of his son's murderer. Jeff had to go through each scenario and decide whether or not to forgive and assist the person or watch them die a horrible death, while also being forced to suffer to move forwards and being tested on his vengeful attitude. He had to get out of the meat-packing plant within two hours' time, or he would be locked in.
In more detail, his tests were: |
 |
 |
 |
The Bathroom Trap
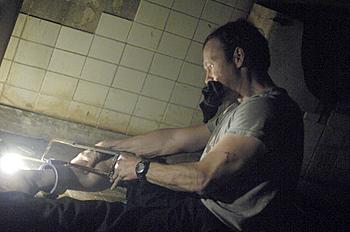
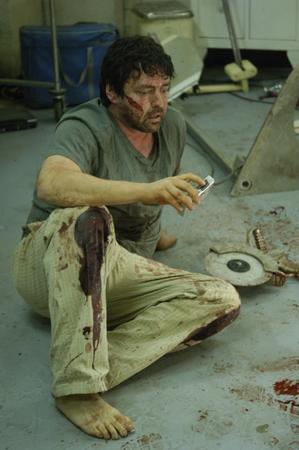
This trap involved two victims, Adam Faulkner and Dr. Lawrence Gordon, who had both been confined in a grimy industrial bathroom. Both were chained by the ankle to pipes at opposite ends of the bathroom. These pipes were connected to a remote electrical source. Since the chains were metal too, the electrical current conducted through those to Adam and Gordon. It's later revealed Jigsaw had the remote to the electrical source. Also present in the room was a dead body, holding a gun, sitting in a pool of poisoned blood, just out of reach of the two prisoners. One of the prisoners, Lawrence, received a bullet, with which to load the gun and kill the other prisoner. He was told that if he didn't do this by a certain time, his family would be killed, and he'd be left to rot. In order to reach the gun, however, he had to saw off his own chained foot with a hacksaw that is hidden in the room. The other victim, Adam, would have to try to escape by sawing off his own leg and leaving. It should also be noted that the hacksaw's strength is only enough to saw through flesh and bone, but not the chains. Both tried to find alternatives, but could find none. Desperate to save his family, Lawrence was forced to saw his own foot off and retrieve the gun. He attempted to fatally shoot Adam, but closer inspection revealed that Lawrence only shot him in the shoulder. He then crawled out to find help. Adam, however, remained trapped. The dead body in the room was actually Jigsaw, who, after getting off the floor, told Adam that the key to unlock his chain went down the drain of the bathtub that Adam had woken up in. The bathtub was filled with water at that point, and Adam accidentally drained it when he woke up, unwittingly sending the key into the drain. It is assumed that Lawrence either died from his wounds or could not relocate the bathroom, because the corpse of Adam was found in the Nerve Gas House in Saw II. In Saw III, it is revealed that Adam did not in fact die of starvation or dehydration after being locked away, but by suffocation. Amanda, feeling terribly guilty, decided to help him by sneaking into the bathroom and placing a strip of plastic wrap over his head, bringing him to a somewhat more timely death. |
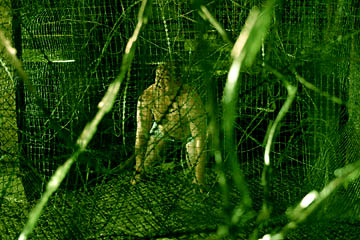
The Razor Wire Maze
This trap involves a victim who wakes up inside a fenced-in area of a basement. Between the victim and the door, there is a gauntlet of densely strung together razor wire that the victim must navigate in order to find an exit. There is a hole cut somewhere at the end of the fence, but it is in a place where the victim is not likely to look. The door out of the basement is set on a timer and the victim must escape before the timer goes off. Paul Stallberg was the victim for this trap. He was a man with a decent life, yet he decided to slit his wrists, presumably for attention. According to Jigsaw, the irony of his situation was that if he really wanted to die, he just had to stay where he was (since the door to freedom would close, trapping him in). But if he wanted to live, he would have to "cut himself again". Footage from the movie shows him pushing his way through the wire, and making it to the end, but not finding the hole in time, therefore being trapped in the basement "forever". Detectives found him hanging dead on the razor wires. He was cut so deep that detectives found traces of stomach acid and intestines on the floor. |
|
The Flammable Jelly
Mark Rodriguez, who commits workers comp fraud, is tested on his so called 'illness', and is stripped nude and covered in a flammable jelly. He is in a dark room with a safe, broken glass completely covering the floor (he is barefoot), a lit candle, and hundreds of numbers written on the walls. Via a recording, Mark is told that there is a slow-acting poison in his system and he has about two hours to find the correct combination and take the antidote for the poison which lies inside the safe. While looking at the walls however, he draws too close to the candle and goes up in flames. His scorched body is shown afterward. Detectives also found a peephole in the wall, showing that Jigsaw liked to "book himself front row seats to his own sick little games." |
|
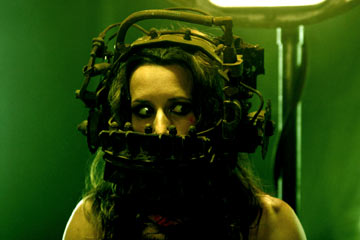
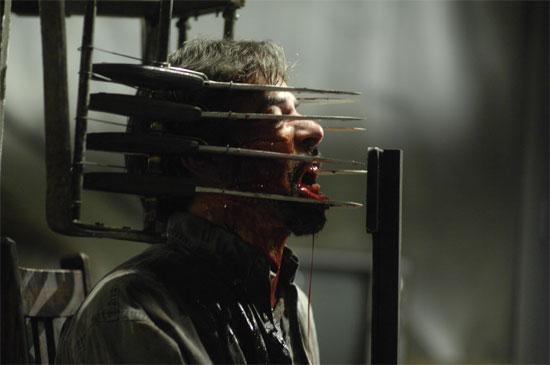
The Reverse Beartrap
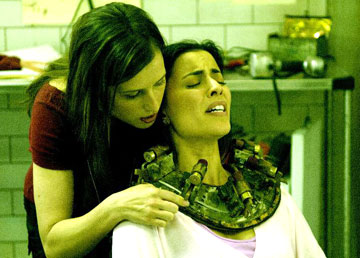
One of the most infamous traps, this trap was used on a heroin addict named Amanda Young (Shawnee Smith), who was duct taped to a chair in a dark room with a heavy metal apparatus hooked into her upper and lower jaw. The Jigsaw Puppet comes on the TV and reveals that she has a short amount of time to get the trap off of her, or it will act like a reverse bear trap and rip her jaws wide open. He tells her that the key is in the stomach of the dead man lying across the room from her. She must cut into his stomach and retrieve the key, although he is not actually dead - just in an opiate induced state of paralysis. Amanda cuts his stomach open with a scalpel, getting the key and removing the trap just in time; as it dropped to the floor it shot open. The irony of this trap is that the man on the floor is Amanda's former drug dealer, and that he himself is in an opiate overdose, presumably administered by Jigsaw. |
|
The Drill Chair Trap
This trap involves two power drills attached to the sides of a chair. As the time presses on, the drills move closer to the victim's head, which is held steady by a metal neck brace. In this case, a man named Jeff was shackled in while Detective Sing had to look for the key to his shackles. Inside a box connected to the chair was a key ring with countless keys. He did not know which one was the right one and moments before Jeff would be killed, Detective Sing shoots the drills, deactivating them. The man in the trap is not the same Jeff that would later be tested in Saw III. |
|
The Quadruple Shotgun Trap
This trap involves four double-barreled shotguns suspended from a ceiling in a hallway, each with a tripwire connected to its trigger. When the victim steps across the string, a chain reaction is caused in which the four shotguns go off simultaneously, blowing the victim to pieces. In this case, the victim was Detective Sing, who was chasing Jigsaw through his warehouse in an attempt to capture him. |
|
Zep's Test
After placing Lawrence and Adam in the Bathroom Trap, Jigsaw then put Zep Hindle, a hospital orderly, into a game of his own: Zep had to monitor the two prisoners in the Bathroom Trap to assure that Lawrence killed Adam. If he didn't, then Zep would have to kill Lawrence's wife and daughter in order to attain an antidote to the poison flowing through Zep's body. After Lawrence failed to kill Adam in time, Zep attempted to kill the mother and child, but failed too, as they got away. Making his way down to the Bathroom Trap, he then tried to kill Lawrence, but was instead beaten to death with a toilet lid by Adam. |
The Venus Fly-Trap
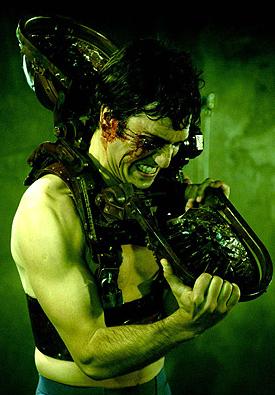
This trap is similar to an iron maiden device, but on a smaller scale. Consisting of a harness, attached to the victim's chest, it is only removable if the key to the padlock is obtained. Attached to the harness are two masks, opposite from each other and angled down from the victim's head. Each mask has several nails protruding inwards. It is on a spring timer, and if it isn't removed in time, the two masks will clamp together on the victim's head, like a venus-fly trap, and drive the nails through his head. The victim in this trap was Michael, a police informant. He woke up in an empty room, and found himself in the helmet. In order to remove the device, Michael had to find the key, which he soon learned, from a video tape, was hidden behind his right eye. Supplied with a scalpel, he attempted to surgically remove his eye, but failed to do so in time. The timer went off, and the masks fatally snapped shut on his head. |
The Electrified Staircase
A staircase surrounded by a cage forms the setting for this two-trap guard mechanism. A tripwire halfway up causes the cage to close, and the cage itself becomes charged with an electrical current, while the stair above the pressure pad springs forward, thereby breaking the shins of the victim (a SWAT officer); however, in the movie, the victim was considered the lucky one. The other two SWAT officers caught him as he fell back, and crashed into the caging, receiving a lethal shock. |
The Nerve Gas House
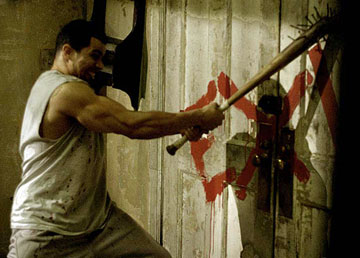
This large-scale trap involves multiple victims in an abandoned house riddled with traps, containing one for each person. The victims breathe in a deadly nerve agent through the air-ducts as they navigate the house, and must find the antidotes. The door to the house will eventually open on its own, but if they do not find an antidote, they will die before this happens. Each trap contains a way to get an antidote. Also inside the house, several weapons are found, including a single-edged blade and a bat with several nails driven through it. Aside from Laura, who succumbed to the nerve agent, the only others to die without the traps were Jonas, who got a blow to the back of the head with the nail-studded bat by Xavier, and Xavier, whose throat was slit with a hacksaw by Daniel. |
The Magnum Eyehole
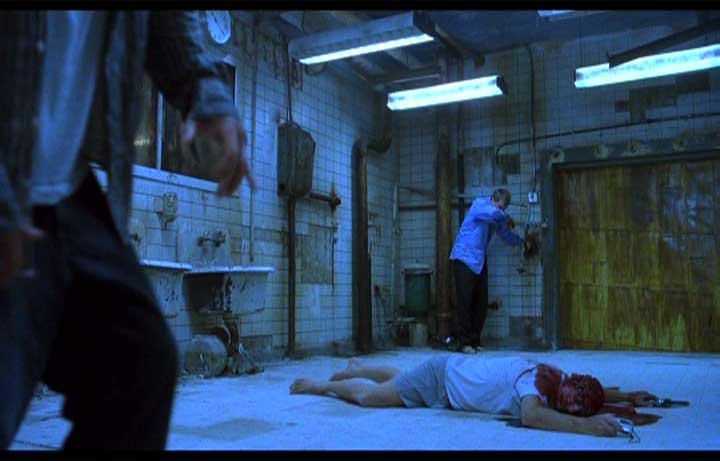
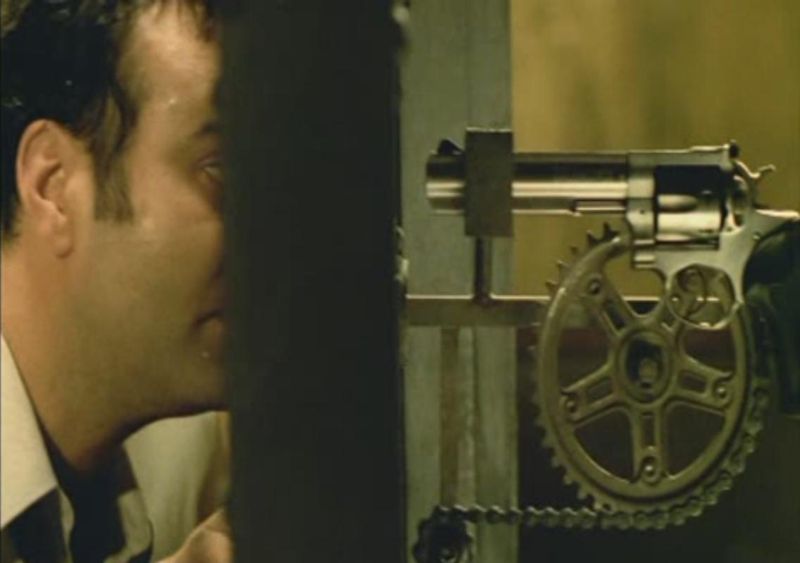
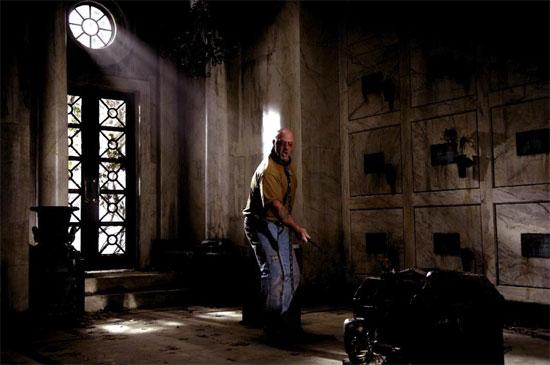
This trap consisted of a locked door, with a revolver firearm attached on the other side of the eye hole, connected by a series of gears. A note given to the players told them not to use the supplied key on the door, but refusing to listen, Xavier chose to use it anyway. Turning the key in the lock, he unknowingly activated the gears, causing them to pull the trigger of the gun. A revolver was aimed at the peephole, and would fire in whoever was in the direct line of fire. Gus was looking through it at the time, and was shot through the eye, blasting through the back of his head, splattering blood and brain matter over the rest of the group. The door, on a timer, would eventually open on its own. |
The Furnace
This trap was built like a furnace for cremating bodies. The victim must crawl inside to retrieve two antidotes that are placed inside. One would be placed with a chain attached to the top of the furnace that, when pulled down, will close the door and ignite the furnace. The only way out is to twist a knob that turns off the gas. Obi fell victim to this and almost escaped through the window on the other side, but wasn't able to fit. He burned to death. The knob had a painting of a devil pointing to it which said "twist". This clarifies Jigsaw's line, "Once you are in Hell, only the devil can help you out." However, there was the gas panel at the other end of the device, and had Obi and others acted faster, he may have been able to get out in time. Original Idea: Before settling on the final version of the Furnace, the creators and writers of Saw II had originally thought of having Obi's tape recorder attached to the collar of a pitbull in the basement. They decided against it, as it would lead to cruelty to animals, and instead attached it to a corpse-like mannequin. |
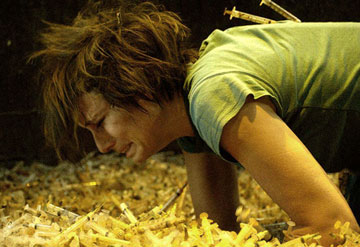
The Needle Pit
This trap involves a pit in the middle of a room, filled with thousands of filthy syringes. A locked door in the room holds an antidote, but is set on a four minute timer. If the timer expires, the door will remain locked forever. This trap was meant for Xavier, a drug dealer, who would have to jump into the pit of needles to find the key to the door. However, instead of going in himself, he picked up Amanda and threw her in to find the key. Although she found the key in time, Xavier fumbled with it and was unable to unlock the door in time. This trap, unlike many of Jigsaw's other traps, would not kill the victim if they failed the task, but was more of a punishment (although the victim would still die from the effects of the nerve agent, unless an antidote was found). Original Idea: The creators and writers of Saw II had originally intended for Amanda to land up to her neck in the needles as if it were a pool, but realized that it would be impossible for her too move in such a pool. Also, getting enough needles would have taken too long, as it took the production team a long time to get as many needles as they had. |