Tips and Tricks
For an Alacrity 19
by George Bollenbacher
When I started
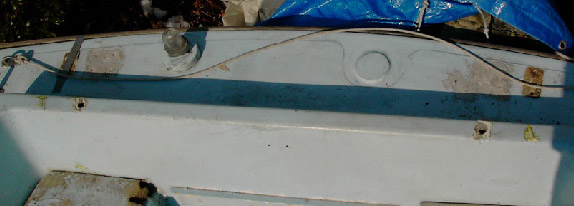
sailing my 1970 Alacrity 19 last spring, I noticed right away that the
mainsheet traveler was rudimentary at best; simply a steel rod running
across the transom above the tiller. With no controls for positioning
the sheet, it was only possible to bring it amidships by holding it
with your hand. If you didn’t want to be a slave to that task, the boom
was always too far to leeward when you were beating, a distinct
impediment in making the boat point.
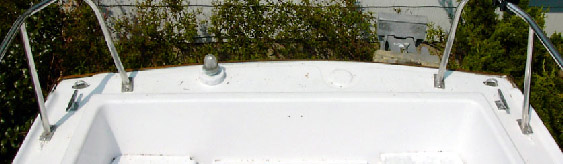
During last summer and into the fall I kept designing and redesigning a true traveler in my mind. Late in the summer I saw a sale at Harken, and was able to buy a low profile track, 40” long, and a small boat traveler car (part # 171on www.harkenstore.com in the clearance section) all for just under $50. Now all I had to do was design, fabricate, and install the traveler so that it was rock-solid and cleared the tiller. One option was to avoid the tiller problem entirely by mounting the track across the cockpit just behind the companionway, through-bolting it to the mini-deck there. That would significantly increase the stress on the track and car, because the sheet would attach mid-boom instead of at the clew. However, the
During last summer and into the fall I kept designing and redesigning a true traveler in my mind. Late in the summer I saw a sale at Harken, and was able to buy a low profile track, 40” long, and a small boat traveler car (part # 171on www.harkenstore.com in the clearance section) all for just under $50. Now all I had to do was design, fabricate, and install the traveler so that it was rock-solid and cleared the tiller. One option was to avoid the tiller problem entirely by mounting the track across the cockpit just behind the companionway, through-bolting it to the mini-deck there. That would significantly increase the stress on the track and car, because the sheet would attach mid-boom instead of at the clew. However, the
Alacrity’s
mainsail is small enough that the increased stress would be no problem.
This arrangement would also require installing a new bail on the boom.
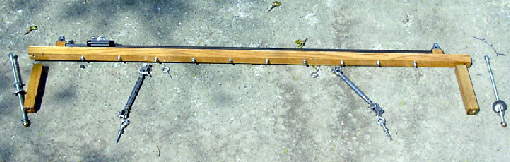
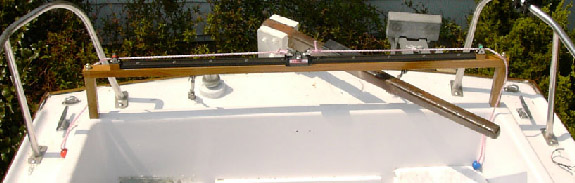
Before I went that route, I wanted to see if I could design a traveler to go where the old one was, and I came up with a pretty workable solution. First, I bought an 8’ length of 1”x1” oak from a specialty lumber yard nearby, and cut a 4’ section for the transverse and two 6” sections for the uprights. Then I mounted the track on the transverse, through-bolting it, and added blocks cut from the same oak stock as track stops. I mounted lance cleats on the track stops for the control lines. Then I drilled a ¼’ lengthwise hole through the uprights. (It pays to have a drill press for this instead of relying on a hand-held drill.) If you can get a woodshop to do this, it may save you some frustration. I also drilled a ¼’ vertical hole through each end of the transverse.
I got a 4’ length of ¼” threaded rod, and cut two 9” lengths. On the top (exposed) end, I put a brass cap nut, and on the bottom I put fender washers and lock nut. I knew that this would hold the ends securely, but I was a little worried about flex in the middle of the 4’ section. To add stiffness, I got a pair of ¼” turnbuckles, and put two eyes in the transverse and two on the deck, far enough from the center to clear the tiller when it is as far over as it will go.