JAL Computing
![]()
![]()
![]()
![]()
![]()
|
|
|
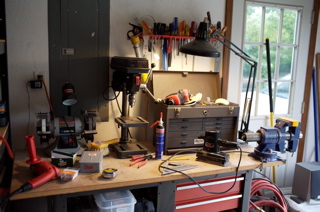
Setting Up the Shop Avery has a ToolKit
for building an RV-12. Of course, you will need to buy a new toolbox
to hold all of your new toys :). You may also want to consider a 5 inch bench vise, drill press, band saw and bench grinder. Don't forget to add plenty of overhead shop lights.
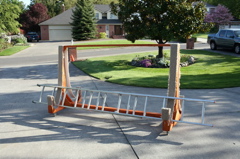
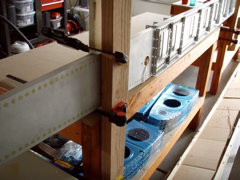
Here is a picture of a wing stand that I built. Note that I doubled the lower spar and cut the outside uprights to 18 inches. Place the carpet screws/washers on the sides of the outside uprights or cover the screw heads with carpet to protect the wings from scratches. This stand works quite well with the RV-12 wing, although I have not tested it with installed flaperons.
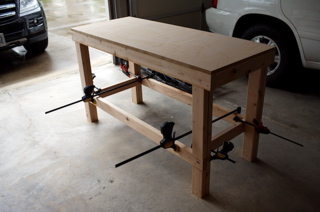
I built two EAA work tables from these plans, but I used construction adhesive (LocTite) instead of wood glue and MDF board instead of plywood. I used four large "luncheon" folding tables to skin the wings.
Special ToolsThere are some tools that are not included in the Avery RV12 toolkit that you may find useful:
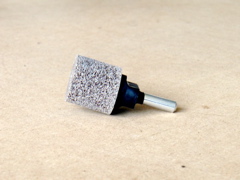
This is a one inch ScotchBrite wheel mounted on a mandrel that can be used to de-burr the scalloped edges of the ribs. The two inch wheel is useful for de-burring the wing skins. Both can be used on a hand held air grinder, but the hand held grinder needs to be used with care as it is harder to control than a bench or drill mounted wheel. Avery also sells a mandrel for the 6 inch ScotchBrite wheel which I used to mount a second six inch wheel on a drill press. I ended up using four ScothBrite wheels, a six incher on a bench grinder, a six incher on a drill press, and a one and two inch wheel on a die grinder.
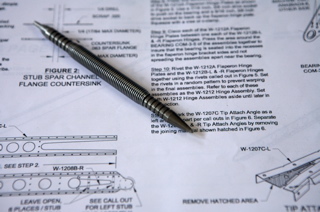
This aligning tool is used to align the holes for riveting. I made this from a tapered awl by grinding the tip. The mark is the insert level for the tool. Just insert the tool and position the tool perpendicular to the work surface. This works great when you need to align rivet holes in the skins and ribs. I treated the row of rivets for each rib as a unit, taking care to pre-position any difficult rivets before I started pulling any rivets in that unit.
I used 2X4s and quick clamps to support the spar.
This is the modified close quarters hand riveting tool showing how the modified head can fit over a rivet in the attach angle without striking the aluminum. Note how the top of the tool has been ground flat in the picture on the right. In the picture on the right, the part that was ground flat is exposed, just behind the nose piece. You can cover this area with duct tape.
This is a drill stop size #30 that is available from Avery tools. I was very glad that I used this tool when I match drilled the trailing edge of the wing tip.
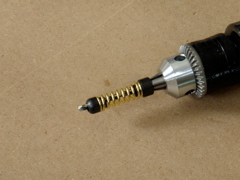
Another most important tool is a spring powered center punch that can be modified to punch in the steel mandrel of a pulled rivet. This will allow you to drill the manufactured head of the rivet without striking the steel mandrel. The other end of the tool can be ground for use in punching out the remaining rivet once the head has been removed. I drilled a hole in a piece of wood and used this as a backing when I punch out the remaining rivet. Consider using a #31 drill when removing an 1/8 inch rivet in a hole previously drilled with a #30 drill.
I modified the spacing of this edge roller for "bending" the lower edge of the wing step doubler. Butch did not recommend using this tool unless the point of roller contact was away from any rivet holes, so I removed the two tiny washers, pulling the rollers closer to the aluminum disk. Extra material may be removed with a bench grinder, a Dremel cut off wheel or a nibbler (shown below).
When it comes time to build the stall warning assembly, consider purchasing #8 and #4 screw machine countersink cutters (100 degrees) and numbered drills (#19 and #31) specific for the #8 and #4 countersink screws. Don't forget to install the correct size (1/8 inch rivet) nose piece on the Avery Air Rivet Puller when pulling 1/8 inch rivets. I sprayed some WD-40 into the nose piece as recommended and it significantly improved the smooth release of the spent mandrel. Remember to store the rivet puller in the upright position allowing the internal oil to return to the dependent position.
|
Send mail to [email protected]
with questions or comments about this web site. Copyright © 2001, 2002, 2003,
2004, 2005, 2006, 2007, 2008, 2009 ©
|