Kelley's Works in Progress
Works in Progress by Works in Progress
Works in Progress is simply not satisfied with the way things are done, and is always looking for a better way. It's just who we are...
With this in mind, we'll probably always have projects in the works - and if you don't see something anywhere here that you want fixed, do please drop us a line. If it's a replacement for the original part, save the old part! We'll probably want it for measurement and analysis, and just having the original part can save a boatload of design work! Please - if you even think there's a better way, don't toss the old part! If we need it, we'll make arrangements to get the thing shipped.
Of course, we're not planning on doing a bunch of "one-off" parts - that's even more work than we'd care to get into. But, if it's a part that shows a definite deficiency, and there would be use for more than "just a few" of them, then having a new one designed is a definite possibility!
So, what are we working on now?
Fan Clutch Eliminator
One of the first hard parts for Works in Progress to design is the Fan Clutch Eliminator for XJ/MJ. More applications may become available, if there is enough interest.
The typical service life of the fan clutch - standard or heavy-duty - is five years or less. The stock fan clutch is a viscous coupling, comprised of a steel "hub" and an aluminum "rotor" connected by a silicone fluid which increases in viscosity as temperature increases. As the fluid thickens, there is less slip between the hub and the rotor, and the fan speed gets closer to the pully drive speed.
Unfortunately, it is also this heat that breaks down the silicone fluid - both the heat of the operating environment and the heat generated by the slip between the hub and the rotor. Therefore, service life really isn't what it should be. What to do?
Enter the Works in Progress Fan Clutch Eliminator. Machined from wrought 6061T6 aluminum bar, it is a solid coupling between the fan drive pully and the fan. It installs using the original hardware, so there's nothing else you have to buy to make the thing work. It uses the OEM fan, so you don't have to look for a special fan blade. The "kit" is nothing more than the new fan hub, and it's about the size of your fist.
Another plus - anyone who has lost a motor mount in an XJ or an MJ with the 4.0 has probably had the fan try to go through the radiator - which makes for an expensive repair job! With the FCE, nearly an inch of material is eliminated from the area forward of the fan - since the fan mounts on the face of the FCE. Therefore, the closest thing to the radiator is the leading edge of the fan blade - and that's a good inch behind the fan clutch hub - plenty of room!
Also, since it's a solid part, there is no viscous coupling to worry about, no seals to weep, no fluid to lose or break down, and it doesn't matter which way the thing spins. Since it's much smaller and solid aluminum, it's going to weigh less, which will help reduce the load on the engine (but there's a little more to it than that - I'll get there in a minute.)
Disadvantages? Sure - as has been said, "There's ain't no such thing as a free lunch." The disadvantages are slight, but should be mentioned.
Noise - with the fan constantly running at drive belt speed (which is slightly faster than crankshaft speed,) there's going to be a constant "fan whine." I haven't been able to quantify this additional noise; but, if you'd wanted a quiet ride, you'd have bought a Cadillac or a Lincoln, right?
Power Loss - there will be a slight (but measureable) power loss involved in running the fan constantly. We're not racers, and it's not going to be a great deal (you'd have to put the vehicle on a dyno to find out what the loss is, and I haven't gotten that far yet.) I wouldn't consider it anything to worry about - and if you were building an all-out speed job, you'd probably use an electric fan in both spots anyhow.
All in all, I suspect this will be a good trade-off. I'm sure you'll all let me know what you think.
AW4 Cooler Line Adapters
I tell ya something - when Ford came up with those o-ring style "Quick Disconnect Fittings," I could have shot someone. When they started using them for containing critical fluids (like fuel!) shooting them seemed nice. Seriously - there's not much holding them together but a little "spring" tension from a Nylon clip, the two o-rings that seal the thing sit in there basically loose, and every time you take the thing apart, you have to put in new orings and a new clip. Whose brilliant idea was that? Throw in the fact that they'll leak of their own accord after a few years, and this really was not one of Ford's finer moments...
So, we figured there was a better way. Actually, this one started a while ago, when I got tired of dealing with the damn things on my 1987 XJ. My solution was, at the time, really hokey - but it worked, and it worked the way it wanted to.
We've finished drawings for the manufacture of a one-piece adapter that will thread into the AW4 housing, and will accept a -6JIC flare fitting. It will also accept caps (on the transmission) and plugs (on the lines,) so if you have to pull the transmission, you can block things off so you don't lose fluid all over the place.
There's not much of a disadvantage here - but it's a good idea to put these in while you're installing a transmission cooler kit. Most cooler kits use 3/8" hose to plumb the kit, and many kits will use a -JIC or -AN fitting, so you can have good, solid plumbing for your new cooler.
Use and care instructions will be provided. These fittings will be CNC machined from wrought brass bar stock for long life and exceptional durability. The working idea here is "overkill."
Belt Tensioner Knuckle
On the earlier XJ/MJ with 4.0, the belt is tensioned by a long bolt underneath the power steering pump. OK so far.
This bolt has a knuckle on it - this knuckle has two holes. One is threaded to be borne by the bolt, the other is smooth and has a stud on the bottom of the pump housing on it. Still fine.
When you tighten the belt, all of the strain is borne upon the threads in this knuckle - about a half-inch of threads about 1/18" deep. Small problem.
This knuckle is made of "sintered" metal - metal that started life as a powder, was poured into a die, and heated and pressed to make a solid part. Problem!
While sintering (now called "powder metallurgy") has made remarkable advances in strength, these knuckles were made before the advances. I've broken three of them so far. Considering the entire power steering pump has to be removed to replace the thing, we think it's worthwhile to make something that won't have to be replaced so much...
Again, these parts are CNC machined from wrought bar stock, and the solid threads will hold up nicely to the strain of holding belt tension before you can torque down the rest of the pump bolts.
The only real stumbling block right now is deciding what to make the thing out of - I wouldn't trust aluminum for this, brass might be still a little weak, and steel tends to rust. Using stainless steel will drive up the price of the thing - both in terms of material cost and machining costs. We'll figure something out...
Headlamp Upgrade Harness
In Prototype Evaluation!
UPDATE
The Headlamp Harness Upgrade is finally in prototype as of 23APR2007. With a three-month prototype cycle, and return for evaluation, I'm hoping to start production as of 15AUG2007.
Some changes were necessary to the basic design to accommodate XJs and MJs of all years, and some small revisions may remain, but the basics of the thing haven't changed. Price is still a bit up in the air, but I'm hoping I can keep it to around $70-$80. I've designed this using 12AWG wiring and 40A relays, so it will support H4 or H6054 upgrade bulbs to 200W per filament, and it ships with everything you need - save fuses. I don't know what wattage of bulb you're planning on running, so I haven't included the fuses you'll need. However, it uses the same ATO/ATC "blade" type fuses that the XJ and MJ use, and there is a chart in the instructions to help you select fuses (and, if you don't see your bulbs listed, email me with what you're running, and I can tell you what fuse to use.)
I should have a page up with a little more detail when I get closer to production time - say, mid- to late-July. I'd like to make sure that it is going to work, and that no substantial changes are needed...
There are a few harnesses out there, but most of them are pretty expensive (>$90!) and no-one tells us what you can consider a "maximum" bulb rating for their harness.
We feel that for a part to be truly reliable, it is sometimes necessary for the end-user to know what it can and can't do, so we took that into account with the design of this harness. Here's a breakdown:
- Designed to support up to two 200W bulbs on each circuit. With included 30A relays for high and low beams, this allows you to run up to two 180W bulbs on each circuit - as shipped.
- Plug-and-play design. Only two connections need to be made with tools - connections to battery positive and battery negative
- All wiring bundled for easy routing
- All "long runs" of harness are double-covered for additional safety and abrasion resistance
- Oil- and grease-resistant cable used for underhood environment
- Power runs made as short as physically possible to reduce conductor resistance
- Plugs directly into OEM headlight wiring - may be easily removed for use in another vehicle, and there are no small connectors to figure out!
- Uses standard electrical parts (relays and fuses) for easy service. The relays should be the same as what you already have in your vehicle, in most cases
- Will create a noticeable effect with OEM sealed beam headlamps
The only thing thing that might seem, at first, odd, is that there are no fuses in the box when you open it. There's a good reason for that - we don't know what lights you're going to plug into the thing! Therefore, the instructions will also have a "fuse chart" - telling you which fuse you'll want to use for what bulbs, by power rating. All you have to do is look up your low beam power and your high beam power, select your fuses, and plug them in. You do have spare fuses, don't you?
Copper Heater Plumbing
While this might, at first, seem like an oddity, it has a good reason.
The first time I had to service the heater hoses on just one of my XJ's, it cost me about $90 just for all those little right-angle moulded hoses! Nope - I don't feel like repeating that experience again anytime soon!
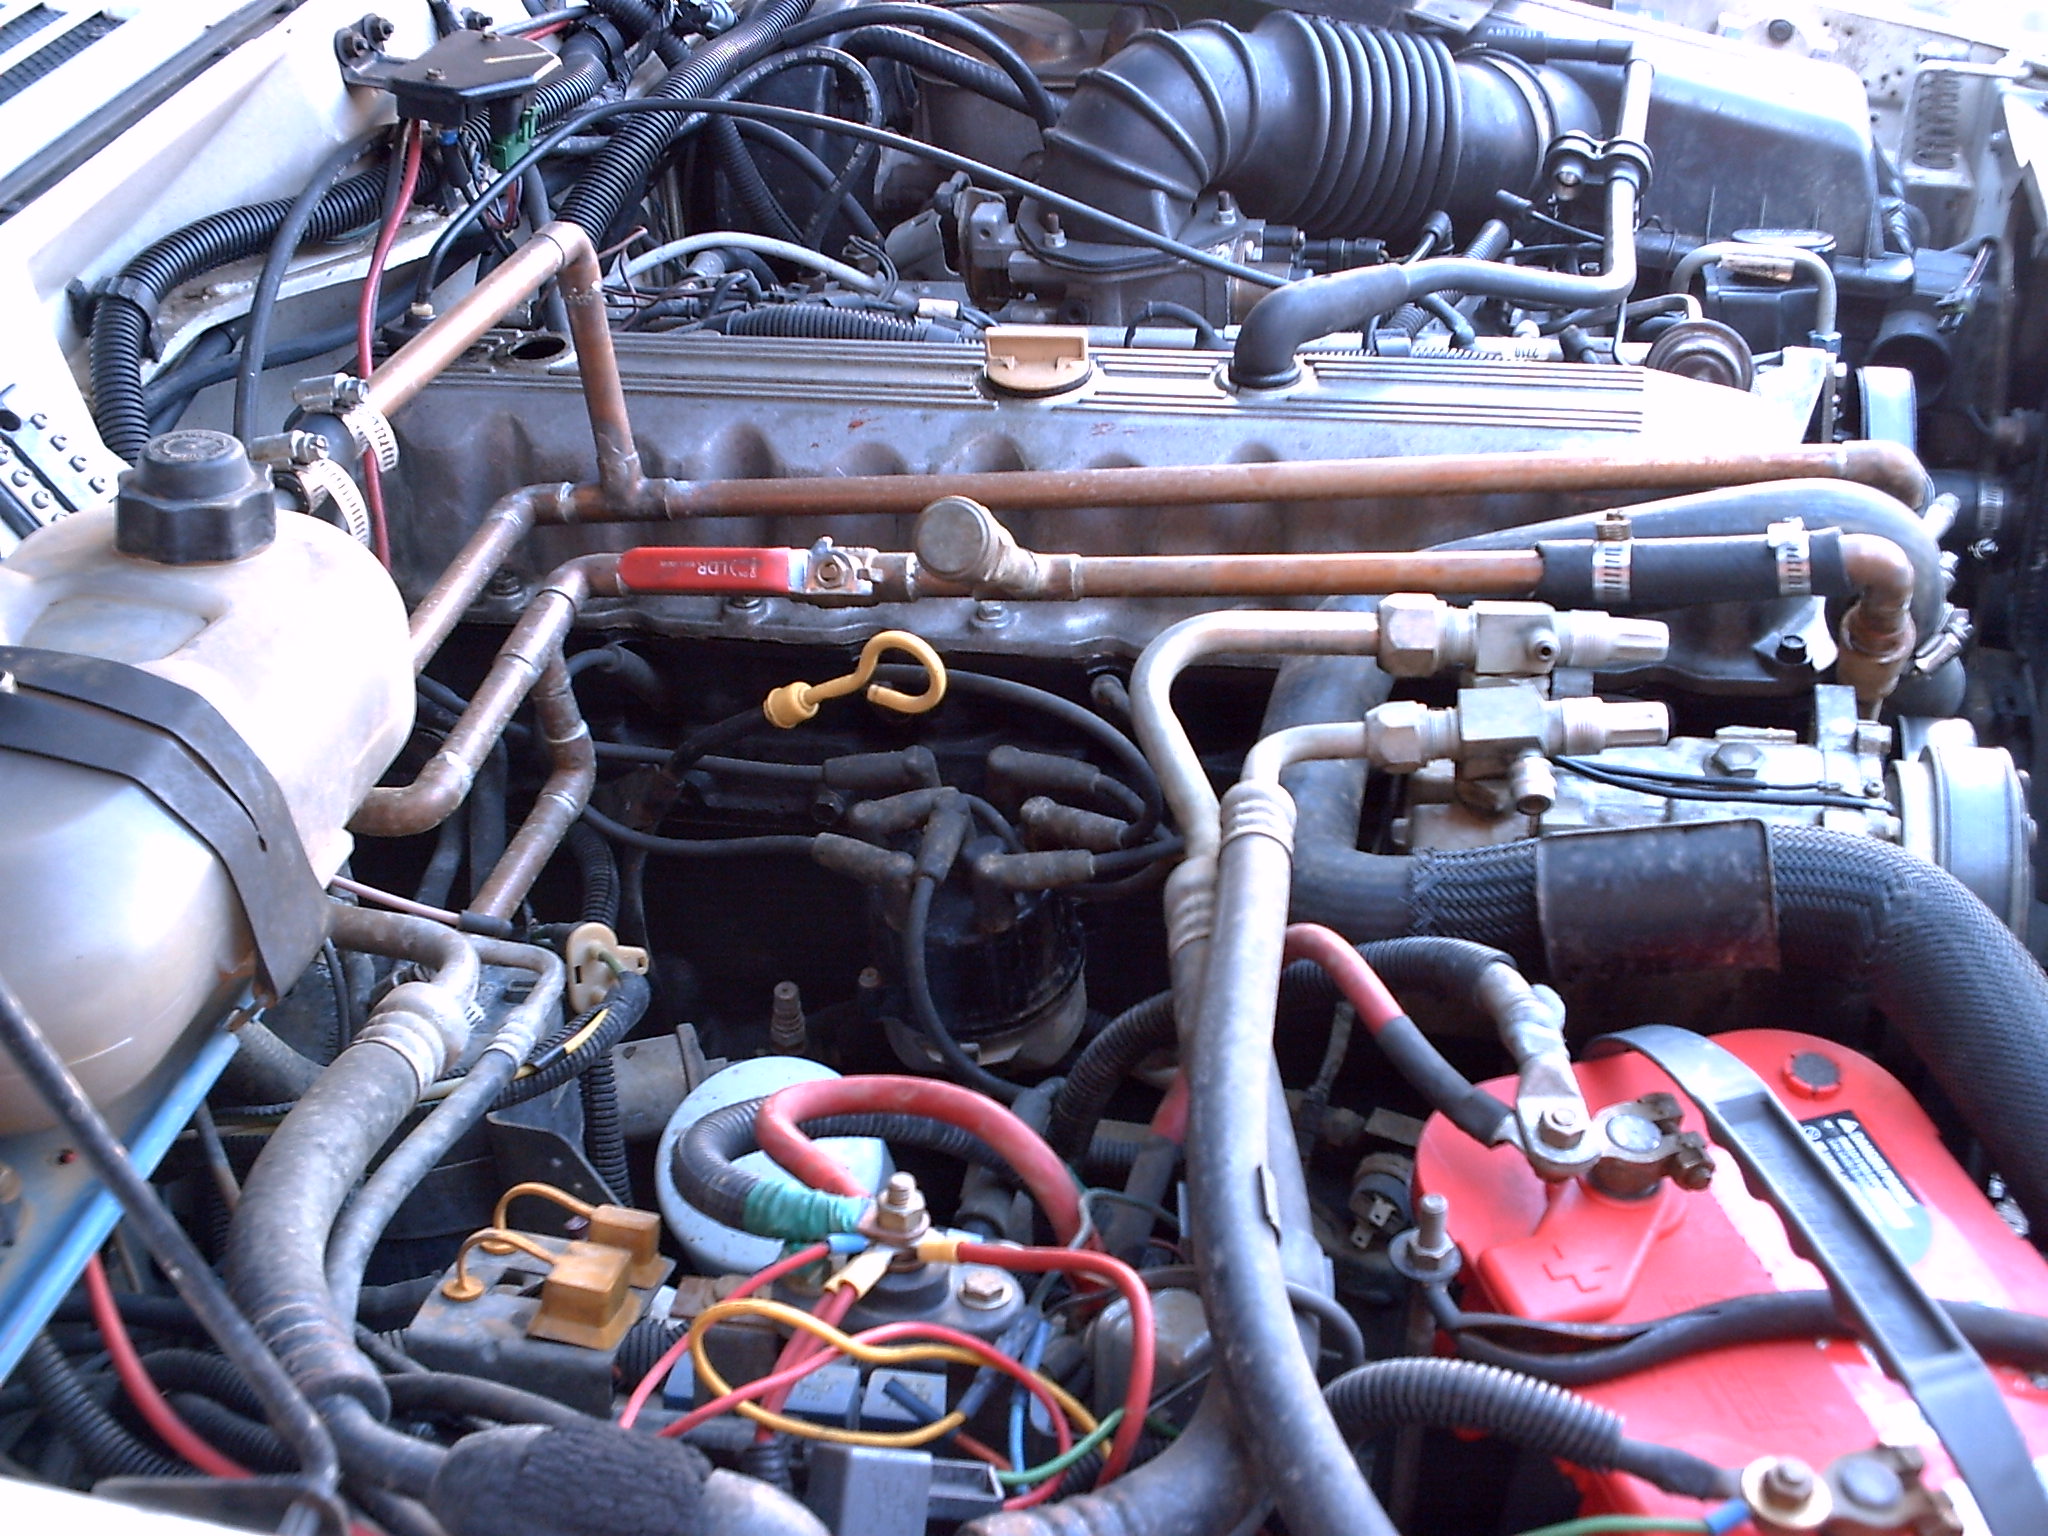
So, we decided to try something - instead of heater hoses the next time around, we got out a batch of copper pipe, fittings, a couple adapters, and the torch! The results were something like this:
Yes, it looks a little odd - but what "quick and dirty" doesn't? The point is, I've reduced the need for hoses to about a foot each of 5/8" and 3/4" hose - and you can buy that all together for less than two dollars! I've made a couple other modifications as well...
First, note the cap right next to the dipstick handle. That's a cap on a hose bibb adapter, and that's there so I don't have to go looking for a flush tee when it's time to backflush. Also, it won't break, and the hose stays on there until you take it off. The cap is also brass - the only part in there that might want changing is the rubber ring under the cap! Those are also cheap - they usually come in packs of ten at the hardware store for two or three dollars.
There's also a valve to the left of the hose bibb adapter. Why? It forces a reverse fluid flow while backflushing. Reversing the fluid flow (the whole point of a "backflush" - and how it gets its name!) results in much more deposits and debris being loosened up and getting drained from the system, which makes maintenance all the more effective.
There are only two problems I see with this idea:
- First, I don't know how interested everyone will be. I plan to clean this design up for my own use (I like it, and it's working well,) but I don't know if anyone else will want it. I'll have measurements for 1987-1990 XJ/MJ with 4.0, but anything else will require a "guinea pig" vehicle for me to work up the design on. It's up to you (but if you let me revise the design on your vehicle, we can probably come to an arrangement of mutual benefit.)
- Shipping. This is going to have to go into a fairly large box - bending it isn't a good idea, and since all the joins are soldered, I'll want to make sure they're all solid before it leaves here. Can't do that and keep it in a short box. Still, I'll ship it if you're willing to pay for it...