THE OPTIONS
|
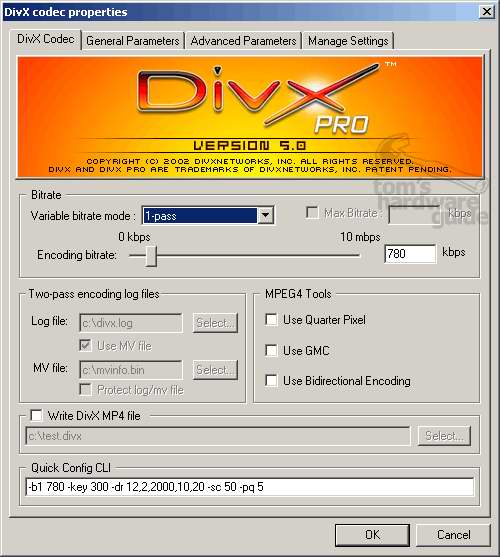
1-Pass: Which is suppose to be constant bitrate. This doesn't really mean constant bitrate, but I think I know what they mean by constant because it can be set to an almost constant bitrate using this mode. Nevertheless its default settings are definitely not constant bitrate. The confusion comes because in its 'constant bitrate mode' it uses quantizer settings (explained later) to control just how variable the bitrate will be. So on its default settings the so called "constant bitrate" really just means a normal variable bitrate (like the old Divx low motion codec). In laymens terms it means that on fast motion scenes we get more bitrate when needed and on low motion scenes we get less bitrate. So perhaps they should call it Average Bitrate (ABR) or just Standard Encoding or something a little less confusing? 1-Pass Quality-Based: Now that we've explained how constant bitrate isn't actually constant bitrate, we can now show you how the 1-pass encoding is just a weird name for the real constant bitrate option! Yes, using the 1-pass quality every single frame gets the same bitrate so it is supposed constant bitrate (CBR). Instead of letting us use a bitrate setting (i.e. numbers in kilobits per second), it uses a quality percent slider bar (D). I know I'm starting to sound sarcastic but its a bit of a confusing setup wouldn't you say? 2-Pass, first pass & 2-Pass, second pass: These two options are part of the same thing. They allow us to use 2-pass variable bitrate encoding. In other words, the first pass will examine the movie and make a log (stats) file with details about how many parts have high motion scenes and how many parts have low motion scenes. Then, with this information, it can calculate the best possible way to compress the movie into the size you you wish to fit it. Once the log file is made you can then choose the second pass option and the movie will finally be compressed based on this information. Please note that creating this log file takes the same amount of time as actually compressing the whole movie! Using the 2-pass variable bitrate option will give you the best possible quality! The price you have to pay for quality is, of course, the extra time it takes to make. |
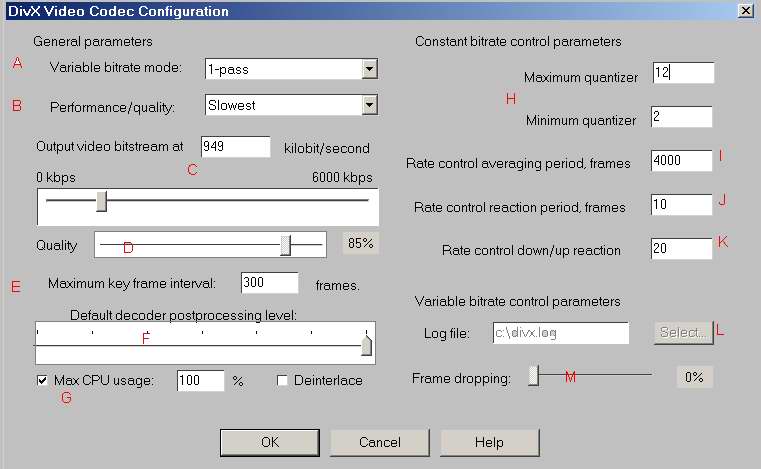
(B) 'Performance/quality'. This sets the amount of time the codec spends looking for the best way to compress each frame. The 'Slowest' setting takes the longest but produces the best quality compression and obviously the 'Fastest' setting spends the least time and so will make the worst quality. Mayo notes that the fastest quality is really meant for real time video capture.
(C) 'Output video bitstream'. This is where we put the bitrate for the movie you wish to encode just like we would do with any other of the Divx codecs. Along with the quantizer setting this option is the only setting that is really going to make a big difference to the final filesize and quality of your movie. To enter it you can either type the number or use the slider bar. I suggest you use a bitrate calculator to work out the best bitrate for your movie length. You are looking at between 650-1000 kbps for a single CD movie and between 1300 to 2000 for two CDs.
(D) 'Quality'. This is used solely for the '1-Pass Quality-Based' encoding option that I already explained previously. If you choose the 1-pass option this slider bar will be the only option you will be allowed to set. The quality will be constant for every frame making 1-pass encoding useful for making master copies that can be stored and edited later. At its default setting of 85% it will encode at about 780kbps constant bitrate (CBR). Just moving it a little bit more or less will make huge changes to the quality and filesize. I think 95% gives a good quality compression and you will end up with a movie usually under 2GB in size.
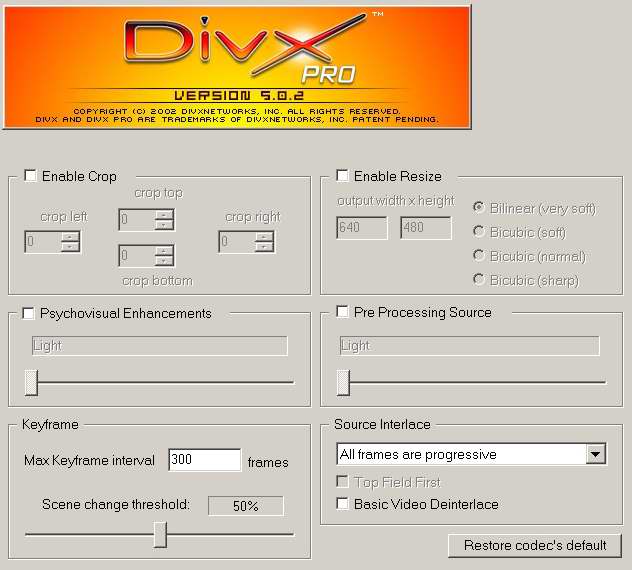
(E) 'Maximum key frame interval'. In a movie a scene change is described as when the camera switches from one person to the next. This produces a huge change in the picture. Since Mpeg compression is based on only saving the differences between two frames, if the next frame in the sequence is a completely different one from the last (as is the case for almost every scene change) then it is better to start each scene with a whole keyframe rather than one built out of blocks. And, since all the frames after the first one of a new scene are based on the first, they will all appear slightly better quality as a result of the correctly placed keyframe. In movies the average time between each keyframe is between 2 and 8 seconds. The Divx 4.0 codec is like Nandub in that it automatically inserts keyframes at scene changes. But no keyframe detection method is fool proof. So this 'Maximum key frame interval' option is built in for safety. All it does is put a keyframe if none are detected after the amount of frames you choose here. It is set at a default to inserting a keyframe once every 300 frames. This is basically the same as one keyframe every 10 seconds. I always leave this setting at default because I see no big reason to change it.
(F) 'Default decoder postprocessing level'. This is basically the same as the CPU setting in the old Divx 3.11 codec. But this time Mayo have allowed us to choose the default level. This setting has nothing to do with encoding quality, it only affects the default playback setting used in Media Player (or the official Playa). These settings can be changed manually by right-clicking in Media Player. The reason Media Player allows various CPU / Postprocessing options is because the faster your computer the better quality Media Player can play the movie. If you have a very fast computer you can set a default playback setting that includes both de-blocking and de-ringing filters. But what are these you ask?
|
Blocking (macroblock
artifacts) |
After the De-blocking
Filter |
 |
 |
As you can see above the biggest problem with any mpeg encoding is the macroblocks (blocking). The deblocking filter tries to blur the edges of these squares and make them blend together. Its a very very hard thing to do and is not always perfect. Some people prefer not to use the filter at all since it blurs the image somewhat, others have no choice since the CPU power of their machine is not enough.
|
Ringing (edge artifacts) |
After the De-ringing
Filter |
 |
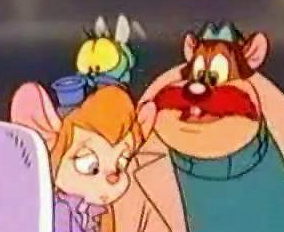 |
The Ringing artifacts are little bright glitches found around the sharp edges of a movie (hence they are more noticeable in cartoons). This is a result of the compression and is only really noticeable at low bitrates.
Regardless of what these filters do, both of them are used at the same time so we cannot turn individual ones on or off. But if we set the postprocessing level to 0 it will use no filters. An Mpeg file is basically a black and white movie with solid blocks of colour painted over the top! The black and white image will show most of the artifacts since the human eye cannot detect quick changes in colour as easily as it can shade. If we use setting 1, 2 and 3 it will use various quick 'n' dirty deblocking and deringing filters that only effect the shades and not the colour. If we go as high as settings 4, 5 and 6 the filters will effect all the colour parts too. Most people will find that their computer power will only allow them to use setting 1 or 2 otherwise the movie playback will not be very smooth. I usually use a default setting of 2 but just decide what you feel is best for you.
Now, back to the other settings:
(G) 'Max CPU usage'. This has absolutely nothing to do with video quality. If you are worried that the codec is not taking advantage of the full speed of your computer you can check this box. It will try to make sure that all CPU power has been devoted to encoding. If you check this you will probably have problems running any other program while you are encoding (or they will just run quite slow).
Deinterlace
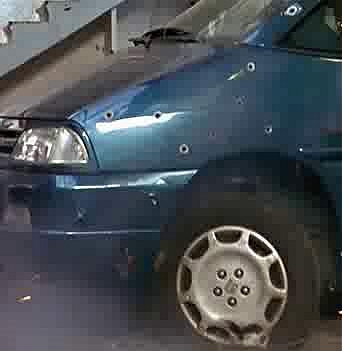
To the right of the CPU setting we are given the option to deinterlace our movie. To do this just make sure the deinterlace checkbox is ticked. Basically an interlace problem is when the original DVD looks like the picture below on the right.

The reason it looks like this is because the fields have been mixed up; part of two different frames are displayed weaved together! Mayo have tried to be kind to us and help solve this problem. Unfortunately their solution probably produces the worst results of any of the deinterlacers I've seen so far. As you can see from the above picture on the left, the Mayo deinterlacer appears to be a threshold based deinterlacer set at about 15%. This makes the final image contain a lot of ghosting. Did you also notice the gaps in the picture? I have no idea what caused them but I'm guessing its some kind of bug in the program.
In short, I suggest you use one of VirtualDub's Deinterlacers on your movie first, and always keep the Mayo one turned off! Of course you should never ever use a deinterlacer unless you have the above problem. I noticed that some people suggest that using it makes the final DivX movie smaller. Please don't do it for this reason! Yes, the movie is sometimes smaller but this is only because the deinterlacer blurs the image and makes compression easier. If you must blur your movie just use a VirtualDub noise or blur filter.
(H) 'Maximum quantizer & Minimum quantizer'. These offer the most control over the final file size and quality (at least when it comes to using the "constant bitrate" option). I'm not joking! If you set the bitrate setting of your movie at just 1 kbps it can still go over sized if you set the quantizers wrong and vice-versa, even at 6000 kbps you can have a seriously undersized movie! So what exactly do these settings do? These quantized values represent the compression levels the codec is trying to use on both fast motion and low motion scenes. Those who use Nandub will recognise these options as working in a similar way to its DRF compression levels. The lower the quantization setting the less compression will be used and the larger your movie will end up! Remember this rule, always!
To clarify further, to have a very highly compressed movie you want both the max and min quantizers set as high as you can get away with. The Mayo default settings are a pretty good all round settings that work quite well, but if you want better quality you do the following:
Minimum quantizer: If you start encoding a movie and notice the low motion scenes look blocky then you can try lowering the minimum quantizer (for less compression). Obviously this will take up more memory but you have to get a good balance. Its default value of 2 is good quality but you may wish to increase the compression level to between 4-5 for a single CD movie because its perhaps a bit too high.
Maximum quantizer: If you start encoding a movie and find that the fast motion (action) scenes go really blocky, then try lowering the maximum quantizer (for less compression). Again this will increase the amount of memory the movie will take. The default setting is 12 but this is not enough for me, I like my action scenes clear. I suggest you play about with lower settings of between 6-8 for better quality in single CD movies. Be careful with the max quantizer setting it can eat up memory really quickly and give you an oversized movie.
Obviously lowering both quantizer settings will make the movie larger so get the balance so you don't go oversized. Get the balance so both low motion scenes and high motion scenes encode well. It is possible to get almost perfect constant bitrate by setting both the max and min quantizer to the same number. But this will not give best quality if you need to fit a movie on a CD. The only advantage would be that the final filesize will be much more predictable.
Since I am pushing the DVD2AVI method of encoding I suggest you set the quantizers quite high. Then find some parts of the movie with action and do a few 30-60 second tests to see what they looks like. Lower the max value until you cannot hardly notice the blocks. Again find a low motion scene where people are just speaking or something and lower the value until you cannot hardly notice any blocks. You may find that you do not need to use the very slow 2-pass encode option for super quality if you do it this way.
In case any of you missed it, the Divx 4.0 codec is basically letting us do what we did with MakeFilm. It lets us set both the max and minimum compression values for our movies. With MakeFilm we needed to encode a separate low motion and high motion movie. The new Mayo codec does it all for us in one go and a lot faster may I add. This option is what I've been asking for since I first started using DivX. Now we have it neither Makefilm, FairUse, AVIRevolution nor DivXProject will do! Divx 4.0 has only one real contender when it comes to great options and that's Nandub the SBC encoder!
(I) 'Rate control averaging period, frames'. This controls how many frames are used for determining how the bitrate should be averaged out. The default setting of 2000 seems to work fine in most cases. Mayo say increasing this number should also increase the quality control, so experiment a little.
(J) 'Rate control reaction period, frames'. This seems to control a balance between high motion and low motion quality (although I'm not exactly sure of the process they are using). The default value of 10 seems to be fine for most movies. If you increase this number it will tend to favour high motion scenes making them look a bit better. But increasing this number may also make the low motion scenes look worse so a balance must be found.
(K) 'Rate control down/up reaction '. This controls the motion detection sensitivity. The higher the number we put the more sensitive to motion the codec will be. So if we set it very high it will think almost every scene is an action scene and increase the bitrate to keep high quality. Unfortunately this can increase the size of the movie too. The default value of 20 seems fine.
(L) 'Log file'. This is where the information from the 2-pass encoding is stored. You can rename it or use ones created by other people. You have to remember that when you are doing 2-pass encoding to keep the same video resolution and settings on the second pass as you did on the first.
(M) 'Frame Dropping'. This is not the same as the crispiness / smoothness settings of the old DivX codec! Firstly it only works with 2-pass variable bitrate encoding. And secondly the crispiness controls how many dropped frames you will get in your movie. A crispiness setting of 0 produces no dropped frames. The higher the crispiness setting the more frames will be dropped. Although this frame dropping saves a lot of memory if it is set too high the movie playback will tend to look slightly jerky. The reason crispiness only works on 2-pass encoding is because the Mayo DivX codec uses the log file to find places in your movie that it can best drop frames and not be noticed very much, such as very low motion scenes. Frame dropping is not the evil no no but probably just not needed for CD movies.
|
Note: to say that the Crispiness setting is not the same as the old DivX codec is not quite true. Dropping frames is a special feature that was added to the DivX codec to save memory on low bitrate movies. The old DivX codec used to base its frame dropping on the crispiness / smoothness settings of the movie. The smoothness and crispiness settings seemed to effect some kind of pre-filter that was designed to soften noise in the picture. The softer the picture the better it would compress and vice versa. Since the old DivX codec would encode each movie in small sections at a time (each containing only so many blocks), if the picture was too clear and sharp it would 'drop' frames to compensate and fit the movie into the block size. In effect using a high crispiness setting would produce a sharp picture but a jerky playback, while having a high smoothness setting would produce a smooth playback but a softer picture. |