Perhaps the first question you should ask yourself is, �Why do I want to lift my truck?� If you�re just doing it for the beefy looks, with no real intention of going off road, then you don�t have to worry about a lot of the stuff I�m going to talk about. You�ll probably be better off with a body lift or similar option, because suspension lifts and the associated parts can have adverse effects on your rig that may not be worth it to you.
Trail rigs, on the other hand, require more ingenuity to work properly. If you are building your vehicle to work hard, a lot of planning, time, labor, and cash is involved. Shortcuts here can be dangerous. You�ll want to do extensive research into the pros and cons for lifting your particular vehicle. Talk to people who have already lifted a vehicle like yours and find out what works and what doesn�t. You may not need all the fancy stuff that you see in the magazines, and you may need more. And, most important, set aside a budget in excess of $1,000 (excluding tires and gears, leaf sprung vehicles only, self-installed) for a properly lifted vehicle. The correct parts add up quickly. Know before you buy!
Installing a lift on a leaf sprung vehicle is not rocket science. It can be done by a competent mechanic without special tools in a couple of days (if all the parts are ready to go). The parts are bolt on and don�t require a lot of extra work (unless you�re installing new brake lines or pinion shims, which require adjustment for proper angle). It�s quite frustrating, as the underside of your rig is probably dirty and the parts are welded on by rust and dirt. But, with patience you won�t need to pay a shop several hundred bucks or more for labor. If you are having a shop install it, make sure you know exactly what they will do to it. Ask about the important stuff like rear springs, steering, shocks, and brake lines. Most often, they probably will try to tell you that it�s unnecessary. That�s when you should look for a new shop. Also keep in mind that installing all the necessary parts can bring the total up to $1,700 or more. You have to ask yourself if it�s worth getting a couple of busted knuckles over.
The next question is how tall do you want to lift it? The only practical reason for a lift stems from the fact that four-wheeling requires ground clearance. The first part of your vehicle to touch the ground is your axles. To raise the axles, bigger tires are needed. With bigger tires comes the need for lift kits. With all the problems that lifts can cause, it only makes sense that you shouldn�t go taller than your tires require. So, of course, you have to first decide how tall your tires need to be, then decide on the lift kit.
Body lifts are made up of solid blocks that space your vehicle�s body off of the frame. They DON�T raise the suspension or the drivetrain. So, while they make room for bigger tires, they don�t raise the vulnerable parts of your undercarriage. If you are building a show vehicle that only needs lift height, not lift functionality, then a body lift will probably work fine. You should, however, keep in mind that body lifts come with their own set of drawbacks. As many of your critical components are mounted to the frame, you will need to relocate and/or extend them to function properly. This includes relocating your bumpers back to the proper height, extending your shift levers, extending your steering shaft, and relocating the radiator to avoid being gouged by the newly lowered fan (it�s height stays the same while the radiator raises with the body). This can make the once attractive price of the body lift look downright ugly. I do not recommend getting a body lift. They are only a stopgap measure, and really aren�t worth the trouble. They also cause severe stress on the body when wheeling. The extra couple of inches produces leverage that could shear a body mounting bolt at extreme flex. If you do get a body lift, I definitely wouldn�t recommend more than two inches, and nothing homemade.
Suspension lifts use springs to raise the frame and body off the axles. With a rig that will be used to wheel, they are definitely the better choice. They are definitely more expensive and labor intensive, but well worth it on the trail. When choosing a suspension lift, remember that the taller you go, the more drawbacks their will be. All of these drawbacks require corrections.
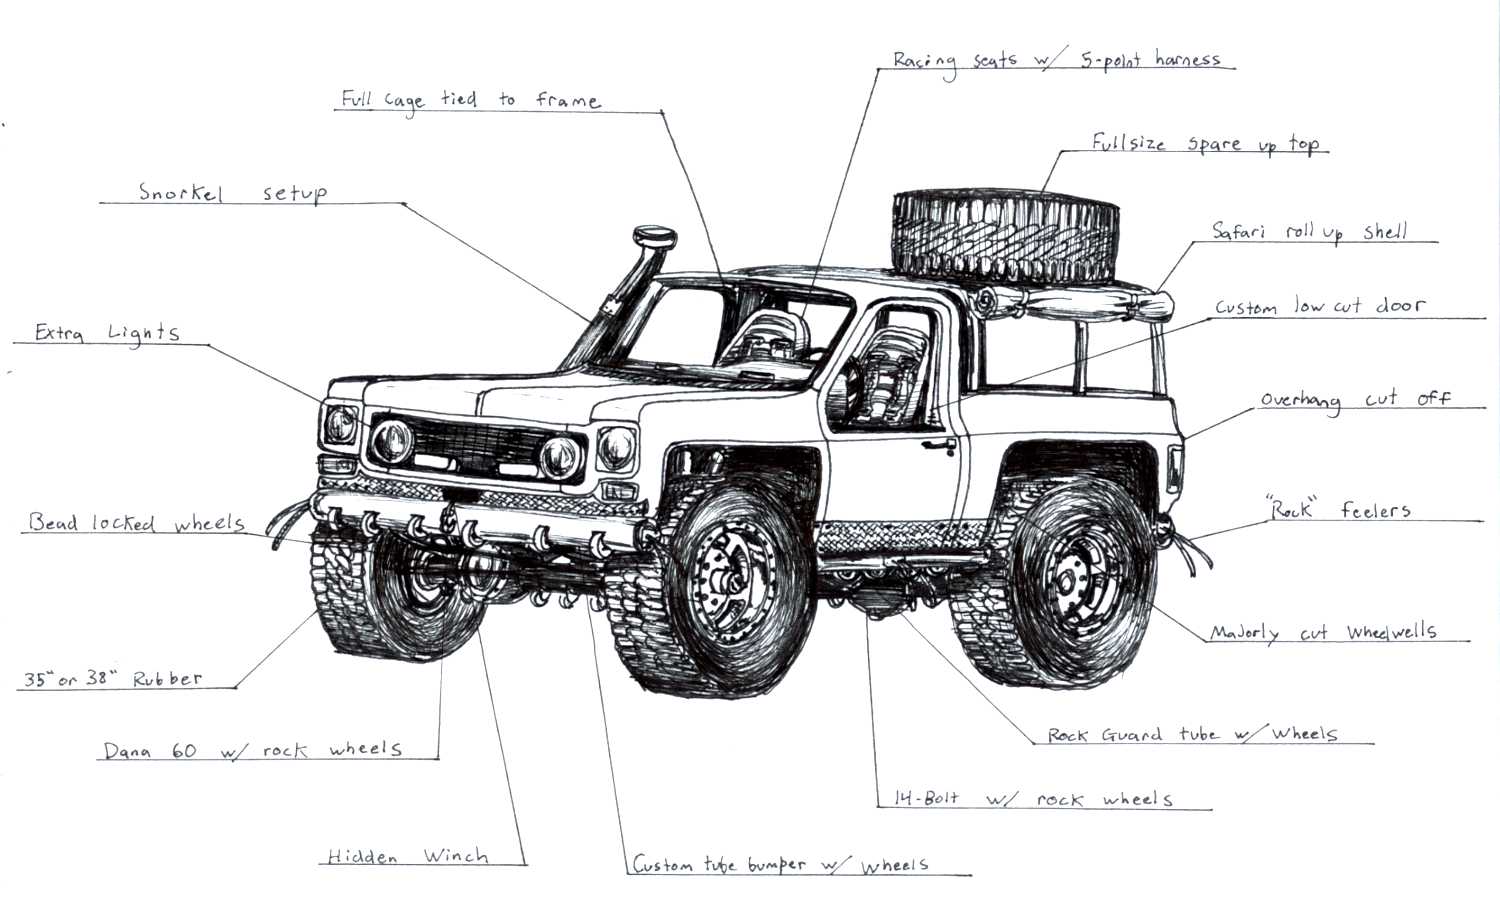
Bolting on a lift kit requires much more than the kit itself. You will need new shocks (1) to match the lift height, extended or dropped brake lines (2), extended driveshafts (3), longer shackles (4) (only SLIGHTLY longer to compensate for the longer springs, avoid shackles used to lift the vehicle), relocated bump stops (5), raised/extended steering components (6), swaybar spacers/disconnects (7), and pinion angle correction (8). Another thing to avoid (if at all possible) is getting lift blocks. Lift blocks are definitely cheaper, and they won�t stiffen your rear spring ride like a suspension lift will, but they cause other problems. Under heavy throttle, the added leverage of the blocks between the springs and the axles can cause axlewrap that will snap your driveshaft u-joints in a second. Plus, they are shifty under load and have been known to spit out at the most inopportune times. I would steer clear of them if I were you.
When choosing your specific lift, make sure you know what parts it will come with, such as bushings, shocks, etc. Not all lift kits are created equal! Keep in mind that once the vehicle is lifted it will never act or handle like it did stock.
1. The shocks will need to match the new lift to avoid overextension, and/or bottoming out. If either happens, it could bend or break the shock, the springs, or any number of other components.
2. Some lift kits come with brake line drop brackets, or they can be purchased separately. However, after about 4"� you�ll need to upgrade to extended hoses.
3. The driveshaft is only designed with a certain, limited, amount of travel in it. Even with a 2� lift, at extreme flex there is not enough travel to reach full extension. This can lead to separation at the slip yoke. Any driveshaft shop should be able to modify your existing one or build anew one.
4. As the springs get taller, they also get longer. With the extended length, as the spring gets flatter, it needs to travel farther back than the stock spring. This is where extended shackles come in. With extended shackles, the springs won�t hit the frame. Some people promote using 2 or 3� longer shackles as lifting devices. This is extremely unsafe and should be avoided at all costs. Offroad Design is one company that sells a heavy duty, slightly extended shackle that is ideal for this situation.
5. The bumpstops need to be moved up or down in accordance with the new lift. Every vehicle is different, and thus requires experimentation. Park with a wheel up on a rock or something and see if the springs are becoming stressed before they hit the bumpstop. If so, move the bumpstop down to hit the spring before it becomes overflattened. If they are hitting the spring before it is reaching near full compression, you can probably raise it to allow more travel. Make sure that everything in the suspension cycles fully without binding.
6. Steering problems are one of the main drawbacks of a suspension lift. As the frame goes further away from the steering components on the axle, it causes wander and binding that wasn�t there when stock. These problems can be solved (to a certain extent) by installing either a raised steering arm, a dropped drag link or pitman arm. At 2�, none are absolutely necessary, at 4� a dropped pitman arm or drag link is sufficient, at 6� a raised steering arm is best, and at 8� a combination of all three is needed. At 10� or more, custom or crossover steering is needed.
7. Swaybars go between the frame and axle, and drop spacers are a cost-effective way to lower them. But, I would recommend using a swaybar disconnect system, such as the one offered by Offroad Design. It adds space between the axle and the swaybar ends, but it also disconnects using pins to free your axle. This leads to majorly increased travel and flex. Then, when you�re done wheeling, it can be hooked back up for good road manners.
8. This is a subject I am not an expert at, but I can try to explain it. Your driveshafts are obviously not horizontal. The mechanism that allows them to operate at an angle is the universal joint. The universal joint, or �u-joint�, spins back and forth and around in circles at the same time. In other words, it speeds up and slows down so that the driveshaft can remain at a constant speed. It�s very hard to explain, but look at your driveshaft and you�ll be able to envision how they work. Anyway, they take a lot of abuse. The higher the angle that they work, at the more abuse they take, and the shorter they last. When stressed, they break easier and wear out faster. To fix this, it is necessary to rotate the axle housings up to relieve the angle that they work at (see drawing). This can be done with pinion angle shims or by cutting the knuckles off of the axles, rotating it, and re-welding the knuckles back on. As you can tell, this is serious business. Your best bet is to consult somebody that knows what they�re talking about or talking to a shop. This step can generally be avoided on lifts under 4�, especially with long wheelbase trucks.
So you�re looking for flex, huh? The first thing to remember about springs is that the taller they are, the stiffer they are. So, it makes sense to go with a mild lift height. This may not afford you the biggest tires, but the benefits of keeping all of the tires you do have in contact with the ground can offset that. Four wheeling is all about traction, and the easiest way to maintain traction is to maintain contact with the ground.
When looking for flex, it�s best to first start off with the simple stuff. For example, those polyurethane bushings may be great for handling, but they limit the spring�s ability to twist at certain angles. Rubber bushings are much more pliable and are the only way to go if you want flex. You can also make sure that none of your components are limiting the spring�s travel. While you don�t want to bend the spring over backwards, you do want it to be able to max out to its potential. Check to see that all brake lines, shocks, and the like are not the limiting factor in the equation. One simple trick is to disassemble the spring pack and insert teflon pads in between each leaf. This can reduce friction between them and lead to more flex. Make sure that everything with a Zerk fitting is greased, as this will also slicken the ride. All of this can be done to improve flex on a stock vehicle, but what do you want in a lift?
While I have said that lift blocks are to be avoided, it�s true that they can contribute to flex. By retaining the stock, semi-flat spring, it keeps the back half of the truck pretty flexy (compared to a stiffer lift spring). If you do go this route, make sure not to stack blocks, and avoid the throttle.
One thing never to do in order to gain flex is to install add-a-leaves. These are simply overload springs. While they do contribute height, they stiffen the ride immensely.
If you must have bigger tires than a mild lift will allow, you may need to come up with a custom spring mounting idea. Offroad design offers a trick rear shackle flip kit that gives 4� of lift with the stock springs. It also reduces pinion angle for increased u-joint life. As far as the fronts go, you pretty much have to get lift springs. Never, ever, install lift blocks on the front, as the steering and braking forces will spit them right out! I�ve seen extended (and properly welded) shackle mounts on the frame that look pretty good. This is done by taking a block of steel and inserting it between the frame and the solid spring mount, and doing the same thing on the shackle mount. The spring must be spaced evenly on both sides, or it will lead to funky pinion angles. This, of course, leads to broken u-joints. Make sure that ONLY an experienced welder and/or chassis mechanic performs this operation. Safety first!
Probably the best way to maintain flex and have bigger tires is to cut the fenders. This allows you to have huge tires with only moderate springs. The fenders on Chevy trucks can be cut a good 4� without any problems. You can probably do more with some relocation of certain equipment.
Keep in mind:
Bigger tires can also lead to a somewhat flexier ride. By producing more leverage on one side and weight on the other, it can serve to push the axle to a greater angle. Also, being �unsprung weight�, bigger tires will cycle the suspension more on road, and soak up a lot of the bumps.
Because not all springs and not all tires are as tall as they say they are, this is only a general guide. Some experimentation will be needed in each individual case.
31�s: Stock, no mods required
32�s: Depending on the brand of the tire, stock. You may also encounter slight fender rubbing
33�s: You�ll either need to trim the fenders moderately, or install a 2� lift
34/35�s: Either a 2� lift with a lot of trimming, or a 4� lift with possibly slight trimming depending on travel of the springs
36�s: A 6� lift or a 4� lift with monster trimming
38�s: A 6� lift with lots of trimming or an 8� lift
40�s: An 8� lift with trimming, or a 10� lift
42�s: A 10� lift, possibly trimming necessary
44�s: A 12� lift, or 8-10� lift with MONSTER trimming. It�s possible to avoid the need for a 12� lift if you really don�t care about your fenders. We�re talking 4-6� here.