Welcome To . . .
MWK Stationery Tutorial
Well here it is ~ a stationery tutorial. I hope you find
this tutorial helpful. I tried to include every detail and
make this very easy to follow. The tutorial begins with a
step-by-step process for creating your stationery picture
with Paint Shop Pro 6. The tutorial will end with a hyperlink
to two text files that you can copy and paste the html code
for setting up your stationery. One text file is the code and
the other text file explains what you need to change in the
code to add your stationery picture file; text font, color
and size along with the scrolling ticker. Now on with the
tutorial ~ enjoy and most of all ~ have fun! :o)
STEP ELEVEN
Now for the neat line to divide your graphic from
the note part of your stationery. (Please note: you
can skip this part and go to the next page if you do
not want a divider line). The choice is yours.
Add a new raster layer the same as you did in step 3.
Now choose the line button from the tool bar as shown
in the picture below and set the settings as shown.
Then click on the top of the box and hold the mouse
button down and drag the line to the bottom of the box.
Let go of the mouse button and there you have it a line
but wait there's more to do to this line.
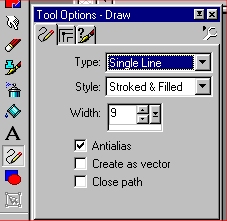
Step Eleven: Creating the Line
STEP TWELVE
Now go to Selections and Select None.
Then choose the magic wand tool from the tool
bar as shown in the picture below then click on
the line ~ this will select only the line.
Now go to Image, Effects, Inner Bevel.
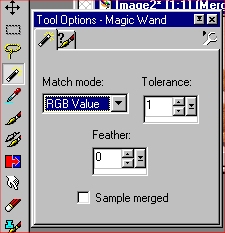
Step Twelve: Select your divider line
STEP THIRTEEN
Once you have selected the inner bevel effect make sure
the inner bevel settings are set-up as shown in the
picture below . . . Then click OK.
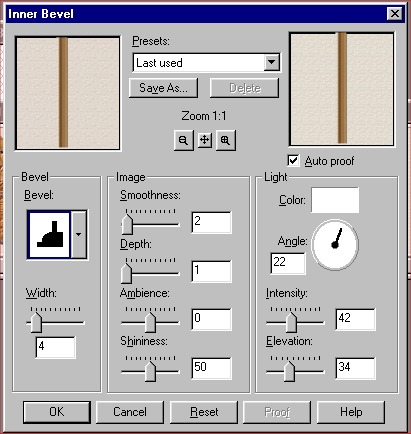
Step Thirteen: Adding life to your divider line!
STEP FOURTEEN
Your divider line should still be selected so now
it's time to give it a 3-D look! Go to Image, Effects
and Drop Shadow and make sure your drop shadow is set-up
the same as in the picture below . . . Then click OK.
After you add the drop shadow to your divider line you
will need to clean up the line on the top and bottom of
the line by using the rectangel selection tool and choosing
a middle section of the line and then copy and paste this
section over the top part of the line and then paste again
over the bottom of the line ~ this way the line will flow
smooth on your stationery. Be sure to select none when
you are finished cleaning up the divider line.
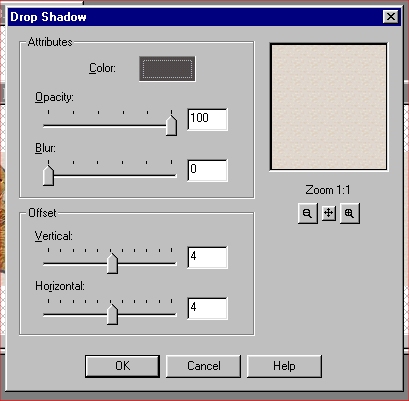
Step Fourteen: Add a drop shadow to your line!
Click here to CONTINUE
Click here to RETURN HOME