 |
|
|
|
|
|
|
|
|
|
|
|
|
|
|
|
|
|
|
|
|
|
|
|
|
|
|
|
|
|
|
|
|
|
|
|
|
|
|
|
|
|
|
|
|
|
|
|
|
|
|
|
|
|
|
|
|
|
|
|
|
|
|
|
|
|
|
|
|
|
|
|
|
|
|
|
|
|
|
|
|
|
|
|
|
|
|
|
|
 |
|
|
|
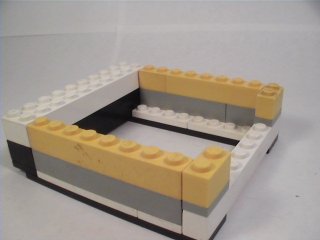
Step #4 |
|
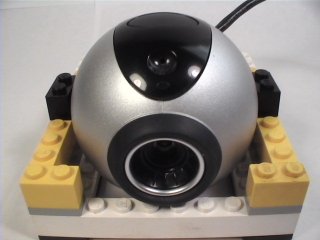
Adding the cam |
|
|
|
|
|
|
|
|
|
A |
|
|
|
 |
|
|
|
|
 |
|
|
|
|
|
|
|
Add two 8x1 bricks and two 2x1 bricks on the assembly as shown in yellow. |
|
|
|
|
|
|
 |
|
|
|
B |
|
|
|
|
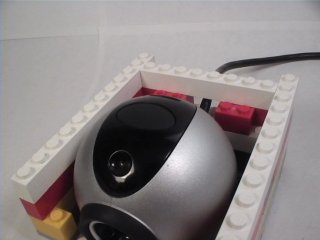
Place the cam with the axles on the cradle foundation four studs from the front, as pictured. |
|
|
|
|
|
|
|
|
Also, make sure the lip directly under the focus ring fits snugly against the 10x1 brick in the front, and that the cord travels OVER the backside of the cradle. |
|
|
|
|
|
C |
|
|
|
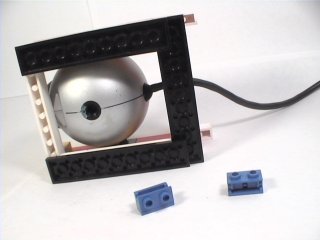
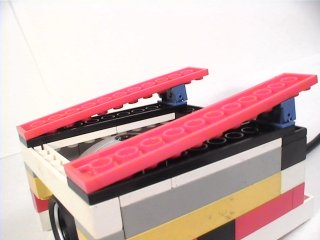
Place six 4x1 bricks and two 2x1 bricks around the top of the cradle as shown in red. |
|
|
|
|
|
|
|
|
|
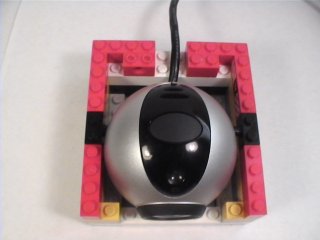
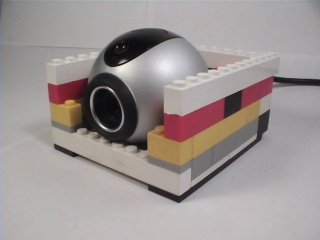
Securing the cam |
|
|
Step#5 |
|
|
|
|
|
|
|
|
|
|
 |
|
 |
|
|
|
|
|
A |
|
|
|
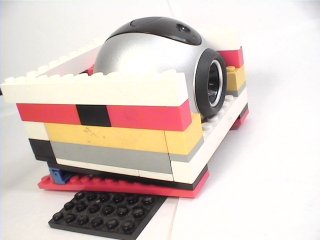
Place two 12x1 bricks along each side of the assembly and a 8x1 brick in the rear. |
|
|
|
|
Another angle showing the 8x1 brick placed over the cord.. |
|
|
|
|
|
|
|
|
B |
|
|
|
A 10x2 plate can be placed across the back of the assembly to further secure the structure. (Not shown) |
|
|
|
|
|
|
|
Step#6 |
|
Adding an Angle |
|
|
|
|
(Optional) |
|
|
|
|
|
|
|
|
|
|
|
|
This step is nessesary if you wish to adjust the angle of the cam while it is in the cradle. |
|
|
|
 |
|
|
|
 |
|
|
A |
|
|
|
|
|
|
|
|
|
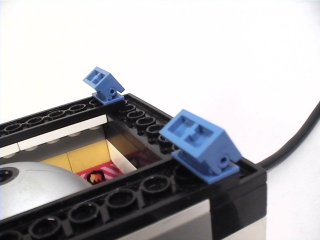
See the two little "Happy Birthday" hinges? |
|
|
|
|
|
|
Stick 'em here |
|
|
|
 |
|
|
 |
|
|
|
|
|
Add two 12x2 plates as shown. The angle can be increased by adding bricks under the hinges.. |
|
|
|
|
|
|
If your shot requires a rotation other that your LEGO(R) base plate will allow, add a large plate on the bottom and tape it down with masking tape. |
|
|
|
|
|
(Click "next" to continue) |
|
|
|
|
|
|
|
JFMP Home |
|
|
 |
|
|
 |
|
|
|
|
You're almost done... |
|
|
|
|
|
|
|
|
|