 |
|
 |

|
||||||||
|
|
| On your mark ......, Get Set..........., Go! | |
|
We start with opening our favorite Editor (mine is HomeSite 5) , copy n paste this code below and name it as HelloWorldSwing.java
and save this code in C:\javacodes directory Lines in Gray are the necessary import and class declaration Lines in red are required to build a small frame with min, max and close buttons Lines in Green are required to Exit the Swing Application on clicking the close button
import javax.swing.*;

public class HelloWorldSwing
{
    public static void main(String[] args)
    {
        JFrame frame = new JFrame("HelloWorldSwing");

        frame.setDefaultCloseOperation(JFrame.EXIT_ON_CLOSE);
        frame.pack();
        frame.setVisible(true);
    }
}

|
|
|
c:\>md swingcodes c:\>cd swingcodes c:\javacodes>set classpath= c:\javacodes>javac HelloWorldSwing.java c:\javacodes>java HelloWorldSwing |
|
You can see a small frame somewhere on the top of your screen with minimise, maximise
and close button, with HelloWorldSwing Title Embedded with it,
we will add a small text [Label] inside it , Concentrate on Lines in Blue
import javax.swing.*;

public class HelloWorldSwing
{
    public static void main(String[] args)
    {
        JFrame frame = new JFrame("HelloWorldSwing");

        final JLabel label = new JLabel("Hello World");
        frame.getContentPane().add(label);

        frame.setDefaultCloseOperation(JFrame.EXIT_ON_CLOSE);
        frame.pack();
        frame.setVisible(true);
    }
}
Recompile and Run the code again the output will be as 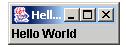
|
|
| Setting the Layout Manager | |
|
Since we are planning to build up a fairly big Application its always good to start of with a fine Swing
Skeleleton System, Requirements Are : 1) Min, Max, Close Button 2) Display Application Title, Set Height and Width of the Application 3) a Container which holds many panels and panel which can hold many components such as Label and TextBox 4) Close the Application when close Button is Clicked 5) Flowlayout is easiest layout like wriing on a paper top right to topleft and after that start in new line
//Requirements and Imports HelloWorldSwing.java
import java.awt.*;
import java.awt.event.*;
import javax.swing.*;

public class HelloWorldSwing extends JFrame
{
 //Main starts the Application and Initialises the Constructor
 public static void main(String args[])
 {
   HelloWorldSwing app = new HelloWorldSwing();
 }
 //Constructor Defines the Frame Title and calls Setup Method
 public HelloWorldSwing()
 {
  super("My Simple Application");
  setup();
  pack();
  show();
 }
 //Setup Method is responsible for Creating Panel, Defining Size, adding Componets to the Panel
 public void setup()
 {
  Container contentPane = getContentPane();
  contentPane.setLayout(new FlowLayout());
  JPanel jpanel1 = new JPanel();
  jpanel1 = new JPanel()
  {
   public Dimension getPreferredSize()
   {
    Dimension size = super.getPreferredSize();
    size.width = 300;
    size.height = 100;
    return size;
  }
 };
 JLabel label1 = new JLabel("My Label");
 jpanel1.add(label1);
 JTextField textbox1 = new JTextField("My TextBox",15);
 jpanel1.add(textbox1);
 contentPane.add(jpanel1);
 addWindowListener(new WindowEventHandler());

}
//WindowEventHandler is responside for Closing the Application when close is clicked
class WindowEventHandler extends WindowAdapter
{
  public void windowClosing(WindowEvent e)
  {
    System.exit(0);
  }
}
}
Recompile and Run the code again the output will be as 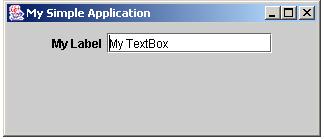
|
|
| setting Borders, Displaying Image | |
//Requirements and Imports HelloWorldSwing.java
import java.awt.*;
import java.awt.event.*;
import javax.swing.*;

public class HelloWorldSwing extends JFrame
{
 //Main starts the Application and Initialises the Constructor
 public static void main(String args[])
 {
   HelloWorldSwing app = new HelloWorldSwing();
 }
 //Constructor Defines the Frame Title and calls Setup Method
 public HelloWorldSwing()
 {
  super("My Simple Application");
  setup();
  pack();
  show();
 }
 //Setup Method is responsible for Creating Panel, Defining Size, adding Componets to the Panel
 public void setup()
 {
  Container contentPane = getContentPane();
  contentPane.setLayout(new FlowLayout());
  JPanel jpanel1 = new JPanel();
  jpanel1 = new JPanel()
  {
   public Dimension getPreferredSize()
   {
     Dimension size = super.getPreferredSize();
     size.width = 300;
     size.height = 100;
     return size;
   }
 };
 jpanel1.setBorder
 (BorderFactory.createTitledBorder(BorderFactory.createEtchedBorder(),"My Border 1"));
 JLabel label1 = new JLabel("My Label");
 jpanel1.add(label1);
 JTextField textbox1 = new JTextField("My TextBox",15);
 jpanel1.add(textbox1);
 JLabel label2 = new JLabel(new ImageIcon("think.gif"));
 jpanel1.add(label2);
 contentPane.add(jpanel1);

 addWindowListener(new WindowEventHandler());

 }
 //WindowEventHandler is responside for Closing the Application when close is clicked
 class WindowEventHandler extends WindowAdapter
 {
  public void windowClosing(WindowEvent e)
  {
    System.exit(0);
  }
 }
 }
Recompile and Run the code again the output will be as 
|
|
| Adding 2 More Panels which holds Radio Button and Check Boxes | |
|
We are at a crutial Point what we will do now is, so concentrate more on Panel2 and Panel3 1) Resize the First Pane we created 2) Add One more pane to Hold CheckBoxes 3) Add One more pane to Hold Radiobutton belonging to same Button Group 4) getPreferredSize() is responsible for the Size of Individual Panel height and width 5) ButtonGroup() is responsible for all 3 buttons belonging to same family, so only one gets selected at a time
//Requirements and Imports HelloWorldSwing.java
import java.awt.*;
import java.awt.event.*;
import javax.swing.*;

public class HelloWorldSwing extends JFrame
{
 //Main starts the Application and Initialises the Constructor
 public static void main(String args[])
 {
   HelloWorldSwing app = new HelloWorldSwing();
 }
 //Constructor Defines the Frame Title and calls Setup Method
 public HelloWorldSwing()
 {
  super("My Simple Application");
  setup();
  pack();
  show();
}
//Setup Method is responsible for Creating Panel, Defining Size, adding Componets to the Panel
public void setup()
{
Container contentPane = getContentPane();
contentPane.setLayout(new FlowLayout());

   //Panel 1 Start -------------------------------------------
   JPanel jpanel1 = new JPanel();
   jpanel1 = new JPanel()
   {
      public Dimension getPreferredSize()
      {
         Dimension size = super.getPreferredSize();
         size.width = 250;
         size.height = 150;
         return size;
      }
   };
   jpanel1.setBorder
   (BorderFactory.createTitledBorder(BorderFactory.createEtchedBorder(),"Border 1"));
   JLabel label1 = new JLabel("My Label");
   jpanel1.add(label1);
   JTextField textbox1 = new JTextField("My TextBox",15);
   jpanel1.add(textbox1);
   JLabel label2 = new JLabel(new ImageIcon("think.gif"));
   jpanel1.add(label2);
   contentPane.add(jpanel1);

  //Panel 2 Start -------------------------------------------
  JPanel jpanel2 = new JPanel();
  jpanel2 = new JPanel()
  {
   public Dimension getPreferredSize()
   {
     Dimension size = super.getPreferredSize();
     size.width = 150;
     size.height = 150;
     return size;
   }
  };
  jpanel2.setBorder
   (BorderFactory.createTitledBorder(BorderFactory.createEtchedBorder(),"Border 2"));
  JCheckBox checkbox1 = new JCheckBox("Check Box1");
    jpanel2.add(checkbox1);
  JCheckBox checkbox2 = new JCheckBox("Check Box2");
    checkbox2.setSelected(false);
  jpanel2.add(checkbox2);
    JCheckBox checkbox3 = new JCheckBox("Check Box3");
  checkbox3.setSelected(true);
    jpanel2.add(checkbox3);
  JButton button1 = new JButton("My Button");
    jpanel1.add(button1);
  contentPane.add(jpanel2);

 //Panel 3 Start -------------------------------------------
 ButtonGroup bg = new ButtonGroup();
 JPanel jpanel3 = new JPanel();
 jpanel3 = new JPanel()
 {
   public Dimension getPreferredSize()
   {
     Dimension size = super.getPreferredSize();
     size.width = 150;
     size.height = 150;
     return size;
   }
  };
jpanel3.setBorder(BorderFactory.createTitledBorder(BorderFactory.createEtchedBorder(),"Border 3"));
  JRadioButton radio1 = new JRadioButton("Radio Button1",true);
    jpanel3.add(radio1);
    bg.add(radio1);
  JRadioButton radio2 = new JRadioButton("Radio Button2",false);
    jpanel3.add(radio2);
    bg.add(radio2);
  JRadioButton radio3 = new JRadioButton("Radio Button3",false);
    jpanel3.add(radio3);
    bg.add(radio3);
  contentPane.add(jpanel3);

	   addWindowListener(new WindowEventHandler());
	}
	//WindowEventHandler is responside for Closing the Application when close is clicked
	class WindowEventHandler extends WindowAdapter
	{
	    public void windowClosing(WindowEvent e)
	    {
		   System.exit(0);
	    }
	}
}
Recompile and Run the code again the output will be as 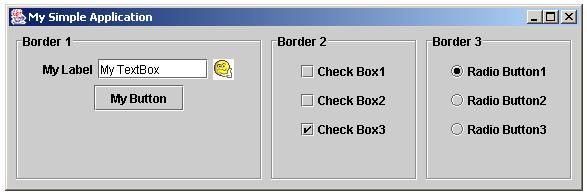
|
|
| Mastering Gridbag Layout - Swing is All About Layouts and Placements | |
|
Once u are Familiar with the above layout placement , u can read more about working with layouts on
Suns Official Website , now we move on the the most complex layout that is GridBag Layout First switch off your computer monitor (Not if u are reading this :-) ) take a paper and draw your screen in rows and cols forming a Matrix 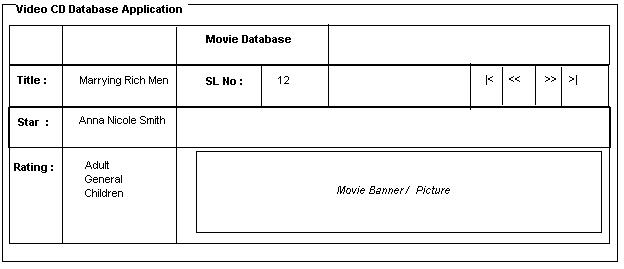
Now Observer the Matrix first box is 0,0 , 0th rows and 0th cols Row 0 => Label Movie Database in 2nd Col , width = 2cols Row 1 => Title Col 0 :: Actual Number Col 1 :: SL No Col 2 :: Actual No Col 3 ::Col 4 Blank :: Col5 first Button :: Col6 Prev :: Col7 Next :: Col8 Last Row 2 => Label Star Name in 0th Col :: Actual Name in Col 1 Row 3 => Label Raings in 0th Col :: Ratings Radio Buttons in Col 1 :: Image Corresponding to CD Since This is Fairly Large Code what we will do now is Develop First 3 Rows First later go for the 4th Row Ofcourse there will be slight deviation over the plan on paper and placing of components as a programmer u would agree with that, Swing is not as Easy as Drawing on a paper you would tell this your Superior
import java.awt.*;
import java.awt.event.*;
import javax.swing.*;

public class GBLayout extends JFrame
{
 public static void main(String args[])
 {
   GBLayout app = new GBLayout();
 }
 public GBLayout()
 {
   super("James Smith's Java");
   setup();
   pack();
   show();
 }
 public void setup()
 {
   Font dataFont = new Font("courier new",Font.PLAIN,12);
   Font titleFont = new Font("courier new",Font.BOLD,14);
   Font titleFont1 = new Font("courier new",Font.BOLD,12);

   GridBagLayout gridbag = new GridBagLayout();
   GridBagConstraints c = new GridBagConstraints();
   c.fill = GridBagConstraints.HORIZONTAL;

   Container contentPane = getContentPane();
   contentPane.setLayout(gridbag);

   JPanel jpanel1 = new JPanel();
   jpanel1 = new JPanel()
   {
     public Dimension getPreferredSize()
     {
  	   Dimension size = super.getPreferredSize();
  	   size.width = 700;
       size.height = 100;
  	   return size;
     }
   };
  jpanel1.setBorder
  (BorderFactory.createTitledBorder(BorderFactory.createEtchedBorder(),
  "Video CD Database Application"));
  jpanel1.setLayout(gridbag);

  // Row 1 Components -------------------------------------------
  JLabel jlabel1 = new JLabel(" Movie Database  ");
  jlabel1.setFont(titleFont);
  c.fill = GridBagConstraints.BOTH;
  c.weightx = 0.5; //Makes Component Spread Wider
  c.gridwidth = 1; //1 columns wide
  c.gridx = 2;     //3rd Col  -- Very Important
  c.gridy = 0;     //0th Row  -- Very Important
  gridbag.setConstraints(jlabel1, c);
  jpanel1.add(jlabel1);

  // Row 2 Components -------------------------------------------
  JLabel jlabel2 = new JLabel(" Title : ");
  jlabel2.setFont(titleFont1);
  c.fill = GridBagConstraints.BOTH;
  c.ipady = 1;
  c.ipadx = 1;
  c.gridx = 0;
  c.gridy = 1;
  gridbag.setConstraints(jlabel2, c);
  jpanel1.add(jlabel2);

  JLabel jlabel3 = new JLabel(" Marrying Rich Men ");
  jlabel3.setFont(dataFont);
  c.fill = GridBagConstraints.BOTH;
  c.ipady = 1;
  c.ipadx = 1;
  c.gridx = 1;
  c.gridy = 1;
  gridbag.setConstraints(jlabel3, c);
  jpanel1.add(jlabel3);

  JLabel jlabel4 = new JLabel(" Sl No : ");
  jlabel4.setFont(titleFont1);
  c.fill = GridBagConstraints.BOTH;
  c.ipady = 1;
  c.ipadx = 1;
  c.gridx = 2;
  c.gridy = 1;
  gridbag.setConstraints(jlabel4, c);
  jpanel1.add(jlabel4);

  JLabel jlabel5 = new JLabel(" 12 ");
  jlabel5.setFont(dataFont);
  c.fill = GridBagConstraints.WEST;
  c.ipady = 1;
  c.ipadx = 1;
  c.gridx = 3;
  c.gridy = 1;
  c.insets = new Insets(0,0,0,20);  //(top.left,bottom,right) Padding
  gridbag.setConstraints(jlabel5, c);
  jpanel1.add(jlabel5);

  JButton buttonF = new JButton(new ImageIcon("first.gif"));
  c.fill = GridBagConstraints.BOTH;
  c.ipady = 1;
  c.ipadx = 1;
  c.gridx = 4;
  c.gridy = 1;
  c.insets = new Insets(0,0,0,0);
  gridbag.setConstraints(buttonF, c);
  jpanel1.add(buttonF);

  JButton buttonP = new JButton(new ImageIcon("back.gif"));
  c.fill = GridBagConstraints.BOTH;
  c.ipady = 1;
  c.ipadx = 1;
  c.gridx = 5;
  c.gridy = 1;
  gridbag.setConstraints(buttonP, c);
  jpanel1.add(buttonP);

  JButton buttonN = new JButton(new ImageIcon("next.gif"));
  c.fill = GridBagConstraints.BOTH;
  c.ipady = 1;
  c.ipadx = 1;
  c.gridx = 6;
  c.gridy = 1;
  gridbag.setConstraints(buttonN, c);
  jpanel1.add(buttonN);

  JButton buttonL = new JButton(new ImageIcon("last.gif"));
  c.fill = GridBagConstraints.BOTH;
  c.ipady = 1;
  c.ipadx = 1;
  c.gridx = 7;
  c.gridy = 1;
  gridbag.setConstraints(buttonL, c);
  jpanel1.add(buttonL);

  //Row 3 Components -----------------------------------------
  JLabel jlabel6 = new JLabel(" Star : ");
  jlabel6.setFont(titleFont1);
  c.fill = GridBagConstraints.BOTH;
  c.ipady = 1;
  c.ipadx = 1;
  c.gridx = 0;
  c.gridy = 2;
  gridbag.setConstraints(jlabel6, c);
  jpanel1.add(jlabel6);

  JLabel jlabel7 = new JLabel(" Anna Nicole Smith ");
  jlabel7.setFont(dataFont);
  c.fill = GridBagConstraints.BOTH;
  c.ipady = 1;
  c.ipadx = 1;
  c.gridx = 1;
  c.gridy = 2;
  gridbag.setConstraints(jlabel7, c);
  jpanel1.add(jlabel7);

  addWindowListener(new WindowEventHandler());
  contentPane.add(jpanel1);
}

 class WindowEventHandler extends WindowAdapter
 {
   public void windowClosing(WindowEvent e)
   {
     System.exit(0);
   }
 }
}

|
|
| Since we have gone too far without Theory ! Have Coffee and Go through some Theory | |

|
|
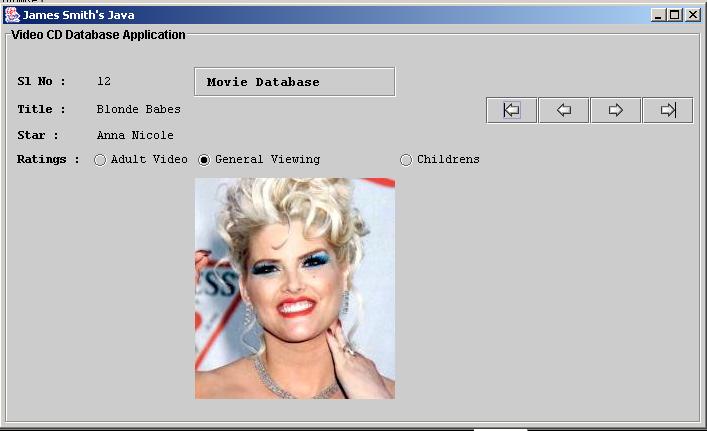
| Coming Back to Our Code , we will build the Third Row with the Image Display | |
|
Now concentrate on Adding Radio Buttons in Blue and Observe the useage of ButtonGroup() Increase the Preferred Size in Red Observe how images are inside labels using ImageIcon() in Green
import java.awt.*;
import java.awt.event.*;
import javax.swing.*;

public class GBLayout extends JFrame
{
  public static void main(String args[])
  {
    GBLayout app = new GBLayout();
  }
  public GBLayout()
  {
    super("James Smith's Java");
    setup();
    pack();
    show();
 }
 public void setup()
 {
   Font dataFont = new Font("courier new",Font.PLAIN,12);
   Font titleFont = new Font("courier new",Font.BOLD,14);
   Font titleFont1 = new Font("courier new",Font.BOLD,12);

   GridBagLayout gridbag = new GridBagLayout();
   GridBagConstraints c = new GridBagConstraints();
   c.fill = GridBagConstraints.HORIZONTAL;

   Container contentPane = getContentPane();
   contentPane.setLayout(gridbag);

   JPanel jpanel1 = new JPanel();
   jpanel1 = new JPanel()
   {
     public Dimension getPreferredSize()
     {
     Dimension size = super.getPreferredSize();
     size.width = 700;
     size.height = 400;
     return size;
     }
   };
   jpanel1.
   setBorder(BorderFactory.
   createTitledBorder(BorderFactory.createEtchedBorder(),"Video CD Database Application"));
   jpanel1.setLayout(gridbag);

   // Row 1 Components -------------------------------------------
   JLabel jlabel4 = new JLabel(" Sl No : ");
   jlabel4.setFont(titleFont1);
   c.fill = GridBagConstraints.BOTH;
   c.ipady = 1;
   c.ipadx = 1;
   c.gridx = 0;
   c.gridy = 0;
   gridbag.setConstraints(jlabel4, c);
   jpanel1.add(jlabel4);

   JLabel jlabel5 = new JLabel(" 12 ");
   jlabel5.setFont(dataFont);
   c.fill = GridBagConstraints.BOTH;
   c.ipady = 1;
   c.ipadx = 1;
   c.gridx = 1;
   c.gridy = 0;
   gridbag.setConstraints(jlabel5, c);
   jpanel1.add(jlabel5);

  JLabel jlabel1 = new JLabel(" Movie Database  ");
  jlabel1.setBorder(BorderFactory.createTitledBorder(BorderFactory.createEtchedBorder()));
  jlabel1.setFont(titleFont);
  c.fill = GridBagConstraints.BOTH;
  c.weightx = 0.5;
  c.gridx = 2;       	//3rd Col  -- Very Important
  c.gridy = 0;       	//0th Row  -- Very Important
  gridbag.setConstraints(jlabel1, c);
  jpanel1.add(jlabel1);
  // Row 2 Components -------------------------------------------
  JLabel jlabel2 = new JLabel(" Title : ");
  jlabel2.setFont(titleFont1);
  c.fill = GridBagConstraints.BOTH;
  c.ipady = 1;
  c.ipadx = 1;
  c.gridx = 0;
  c.gridy = 1;
  gridbag.setConstraints(jlabel2, c);
  jpanel1.add(jlabel2);

  JLabel jlabel3 = new JLabel(" Blonde Babes ");
  jlabel3.setFont(dataFont);
  c.fill = GridBagConstraints.BOTH;
  c.ipady = 1;
  c.ipadx = 1;
  c.gridx = 1;
  c.gridy = 1;
  gridbag.setConstraints(jlabel3, c);
  jpanel1.add(jlabel3);

  JButton buttonF = new JButton(new ImageIcon("first.gif"));
  c.fill = GridBagConstraints.BOTH;
  c.ipady = 1;
  c.ipadx = 1;
  c.gridx = 4;
  c.gridy = 1;
  c.insets = new Insets(0,0,0,0);
  gridbag.setConstraints(buttonF, c);
  jpanel1.add(buttonF);

  JButton buttonP = new JButton(new ImageIcon("back.gif"));
  c.fill = GridBagConstraints.BOTH;
  c.ipady = 1;
  c.ipadx = 1;
  c.gridx = 5;
  c.gridy = 1;
  gridbag.setConstraints(buttonP, c);
  jpanel1.add(buttonP);

  JButton buttonN = new JButton(new ImageIcon("next.gif"));
  c.fill = GridBagConstraints.BOTH;
  c.ipady = 1;
  c.ipadx = 1;
  c.gridx = 6;
  c.gridy = 1;
  gridbag.setConstraints(buttonN, c);
  jpanel1.add(buttonN);

  JButton buttonL = new JButton(new ImageIcon("last.gif"));
  c.fill = GridBagConstraints.BOTH;
  c.ipady = 1;
  c.ipadx = 1;
  c.gridx = 7;
  c.gridy = 1;
  gridbag.setConstraints(buttonL, c);
  jpanel1.add(buttonL);

  //Row 3 Components -----------------------------------------
  JLabel jlabel6 = new JLabel(" Star : ");
  jlabel6.setFont(titleFont1);
  c.fill = GridBagConstraints.BOTH;
  c.insets = new Insets(5,0,0,0);
  c.ipady = 1;
  c.ipadx = 1;
  c.gridx = 0;
  c.gridy = 2;
  gridbag.setConstraints(jlabel6, c);
  jpanel1.add(jlabel6);

  JLabel jlabel7 = new JLabel(" Anna Nicole ");
  jlabel7.setFont(dataFont);
  c.fill = GridBagConstraints.BOTH;
  c.ipady = 1;
  c.ipadx = 1;
  c.gridx = 1;
  c.gridy = 2;
  gridbag.setConstraints(jlabel7, c);
  jpanel1.add(jlabel7);

  //Row 4 ---------------------------------------------------
  JLabel jlabel8 = new JLabel(" Ratings : ");
  jlabel8.setFont(titleFont1);
  c.fill = GridBagConstraints.BOTH;
  c.insets = new Insets(5,0,0,0);
  c.ipady = 1;
  c.ipadx = 1;
  c.gridx = 0;
  c.gridy = 3;
  gridbag.setConstraints(jlabel8, c);
  jpanel1.add(jlabel8);

  ButtonGroup bg = new ButtonGroup();
  JRadioButton radio1 = new JRadioButton("Adult Video",false);
  radio1.setFont(dataFont);
  c.fill = GridBagConstraints.BOTH;
  c.ipady = 1;
  c.ipadx = 1;
  c.gridx = 1;
  c.gridy = 3;
  bg.add(radio1);
  gridbag.setConstraints(radio1, c);
  jpanel1.add(radio1);

  JRadioButton radio2 = new JRadioButton("General Viewing",true);
  radio2.setFont(dataFont);
  c.fill = GridBagConstraints.BOTH;
  c.ipady = 1;
  c.ipadx = 1;
  c.gridx = 2;
  c.gridy = 3;
  bg.add(radio2);
  gridbag.setConstraints(radio2, c);
  jpanel1.add(radio2);

  JRadioButton radio3 = new JRadioButton("Childrens",false);
  radio3.setFont(dataFont);
  c.fill = GridBagConstraints.BOTH;
  c.ipady = 1;
  c.ipadx = 1;
  c.gridx = 3;
  c.gridy = 3;
  bg.add(radio3);
  gridbag.setConstraints(radio3, c);
  jpanel1.add(radio3);

  // Row 5 -------------------------------------------
  JLabel labelim = new JLabel(new ImageIcon("Anna.jpg"));
  labelim.setFont(dataFont);
  c.fill = GridBagConstraints.BOTH;
  c.ipady = 1;
  c.ipadx = 1;
  labelim.setPreferredSize(new Dimension(200, 221));
  c.gridx = 2;
  c.gridy = 4;
  gridbag.setConstraints(labelim, c);
  jpanel1.add(labelim);

  addWindowListener(new WindowEventHandler());
  contentPane.add(jpanel1);
}
 class WindowEventHandler extends WindowAdapter
 {
  public void windowClosing(WindowEvent e)
  {
    System.exit(0);
  }
 }
}
|
|
|
What Next ? Mastering Java Swing Part 2 : Building Menus and Event Handling Making Applications Look WOW ..... |
|
| My Dream to be your Friend and Create a Group of Intelligent and Understanding Programmers | |
|
|
|
in the United States and other countries. |
 If you like this article and/or code
  Kind Regards - James Smith