 


|
Darning
Once you have your mesh stretched in a frame, the next
step is to decorate it. This requires only a needle and a
pattern. I prefer a medium crewel needle, with not too
sharp a point. But most any needle will serve, so long as
the eye is large enough to carry your thread. As for
patterns, I will address that in a moment.
But what thread do you darn with? Generally, I use the
same thread I used to make the mesh. If I used #30 white
crochet cotton to make the mesh, then #30 white cotton is
what I darn with. But monochrome, while popular, is
certainly not your only option. In period, lace was done
in different colors; a portrait of Elizabeth I shows her
wearing a cloak decorated with black mesh; the mesh had
been darned with red and gold threads. (Queen Elizabeth's
Wardrobe Unlock'd, by Janet Arnold). Very late-period
Spanish examples has mesh being darned not only with
different colors of thread, but with different sizes. A
heavy thread in a fine-thread mesh -- or vice versa --
can create some very interesting effects.
So, you have your mesh, your needle, and have chosen your
darning thread,
what next?
Buttonhole stitch
|
First you
want to finish the edge of your work,
particularly if you are working in square mesh.
Thread your needle with a good length of thread.
Tie the trailing end of your thread tightly - a
firm square knot will do - to the edge of your
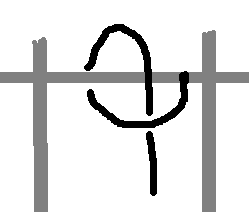
mesh. Make buttonhole stitches around the outer
thread of the mesh. (Figure 1 is a simple diagram
of the buttonhole stitch, if you’re not
familiar with it).
|
When you run out of thread, take a couple tight stitches,
and cut away the remaining thread; leave a tail a couple
inches long dangling. Tie on the new thread, just as
before, catching the dangling tail in the knot. Now,
continue the buttonhole stitch, covering the dangling
tail of your previous thread (and your new tie-in), so
that they is hidden under the buttonholes. After about
ten stitches, cut off the remainder of the tails, close
to the knotting. This makes your thread change almost
invisible.
When you have completely bound the edge, you are ready to
being darning the pattern.
Darning stitch |
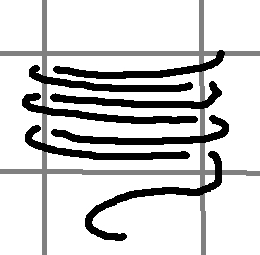
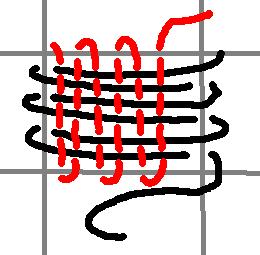
Probably
the simplest decorating stitch available to you
is the Darning stitch. It is the simplest stitch,
being simply an over-under basketweave. Carry the
thread under the left hand mesh thread, then back
and over the right. Next over the left, and over
the right. Just like weaving a basket. If
you’re doing longer stretches, it simply
carries on with the original basketweave
over-under, going over and under alternately
until you reach the end of the row you want to
cover. Whole patterns can be worked just in this
one simple stitch. |
Darning
stitch carried across several meshes
Cloth
stitch |
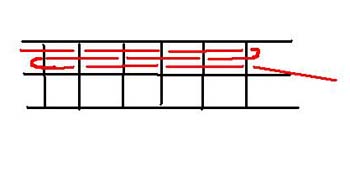
A very
similar stitch is the Cloth stitch. In this one,
the darning stitch (usually only two or three
passes) are carried through the involved meshes.
Then a turn is made at one corner, and the
Darning stitch is done at right angles, with the
thread interweaving between not only the mesh
edges, but the stitches you've already carried
through that mesh. The effect is that of woven
cloth. While it sounds like the antithesis of
lace, it creates a very striking and beautiful
effect. |
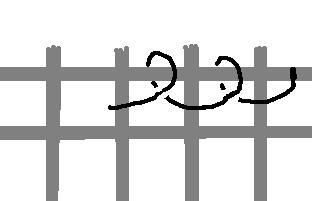
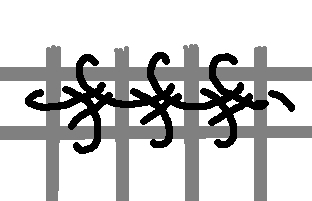
Interlock
stitch, step 1 |
Another
stitch used is called the Interlock stitch. It
sounds and looks complicated, but it is actually
very simple: it is a stretched out buttonhole
stitch, that turns back on itself at the end of
each row. Anchor the thread on the side of a mesh
that is to be filled with interlock stitch. Then,
carry the thread up to the first cross thread.
Carry the thread to the next square, and across,
until you have entered a loose
buttonhole-stitch-type loop in each square. Then,
you carry another loose buttonhole stitch to the
lefthand upright of the mesh. |
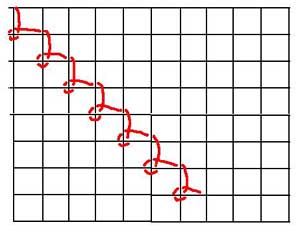
Finally,
you begin to work back toward where you started,
again, doing a loose buttonhole stitch in the
bottom of the mesh. But, where it crosses into
the next square, you pass behind the mesh thread,
looping with the first threads. Continue like
that until you have gotten back to where you
started. If you’ve done it correctly, then
it will look like a little star or flower is
centered, more or less, in each affected mesh.
|
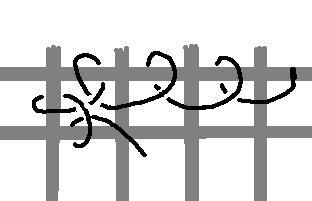
Interlock stitch, step 2 |
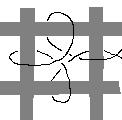
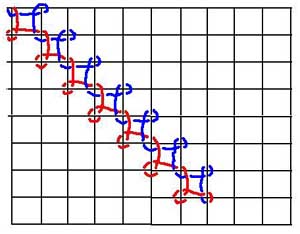
Interlock
stich - the finished product |
Interlock stich - the
finished product carried over several meshes |
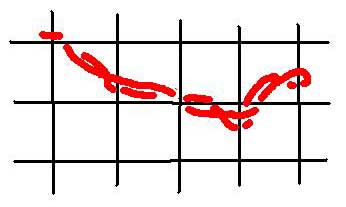
The interlock stitch as described here is perfect for
square patterns. But there is also a variation possible
for drawing diagonal lines. The stitch is the same
stretched buttonhole, but it is arranged a little
differently. Instead of the loop going around the middle
of the mesh edge, it is going around the corner, as in
the diagram below. The effect is slightly different in
appearance, creating a small "windowpane" in
each affected mesh.
Interlock
stitch - on the diagonal, step 1 |
Interlock
stitch - on the diagonal, step 2 |
Vining
stitch |
Vining
stitch is one of the prettier stitches, when done
in combination with other stitches in a pattern;
it creates a thin line, like vining through the
mesh. It is done simply as a running stitch that
passes around and through the mesh threads. Then
it is turned back on itself, weaving around the
original thread, and the mesh edges, until it is
essentially doubled. |
Darning stitches are not the only options available to
you. Embroidered slips were certainly attached to mesh as
decorations, as were cloth appliques of varying levels of
complexity. Beading was also applied to mesh, with
beautiful results.
[The
information and images on this website are Copyright of
Lady Cecilia Bartoletti (June). You may make a copy and
use any information contained herein for personal use
only, or for SCA documentation purposes. Unauthorised
publication is not permitted.]

|