 
|
Advanced
Techniques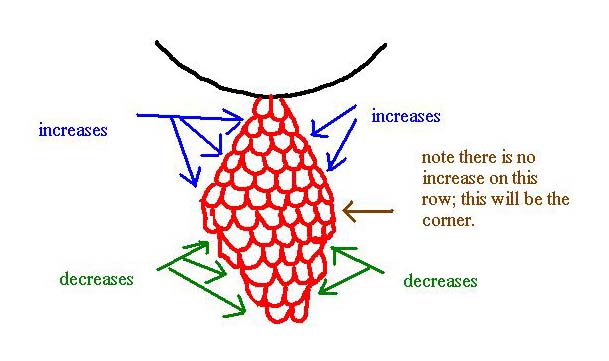 Square
Mesh Square
MeshWhat if you want to make a piece of square mesh? It can certainly be done. All mesh is worked on the diagonal, including square mesh. That means that, to make a square piece, you start at a corner, work outward to the widest point, and then shrink back down to the opposite corner. Cast on two stitches into your anchor loop. Turn and work the second row, increasing once on the last stitch. Turn and do the next row, and increase again. Continue like that, working one increase at the end of each row, until your side is the size/mesh-count that you want. On that last row (the one that completes your mesh count), do NOT increase on the last stitch. Just stop at the end, turn, and start the next row. On that next row, instead of increasing on the last stitch, you decrease instead. Now you go as before, decreasing at the end of each row, until you're back down to only two completes stitches on the mesh gauge. Turn and decrease again, combining these last two stitches. BUT! Before you begin closing the knot, and without dropping your shed, pull the mesh gauge OUT of the stitch, and lay it aside (this may need a third hand, until you're used to it). Then close your knot the same as before, but with no loop forming. Cut the trailing thread free. Instead of cutting the anchor loop and pulling it out, you're going to cut it, and tie a firm knot against your cast on stitches. Then trim the trailing threads, and you're done. To do a rectangular mesh -- like an edging -- the technique is the same. The only difference is that your increases and decreases don't coincide. You'll be decreasing along one edge (for as long as it takes to get your desired length), while still increasing along the other edge. When you get to the end, change your increases to decreases (leaving the original decreases as decreases), until that last corner closes. Finish as before, and you're done. 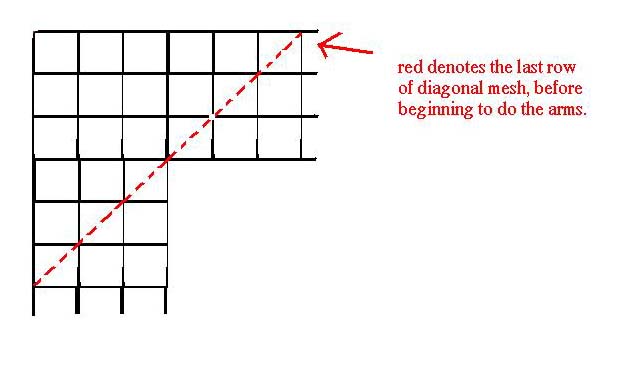 Handkerchief
Edge Handkerchief
EdgeA "handkerchief edge" is a conveninet name for any square that is worked with no center. This is a very handy pattern, which is why I include it here; it can be used for handkerchiefs, obviously; it can also be used for table linens, veil decorations, and more involved structures than you would be willing to cut into a nice piece of mondano. Figure out how many rows of SQUARE mesh you will need to do the darning pattern you have chosen, or to do one inch, two inches, however deep you want the edging to be, and figure out the meshes needed to achieve that. For this example, we'll make it simple: let's say the pattern I have chosen requires the edge to be ten meshes. 1. Start two meshes on your anchor loop, and start netting, increasing at the end of each row like a good girl, just as though you were making a square. Do it until you have TWENTY rows -- that's TWICE the depth of the finished edging. Now count the number of loops on your mesh gauge; it should be twenty two, or the number of rows plus two. Divide that number -- 22 -- by two -- 11 -- and hold that number in your mind. (If your finished edge is fifteen, then you should work thirty rows, have thirty two meshes on the gauge, which you would divide by two to get 16, etc. etc. etc.) 2. Pull the mesh gauge, and start the next row, same as before. BUT!!! You're only going to go in halfway -- eleven stitches. STOP, do not increase, don't do anything else. Pull out the mesh gauge, and turn around at that point. Yes, that leaves half the original "square" untouched; don't worry, we'll get back to it. OK, now you turn back and work back to the other edge, where you increase, just as normally. Turn again, do your meshes on that narrow band again, and DECREASE in the last "inner" meshes. Keep going like that, back and forth, increasing on the "outside" of the row, and decreasing on the "inside." The "inside" side, the side you've been decreasing on? That's the side that will actually be touching the cloth of the handkerchief. So if you need to certain number of meshes to do a certain pattern, THAT'S the side you count on. That's the side you'll measure, if you need to get it a certain length to fit your handkerchief, whatever. 3. Now, when you get that inside bit to the right length, number of meshes, congratulations, you've finished Side One of your handkerchief. Now, how to make that 90 degree turn, to do side two? You know what? It's so simple, I GUARANTEE you'll mess it up at least once; you just keep expecting it to be harder than it is (I know I have to stop and think about it every time). How do you do it? Decrease on the "increase end" and increase on the "decrease end." That's it. On the side you were decreasing on? just do an increase instead. On the side you were increasing, decrease instead. Keep going like that, and you'll very quickly be able to see that, while you were trying to figure out whether you've missed a step somewhere, you've actually done that turn and are deep into Side Two. When you get THAT side to the right length, pull out your mesh gauge, cut your shuttle thread, and leave it be for a while. 4. Now, to do Sides Three and Four. Go back up to the where we started: remember those eleven stitches I told you we'd get back to eventually? Well, we're back. Tie back in at the OUTER edge (don't get confused, and start on the inside, that messes up yur count). And repeat steps 2 and 3 above, just like before. Soon you'll have Sides Three and Four. 5. Now you've gotten to the bottom of Side Four, and are wondering, how do you bring the whole thing together again. Again, it's so easy, I would bet money you'll mess it up at least once. A good tip: lay the whole thing out, in its approximate handkerchief-ie shape right now, so you can see it, make sure nothing is twisted, everything's relatively correct in size, etc. See those two bits of loose loops, at the bottom of side Two and Side Four? Right where you're trying to figure out how to attach the last corner, and bring the whole thing together? We're going to work a normal row of meshes across BOTH of them: first the one you're attached to, then the other, in order, just as though they were not disconnected. DECREASE at the end of the row. And continue, just as though it were a normal square, row after row, decreasing at the end of each row, until you're down to those last two. Work those two together, and Voila! You have a frame of lacis, ready to have the handkerchief -- or whatever -- sewed into the center. SOME TIPS: 1. Lay the thing out often as you work on it; it's easy to get disoriented while you're still learning. Laying it out and looking gives you perspective again. 2. ALWAYS count your meshes. Keep aware of them, particularly if your pattern depends on the mesh being only so big. Even then, it's going to get away from you. I have yet to have a handkerchief edge come out exactly perfect. You learn to adjust. 3. I usually try to put the cloth into the center BEFORE I stretch it on the frame to be darned. It just makes stretching easier, because that hole, unfilled, wants to distort, which robs me of good frame tension. However, I know people who swear by stretching it first, then fitting the cloth. Try it both ways, see which one works better for you. 4. This is not restricted to perfect squares; rectangles can be done the same way; as long as the corners are 90 degrees, the length of the sides is not relevent to how to work is done. For that matter, this sort of thing does not have to be the outer edge of a project. You can do it as an inset for a larger piece, like a tablecloth. Do it the same as always, but you attach the cloth to the outer edge as well as the inner edge.
|