Email : [email protected] Or General Mailer
|
Jai Chavan's
"Dance-Sport" Email : [email protected] Or General Mailer |
| Back || Master Pg. || Overview || Contents || Alphabetical Index || Home || Next |
Head Turn
 |
"To be happy or not to be..." All lies in the head. |
This is very important because the head as an individual part
of the body is quite heavy, and the ears gauge the gravity. And
for a good balance both these factors play an important role.

Heavy head
Since we have no option but to move about with every part of our
body, that we rarely think of the individual body parts as
separate entity and their effect on movements and balance. To
understand this we will take a small example from the day to day
activities.
Lets imagine we go to a shop to purchase an electronic gadget, a
walk-man tape-recorder. It comes with packaging for protection
when handling and transportation. Thus when carrying the
equipment back home the size is quite large and a technique is
need to carry it such that it is not a discomfort to us and the
gadget remains in good shape. All this is done subconsciously.
However now imagine that the gadget is to remain for a life time
inside the packaging. In such a case a thicker metal box can
serve the purpose. This would increase the size and the weight
considerably. Now when required to carry such a package one needs
to be more careful to avoid injury and discomfort.
Almost exactly is the case with the head. The brain itself,
normally in an adult weighs slightly more than a kilogram.
This is also evident in infants for whom moving the head is a
great effort.
So the head is really heavy.
Gravity
The force of gravity acts vertically and the ears in conjunction
to the eyes gauge it. However the ears, the cochlea do the main
work, which is the spiral tube of the inside ear. So if the head
is not held straight up, then the ears gauge the component of
gravity and this can be misleading and thus hamper the balance
and movement of a person.
To get a better picture of this take a rod of that weighs quite a
bit. Keep it vertical and feel its weight and the effort required
keeping it in that position. Next incline the rod and feel its
weight and the effort required keeping it in that position. You
would notice that when the rod is kept vertical it is much
easier. The same example can be experimented with a two-wheeler
vehicle.
See also the picture (number 1) of a lady typing. It is
self-explanatory. The back and the head need to be kept erect.
In the diagram 3, the red line is the direction of
the force gauged by us when the head is tilted. The vertical blue
line represents the gravity that always acts vertically. The
horizontal force acting from the right to left can be attributed
the weight of the body that is inclined. The resultant, the red
line is longer than the other two lines. Thus the resultant force
is much more; if the head is kept tilted when dancing.
So the first part is never to look down, and the second is that
always keeps the head erect and look at eye level especially when
turning.
Having studied the reasons to keep the head erect, we would be
able to do better justice to the exercise given below, and be
able to use it effectively in our day to day activities also.
Exercise 1
Stand erect; look straight ahead at eye-level at a point on the
wall. Keeping the shoulders absolutely square to the wall in
front, raise the left hand straight to the side and horizontal to
the floor. Now look in the direction of the raised hand by
turning the head only, and the eyes keep the sight straight
ahead. This way you would have turned the head at 90 degrees or
1/4 turn. Mark a new point here. Repeat this on the other side.
Thus we would now have three points. One straight-ahead in the
middle and one on the either sides. Now the quadrant formed
between the middle and a point on the side is divided into three
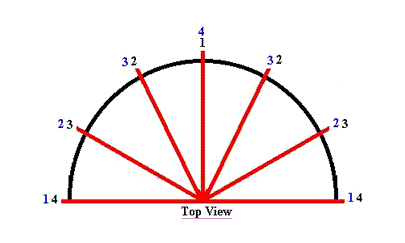
equal sectors. Repeat this on the other side also. See the
diagram "Top View".
Next is to turn the head only to the left, come back to normal
position, and then repeat the same to the other side.
Once you are comfortable doing this then do the same with counts,
counting from 1 to 4. For the counts 4 and 1, you would be facing
the middle or either of the two points on the sides. For counts 2
and 3 the head position would be as shown in the diagram.
When turning from middle to left follow the path numbered in
black, and when returning to middle position follow the path
numbered in blue. Similarly repeat the exercise when turning the
head to the right.
Once you are comfortable, then repeat the exercise to the beats
of music, which has the time signature of 4/4.
The diagram 2, has two ellipses. Bottom one is the floor part and the vertical lines joining the two ellipses is to show that both are at equidistance. The top elliple is the horizontal plane at the eye level. The blue dotted lines are the line of sight that always remain in the horizontal plane irrespective of where the head is turned. Note that the height of the sight-plane can be changed, however the plane should sitll remain perfectly horizontal.
Exercise 2
The whole body turns, however the feet remain fixed as if they
were nailed into the floor.
Stand erect facing the front. In this case the shoulders are
turned and the rest of the body follows, however the head does
not turn. After the body has reached position 2 (of the diagram
"Top View") the head is allowed to turn. The speed is
fast such that the head reaches the side position before the body
has reached that position. Immediately the head starts to come
back to normal position. At this point the body reaches the side
point, and then starts to turn back to normal position. Later the
head already reaches the middle position and the body is still
turning to come to the middle position. Repeat this part on the
other side too.
Remember that the rest of the body turns at more or less the same
speed.
The feeling should be that the turning body pulls the head to
make it turn. The head being lighter as compared to the whole
body is moved very fast. This results in the head overtaking the
rest of the body. Later the body comes back to normal position by
pulling against the head that is way ahead of it.
Exercise 3
This is for the complete turns.
Delay the head form turning as much as possible, however let the
body keep turning at an even speed. Later when the head is
turned, it should move very fast so as to over take the rest of
the body, and come to rest at the middle position.
This will give the illusion of the head being stationary and the
rest of the body keeps turning round and round when one executes
continuous multiple turns.
| Back || Master Pg. || Overview || Contents || Alphabetical Index || Home || Next |