Welcome to Jacques Stereo 3D Site
Diese Seite gibts auch auf deutsch..
What is Stereo3D?
How does it work?
What do I need to see Stereo 3D?
Which games are 3D
compliant?
The driver trouble :-(
The plans
Let's go
What is Stereo3D
With Stereo3D it is possible to see stereoskopic pictures at home
with your PC. This are pictures, where each eye (the left and the right
;-) sees a seperate picture and your brain calculates the depth information
from the differences. A more detailed description can be found at www.Stereo3D.com,
THE homepage for Stereo3D.Many infos and hints are also available at www.stereovision.net.If
you like, you can have a look at this, a small
handbook for stereoskopic images.( ca 362kB).
How does it work?
The prinzip is easy. Each eye sees a seperate picture and when calculating/shooting
the pictures for each eye the distance of the eyes is taken into account
for the virtual cameras to simulate the human seeing with two eyes. You
can easy check it out, simply hold something close to your face and close
alternating your left/right eye. Now you see two different pictures
from which the brain gets the depth information. To project a seperate
picture for each eye, there are many possibilities. In this project we
are using LCD shutter glasses. These glasses are conected to your PC via
a small Black Box with some electronic inside and the glasses darkens in
alternating order your left and right eye (ok, actually it darkens the
glas before the eye, not the eye itself ;-) These glasses are Liquid Crystal
Displays, the same that can be found in your digital watch, just
a little bit bigger. When the left eye can see,the picture for the left
eye is visible (what else) and the right eye is darkened. Same for right
eye.To get a flicker free picture your refresh rate per eye should not
get below 60 Hz (frames per second) ,that means you monitor must be capable
of displaying 120Hz, what is no problem for monitors nowadays. Next component
is you grafic card. Theoretically, your card has to output a picture with
120Hz too, which would be no problem for a modern card. But for different
reasons, another system is used, which is the reason why we need the additional
Black Box.(don't be afraid, you don't have to be an engineer to build this
;-). The used system is called Top-Bottom.The upper half of your screen
is for one (mostly the left) eye and the lower one for the other eye. Hmmmm.
What now? Now I see everything twice??! No, here is the point for the electronics.
The electronic,which is looped in between the grafic card and the monitor,
doubles your refresh rate. And so your monitor displays the upper/lower
half of your screen as a full screen picture. Doing so, your picture gets
stretched on the vertical axis, that mean you have to compress it
before. WOW!!!!!!!! And for what is this good? Now, the grafic card must
display the picture with only 60Hz (you can see this system is from a time
when hardwarepower was rare). The disadvantage of this system is that you
half the vertical resolution because both eys share the screen. But
at 800x600 this not that bad.
What do I need to see stereo 3D?
a PC; for static images a 486 is ok, for games the faster the better (my
K6-II/300 runs ok)
LCD-Shutter glasses
the magic BlackBox, that doubles the refresh rate and controlls the LCDs
3D compliant games, nowadays available in masses
Which games are Stereo3D compliant?
In general all games using OpenGL, Direct3D or Glide. i.e. GLQuake, Quake2,
Heretic II, Unreal, Sin, Colin McRae Rally and so on . .
Sometimes for older games there are special version available here.
Trouble with drivers :-(
You can view stereoscopic pictures on nearly every grafic card. For all
games based on the Quake2 engine or that run with some kind of opengl.dll
(i.e. GLQuake, GLDoom) you can use the drivers from Heretic II. Get your
version for Voodoo I and
Voodoo
II / Banshee cards. Simply rename the original DLL (Backup.dll or something)
replace it with the new DLL with the right name ( for GLQuake opengl32.dll,
for Quake2 3dfxgl.dll aso.). If you would like to play games using Direct3D
or Glide you have to go for the StereoVision driver CD (Eyescream from
Metabyte), which contains the drivers for all Voodoo II cards with 3D support
for OpenGL, Direct3D and Glide. The free driver is NO MORE available for
download :-( at Metabyte/Wicked3D.
The plans
Ok, here comes the main part of this all, the magic Black Box. The circuit
is ripped from various circuit on the net, ahhhh I mean inspired ;-)Ok,
a little more serious, I tried to combine the advantages of the different
circuit to develop a circuit with a maximum of simplicicity, reliability,
power and ease of rebuilding. Sounds like the an egg laying WoolMilkPork
;-) OK, long phrases, short sense.
Here you can find the partlist, the
layout,
the circuit diagram and the layout
diagram as normal pics. You can get this all as an archiv
in Eagle format. Eagle Freeware is available at Cadsoft.
First you need the PCB. Look for etching material at you local radioshack
store. You need a PCB with photoresist (the circuit is about 55x65 mm^2,
just a quarter of a euro PCB),developer and etching delution.
1.) Expose, develop and etching
Print the layout on transparency (with a grafic program at 300dpi ), as
black as possible, printdensity at maximum , brightness as low as possible,
contrast high. In a slightly darkened room, remove the protective cover
from the PCB, apply layout, put a (transparent) CD cover on it to make
the transparency fit tight to the PCB. Hint: The text on the layout must
be readable, that means the ink is on the PCB. This avoids shadows when
exposing. Now expose the PCB with ultraviolett (not ultraviolent ;-) light,
depending on your lamp this takes from 30s to 5 min. With my lamp (mercury
vapor) it takes about 50s after 1 min warm up time. If you have no experience,
just try a little bit to get the right exposure time. (make a small test
PCB, cover it, turn on the lamp, after 2 min. warm up remove the cover
a little bit to reveal a small stripe, every 30s remove the cover a little
bit more to reveal the PCB step by step. 5 steps should be OK. The first
stripe is the most exposed, the last one the least exposed. Now develop
the PCB and you will see whats the best exposure time. After exposure,
you have to develop the PCB. This should take 1-2min and give a sharp layout.
When the layout was too weak, the layout will be blurry and may have hair
cracks or similar problems. ->CRAP. My experience shows it is better do
expose a little bit less and to develop a little bit longer. The last step
is etching. Warming the delution to 40-50 degrees centigrade is advantageous
but is no must.
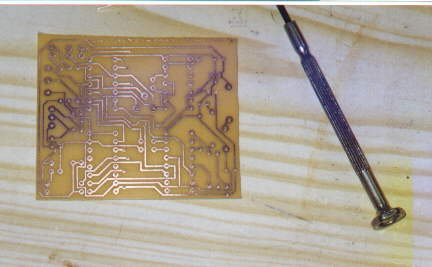
The etched PCB.
2.) Assembly
Drill the holes, drill 0.8 mm. I got a small toy drill, perfectly suited
for such work, but a normal drill with a mounting works too. Now equip
the bridges, sockets, resistors, caps, transistors and switches. Dont insert
the ICs yet. Equip the Loop-Through Adapter. Connect all pins exept pin
14 directy. Pin 14 of the male SUB-D socket is VsyncIn, pin14 of the female
SUB-D socket is VsynchOut, VsyncGND is pin 10 (I use flatband wire, but
simpel telefon wire will work too) Watch out while wiring the double switch
S2, if you do a wrong connection, the glasses wont work. The connections
named Middle, Left und Right go to a 3.5 mm stereo plug (female) that connects
the Black Box with the glasses. At first test supply voltage. On all sockets
there must be 5 volts between pin 7and 14 (8 and 16). The LED must light
up. Now you can insert the ICs (remove supply voltage FIRST!!) and it should
work. If not, the are probably some traces broken or shorted (by solder),
have a close look at the PCB. If all connections are OK, it should work,
there is nothing to adjust.
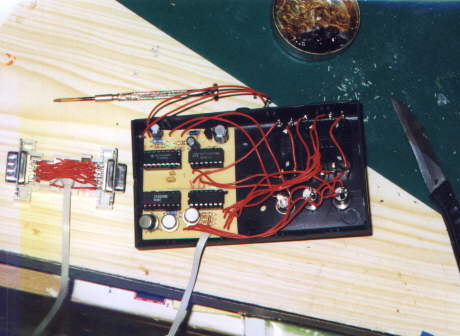
The completely assembled Black Box. Left you see the Loop-Through Adapter,
right the assembled PCB

The complete 3D set, with power supply, Loop-Through, Black Box and
glasses.
Let's go
After you checked everything (PCB traces, solder joints) we are ready to
go. First a general test. Plug the Loop-Through between the grafic card
and your monitor. (If you have a Voodoo card, between the Voodoo and your
monitor) plug in power supply, turn on the computer. The switch for the
refresh frequency doubing should be in normal (no doubing) position. The
computer should boot up normally. Ended up in Windows 95 you have to adjust
your refresh rate at 60 Hz, because most Monitors can display a max. of
120 Hz. (If you have a better one, you can go for 70(140) Hz later) You
can do this via Start->Controls->System->Display->Properties->Extended->refresh
rate. (Iam sorry, I dont know if these are the exact words, becaus I have
the german version of Windows 95) Here you may choose different frequencies.
If you can only choose standard and optimum, you need to install a monitor
first. Simply choose a standard type like 1200x1024 or so, you have to
reboot Windows after that. You shoud be able to run your desktop at 60
Hz. Now its getting interesting. Facing death without fear we switch to
refresh rate doubing. BOOM. No, this should not happen, but now your monitor
should run at 120 Hz and you see a weired picture where the upper and lower
half of your desktop are projected above each other. Many monitors can
display their refresh rates on a menu If you see 120 Hz everything works
fine. Now we need software. A good choice is the viewer
(Win 95, abt. 1.2 MB) from
Brightland
, that runs on almost every grafic card. Install, run, click Top-Bottom,
switch to double refresh rate and WOW. This is true 3D, isn't it??!!! Maybe
the left and the right eye are mixed, simply toggle S2. If the eyes are
correct, the pic should bend if you move (not turn) your head left/right.
It is also important to adjust the eye separation, which differs from people
to people. Trial and error. When everything worked all right, you are ready
for the ultimate animated 3D expirience. Go for Quake2 (or a similar game)
change the drivers (have a look at driver
trouble) ,open the console and enter
cl_stereo 1
vid_restart
Now you should see two pictures which will be combined to a 3D pic via
the refresh doubing. What do you say now????? With
cl_stereo_separation 0.5
you can adjust the eye separation (0- 1).
Ok, If you got hints, ideas, questions, bottles with MARTINI
(full of course ;-) and other beautiful things, you can drop me a mail
.
Jacques T.S.A.K.A.M.M
Last change 05.06.1999