 CIMOT – SQL v.1_0
TUTORIAL
3. HOW TO CONNECT TO MYSQL SERVER USING CIMOT-SQL v.1_0
First off all we need to know which MySQL server we would like to connected with, is it MySQL server in your own computer, is it MySQL server in another computer connected via LAN, or is it MySQL server in the web site which offering free database hosting such like freeSQL (www.FreeSQL.Org) .
This is very important because CIMOT-SQL v.1_0 depend on the of those above connection setting. In this tutorial we will try to connect CIMOT-SQL v.1_0 with MySQL server in local computer and with MySQL server in the web site which offering free database hosting such as freeSQL(www.FreeSQL.Org).
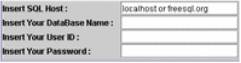
Above picture is the panel we will use to obtaining connection through MySQL server.
You mention in Insert SQL Host text field it offering localhost or freesql.org , choose localhost to connect to MySQL server in your local computer or choose freesql.org to connect to MySQL server in www.FreeSQL.Org .
Connecting to MySQL server in Local Computer
Choose localhost
in Insert SQL Host text field , make sure no character spaces left
behind and after localhost word, if there is
spaces before or after localhost word ( e.g: _localhost
or localhost_ or _localhost_ ) the program will recognized this empty
spaces as character(s) and which mean localhost
not the same as _localhost .
![]()
CORRECT ERROR WILL OCCURE ERROR WILL OCCURE
If you don’t have any database in MySQL server then insert in DataBase Name text field with mysql or test , MySQl installation included pre created database named mysql and test for you as you going to need this mysql database to manage your database users later or testing with test database. If you already have database created before in MySQL server, you can use it as well (e.g: abcDB).
Next is insert your user ID, in the first MySQL installation, MySQL server already gave you a user name root , you can input root in User ID text field. If you have another user ID in MySQL server it also can be used as well (e.g: myname).
The last is insert your Password, only your self know your password to connect to MySQL server right? Input it in Password text field, just remember use the password as per your user ID password.
The text field finally looks similarly like this

Then click Try Connection
! button to try your connection.
![]()
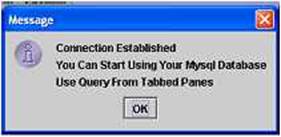
If connection succeed a pop up window will appear slightly,
telling you your connection to MySQl server was
successful and you not need to worry in next time you want to connect to MySQl server using SQL Host provided previously
, you don’t have to try the connection again next time if you use
the same SQL Host, you can directly use CIMOT-SQl
v.1_0 using Tabbed Panes available.
If connection failed, it is because some error occurred during the connection process.. just like below:

Java will tell you something wrong during connection process, in this case I missed the User ID, and leave it blank, the similar error message will appear if you not insert the correct Password and User ID, or you already insert the correct Password and User ID but you haven’t gave access privileges for this User ID ( in next steps we will discuss about giving access privileges to users in HOW TO GIVE PRIVILEGES ACCESS TO USERS ).
Or below error will occurred, non Java programmers will confuse and a bit frighten when this window appear because the popup window will cover almost as big as your screen monitor.

This error occurred because we missed to type the SQL Host in SQL Host text field, or the SQL Host name is not correct, in this case we try to connect to localhost, but maybe there is empty character space (discussed previously) before or after localhost. Or we don’t have MySQL server installed in the local computer, for your information any Java SQL program use Java Connector Driver to connect to SQL server, some how this driver can not do it job to connect to SQlLserver we appointed to, so Java will tell you this failure just like above message in the error window
Error :com.mysql.jdbc.CommunicationsExceptions link failure due to underlying exception:
“ BEGIN NESTED EXCEPTION “
Java.net.UnknownHostException
MESSAGE: localhost: localhost
You may found out in this case I
accidentally left empty characters space before localhost,
that leads the error, if you fill like you had insert all information in the
connection text field such as SQL Host, DataBase
Name, User ID, and Password, and above error occurred, the first
thing you must check is the SQL Host text field. Make sure you insert SQL
Host name correctly.
![]()
Connection through localhost supposed to be easy using CIMOT-SQL v_1.0, for noted CIMOT-SQL v_1.0 is tested over and over using localhost to connect to MySQL server at local computer. If you are found any bugs in connecting to MySQL server at local computer please send it to [email protected].
Connecting to MySQL server through web using freeSQL(www.FreeSQL.Org ) services
FreeSQL is a web service that offer DataBase storage, which mean you can save your database in someplace, and www.FreeSQL.Org offer you database storage in it DataBase Server. CIMOT-SQL v_1.0 also tested for connection to MySQL server through web using FreeSQL services. So special thank to [email protected] in giving this services.
The first thing that had to be done to test the connection through web is to get an account from FreeSQl web site, and create a Database, User ID, and Password to connect to FreeSQL DataBase Server.
Simply click this link www.FreeSQL.Org to go to FreeSQl website.
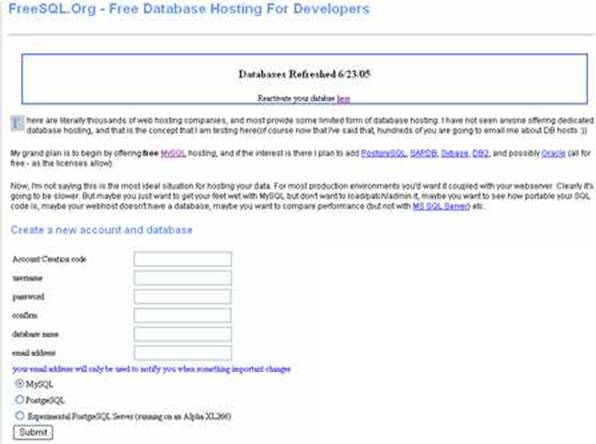
Try to insert the fields with your own choices or just follow this tutorial instruction.
For example we input the field just like below:
qwertyuiop
Account Creation code
jacimot1
username
123456
password
123456
confirm
MyStore
database name
email address
![]()
 And
don’t forget to choose MySQL option button
And
don’t forget to choose MySQL option button
The purple boxes is the most important in creating database in FreeSQL,
If user already exists below message will appear in your browser
Creating Database
that user already exists
If database already exists below message will appear in your browser
Creating Database
unable to create database mydb, that name may be in use
If database & userId successfully created below message will appear in your browser
Creating Database
Database
MyStore created
The permissions have been set on MyStore
You should now be able to connect to:
www.freesql.org
port 3306
as user jacimot1
The best way to do this is probably with PHPMyAdmin or using the MySQL GUI client that you can
get here.
Please note that you are
responsible for backing up your own databases!
Use of this system denotes
acceptance of this disclaimer of liability
Lets presume we successfully create a database account in FreeSQL, the DataBase name is MyStore and the User ID is jacimot1.
If you remember in previous discussion in connecting to MySQL server at localhost…
![]()
In the SQL Host text field CIMOT-SQL v.1_0 offering to choose localhost or freesql.org, because we would like to use FreeSQL services, sure thing we choose freesql.org as our SQL Host. And we will use MyStore as DataBase Name , jacimot1 as User ID, and the last is 123456 as the Password. So the text fields will look like below:

note: don’t forget to check in inserting every information in the textfield correctly…
To try the connection to MyStore DataBase in www.FreeSQL.org click Try Connection ! button to try your connection.

If connection successful than popup window will appear just like below

The popup window simply telling us that there is no problem connecting to Database through any Database Server using CIMOT-SQL v.1_0, and next time if you would like to use the connection using the same SQL Host, DataBase Name, User ID, and Password, you don’t need to try the connection again using Try Connection button, just directly use the Tabbed Pane to start your Database Query.
If connection unsuccessful , there may several cause just like below:
 `
`
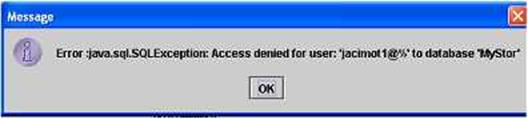
Java
automatically remind us that some thing wrong with the connection process. In
this case I missed to complete the DataBase
Name,
supposedly I insert MyStore instead of MyStor. That makes access denied
by freesql.org.
![]()
The same error message will also popup if insert wrong User ID or wrong Password.
Below I missed to complete User ID, it supposed to be jacimot1 instead of jacimot. Access also denied by freesql.org.

Below I missed to complete the Password, the Password supposed to be 123456, and there is only 5 echo characters in the field. Access also denied by freesql.org.

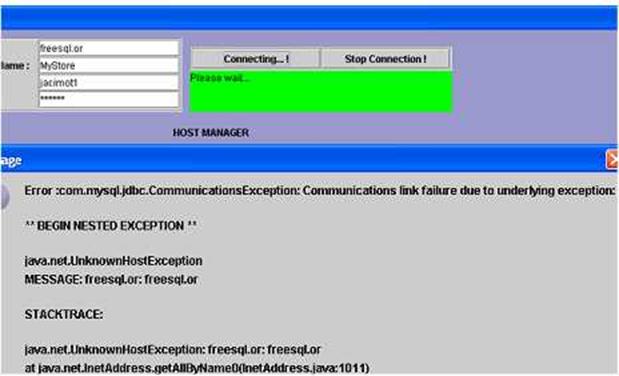
The
next common connection failure is if we not
correctly inserting the SQL Host name, in this case the SQL
Host name supposed to be freesql.org instead of freesql.or.
That was the reason of the communication failure as per Error Message below .
Finishing this part of tutorial you can begin start to use CIMOT-SQL v.1_0 to manage your databases using localhost to connect to MySQL server at your local computer or using freesql.org to connect to DataBase server at www.FreeSQL.org.
If you are found any bugs in connecting to MySQL server through web site please send it to [email protected].