![]() CIMOT
– SQL v.1_0
CIMOT
– SQL v.1_0
TUTORIAL
4.
DATABASE ADMINISTRATOR SIDE QUERY
4.1.
HOST MANAGER
4.1.1.
HOW TO CREATE NEW USERS
To create or insert New Users to
MySQL server at localhost in local computer we need to
make sure all information in SQL
Host, Data Base Name, User ID, & Password already set refer to your self as
mysql database user, the connection
panel should be like below
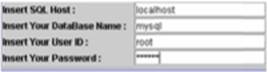
SQL Host : localhost
DataBase Name : mysql
User ID : root
Password : ********
The DataBase Name is absolutely must
be mysql, otherwise the New Users won’t be created, in other words mysql
isa database in MySQL server that
storing all users data, and only through mysql database New Users name can be
created. One other thing is only database Administrator can create New Users,
database administrator is User who have permission using MySQL database with
the first given User ID and Password after installation of MySQL server.
To create new user we will use Host
Manager tabbed panes, click Insert New User from Host Manager tabbed panes:
![]()
The
original MySQL syntax to create new user is:
mysql>insert into
user(host,user,password) values (‘localhost’ or ‘%’ or
‘IP_address’,’new_user_id’,password(’new_user_password’));
mysql>flush privileges;
where
below syntax
insert into user(host,user,password) values(…);
is MySQL
keywords to create new user
and below
syntax
‘localhost’ or ‘%’ or
‘IP_address’,’new_user_id’,password(’new_user_password’)
is the
data value of the new user that we would like to be stored in mysql
database, user in insert into user is actually a name of table in mysql
database, and in the table named user there is a field named user
also, and in this field the new user data will be stored.
mysql
database
user
![]()
![]()
table
user
![]()
![]()
![]() field new
users will be stored in this field
field new
users will be stored in this field
simple
illustration of mysql database tree
‘localhost’ or ‘%’ or ‘IP_address’
we need to
choose localhost or % or IP address
localhost is for
indicating that the new user only able to connect to MySQL server from
localhost or local computer only, % if we want the new user able to connect to
MySQL server from any computer machine in the network including from local
computer, and IP address if we want to give user only can connect to
MySQL server from their own computer within the network.
We use ‘
‘ because all of the data value is a String or Characters.
So the
basic syntax to create new user with User ID: tom, And later tom only
can connect to MYSQL server from localhost, and to password is 123,
will be like below:
mysql>insert
into user(host,user,password) values (‘localhost’ ,’tom’,password(’123)’);
in
CIMOT-SQL we only need to insert each value in each text field
localhost tom 123
Then click
Insert User button
To insert
new user from different computer just set the SQl Host with correct address
Feel free
to try the connection using the SQL Host correct address if you want to use Insert
User Query through network or internet.
Note: in
next steps of this chapter we will use the same connection setting :
SQL Host : localhost
DataBase Name : mysql
User ID : root
Password : ********
4.1.2. HOW TO GIVE
PRIVILEGES ACCESS TO USERS
Now the new user that had been created can not access any database for
mean time, we need to give access privileges in order the new users can access
to some of the database available or to one or two specific database, also we will give the
users what type of privileges the users will have in accessing the database
given.
Below is specific fields of standard privileges available in MySQL:
|
Privileges Fields |
Giving an Access to : |
|
create_priv |
create(database,table,index) |
|
drop_priv |
drop(database,table) |
|
show_db_priv |
show
database(server admin) |
|
select_priv |
select(tabel) |
|
insert_priv |
insert(table) |
|
update_priv |
update(table) |
|
delete_priv |
delete(table) |
|
alter_priv |
alter(table) |
|
index_priv |
index(table) |
|
reload_priv |
reload(server
administration) |
|
shutdown_priv |
shutdown(server
administration) |
|
process_priv |
process(server
administration) |
|
file_priv |
file(access
file in server) |
|
grant_priv |
grant(database,table) |
|
reference_priv |
refrences(databse,table) |
|
lock_tables_priv |
lock
tables(server admin) |
To give privileges access to users we will use tabbed pane Grant
Privileges in Host Manager Tabbed Panes.
![]()
insert
type of privilege insert database insert UserID insert Host for
for this user ID name this User ID
In inserting type of privileges we may choose more than one type of
privileges using coma(,) separated for example:
update
or
update,select
and so on as much as you
wish.
Or if we
would like this a user to have all privileges available we can insert the text
field with
all privileges
Next is insert the database name, for your info MySQL installation already included 1 empty database named test , so we can give this empty database for the new user for a start.
test
Then insert the User ID which we want to give those access privileges
tom
The last is insert the SQL Host for above user to access the database from
localhost
Done, click Grant Button, the complete original syntax for above query is
mysql> grant all privileges on
test.* to tom@localhost;
mysql> flush privileges;
or
mysql> grant select,update on
test.* to tom@localhost;
mysql> flush privileges;
Let say Tom is your co worker, he work for sales department and you are working as database server administration, and last month he failed to reach sales target, then the boss said, “so sorry for your buddy , he had been suspended from the company for 2 weeks, he failed to reach last month sales target, so please revoke his access from company database until he came back to work…”.
In this case we will use Revoke Privileges in Host Manager Tabbed Panes.

The use Revoke Privileges is the same as Grant Privileges , and users can insert the value of all text field the same way just like using Grant Privileges, the different is the query process, Revoke is the opposite of Grant , if the original MySQl syntax like below:
mysql> revoke all privileges on
test.* to tom@localhost;
mysql> flush privileges;
The meaning is similar like you have been revoke all privileges access of tom in using test database from the local computer.
But Tom actually not accessing test database from your local computer right? That syntax can’t be right!! You need to change the SQL Host from localhost to Tom’s computer IP address
The proper syntax if using CIMOT-SQL v.1_0 similar like below:
all privileges
revoke
test
on .*
tom
to
192.168.1.1
@
4.1.3. HOW TO CHANGE SQL
HOST FOR USERS
Sometimes users not only accessing databases only from one computer
machine, let say your job as a supervisor , than if your staff got problem
opening a program because he/she lost his/her password, and the database server
guy is on sick leave, then this is an
emergency situation, wisely you open the program using your User ID and
password just for today. Or lets make it in different way, your staff computer
was crash, then you tell to your staff that he/she can use your computer using
his/her User ID .
Above to situation can be handled by using update user set host
syntax , you can use the Change Host Tabbed Pane in Host Manager
Tabbed Panes
![]()
In the first text field you will be mentioned to choose one type of Host
that you going to give to the Users, is it localhost , % or IP Address,
the next text field is to insert the current User ID which his/her host
is going to be change.
Insert localhost if you would want the user only able to access MySQL
server from your local computer.
Insert % if you would want the
user can access MySQL server from anywhere as long as the computer machine that
user use have a network to computer machine which have the MySQL server
installation.
Insert specific IP Address Number if you would want the user to have
access only from specific computer machine in the network.
4.1.4. HOW TO CHANGE
USERS ID
Changing User ID you only need current Users ID and the new
Users ID just fill the these 2 value in the text field in Change User
ID Tabbed Pane in Host Manager
Tabbed Panes.
![]()
The original MysQL syntax to change Users ID is just like below:
mysql>update user set
user=’tom’ where user=’tommy’;
mysql>flush privileges;
Don’t worry with ‘ ’ symbol in ‘tom’ and ‘tommy’ ,
CIMOT-SQL v.1_0 include it for you automatically, just insert plain tom
and tommy , and click Change User ID button, and tom will no longer exist in MySQL
server database changed to tommy with the same old Password.
If you asking about why so many user keyword in the syntax, you
can read the explanation about mysql database, user table, & user field and
it relationship in Chapter 4.1.1. CREATING NEW USER , just scrool back to the
top of this page. In short mysql database, user table, & user field
relationship is actually just like a relationship between your grandpa, your
dad, and your self.
4.1.5. HOW TO CHANGE
USERS PASSWORD
Changing Password is the same thing in CIMOT-SQL v.1_0 with Changing User ID, only
we need to use Change Password Tabbed PaneI Host Manager Tabbed
Panes. Insert the current Password in the first text field and insert
the new Password I the next text field, then click Change
Password button.
![]()
The original MySQL syntax to change Password is as per below:
mysql>update user set
password=password(’tom’) where user=’tommy’;
mysql>flush
privileges;
4.1.6. HOW TO CHANGE
ACCESS PRIVILEGES TO USERS
To change access privileges to Users we use Change Priv Tabbed
Pane in Host Manager Tabbed Panes. In the first field you can insert the
type of access privileges you want to update to a user , and insert the
second text field with the User ID , then click Change Privileges
button.
![]()
Scroll back to top of this page to know what types of privileges
available in MySQL, the table it’s in 4.1.2. HOW TO GIVE PRIVILEGES ACCESS TO
USERS.
We must very carefully in changing access privileges to Users in
inserting the type of privileges in the first text field, actually you can
insert some types of access privileges in single process, and this time typing
symbol ‘’ is required . Let say
we would like to change tommy access privileges, we wanted tommy to stop messing with the
database because he often creating unnecessary field values into the database,
and he also very often to show the values of tables to other person in
different department, that’s had made uncomfortable condition in the company,
then your boss told you stop tommy’s bad behavior.
Insert the type of privileges into the first text field
select_priv=’N’,update_priv=’N’
select_priv=’N’ will make tommy unable
to see any of table values, there for he no longer can show it to other person
in the company
update_priv=’N’ will make tommy unable
to change any field value in the tables
Insert the User ID into the second text field
tommy
The original MySQl syntax to change access privileges as per above case
as per below:
mysql>update user set
select_priv=’N’,update_priv=’N’ where user=’tommy’;
mysql>flush
privileges;
4.1.7. HOW TO DELETE USERS
To delete Users from MySQL server database is very simple , Use the Delete
User Tabbed Pane in Host Manager Tabbed Panes, and simply insert the
User ID you would like to deleted, then click Delete User.
![]()
The original MySQl syntax to delete a User as per above case is just like below:
mysql>delete from
user where user=’tommy’;
mysql>flush
privileges;
4.2. DATABASE MANAGER
4.2.1. HOW TO CREATE NEW
DATABASES
To create new database is easy using CIMOT-SQL v.1_0 , look for Create
Database Tabbed Pane in Database Manager Tabbed Panes, you should
see only one editable text field there,
just input your preferred Database
Name, and click Create Database button.
![]()
Nothing special in the original MySQL syntax for create new table;
mysql>create database
mydatabaseABC;
4.2.2. HOW TO SHOW
DATABASES
To show available database in MySQL server only need to click Show Database
button in Show Databases Tabbed Pane

Here is the original MySQL syntax to show all available databases;
mysql>show databases;
4.2.3. HOW TO USE
DATABASES
To use specific database in MySQl server use Use Database Tabbed Pane in Database Manager Tabbed
panes. Insert the database name you would like to use and then click Use
Database button.

Here is the original MySQL syntax to use a database;
mysql>use
mydatabaseABC;
The interesting part is , CIMOT-SQL v.1_0 will automatically update the
database name stated in connection information panel with the new one which you
choose already, CIMOT-SQL v.1_0 presume that you want to do something with the
new database, and Java connector driver will need the chosen database name in
connection process with MysQL server, so if you would like to do more action..
the database which you choose will be ready to process, then you wouldn’t need
to change the data base name in the connection information panel manually.
![]()
![]()

previous database in use
current database in use
(mysql)
(mydatabaseABC)
4.2.4. HOW TO DELETE DATABASES
To delete databases is also easy, just insert the database name you
wanted to be deleted using Drop Database Tabbed Pane in Database Manager
Tabbed Panes, then click Drop Database button.
![]()
The original MySQL syntax to delete databases is just like below:
mysql>drop database
mydatabaseABC;
This is the end of server side query tutorial in using CIMOT-SQL v.1_0 ,
in next chapter we will discuss the client side query, four your info if you
are a database server administrator, sure thing you can also use client side
query because you have all privileges access to all database in MySQL server.