I have been using Paint Shop Pro for some time now and have learned a great deal from
others tutorials.
I wanted to make a stand alone globe with a lake applet inside it
(no borders or frame around it) but could
never find a tutorial on such an animal.
Well, I finally figured out how to do it and decided to attempt
my own tutorial.
Hope you find it helpful. Good luck and enjoy.
STEP 1: Start a new picture 350 x 350 pixels, resolution: 300.000 pixels/inches,
raster background,
color depth: RGB - 8 bits/channel, transparent (checked).
Add a new layer
(Layers - new raster layer or alt+L+L) Name it 'cut out'. click ok.
Fill with same color as the background of
your web page. (I used #ffcccc for this tutorial)
Sorry! It only works with solid background pages.
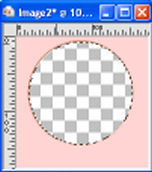
STEP 2: With the selection tool at these settings
![]()
draw a circle starting at x:170 y:150. (coordinates are at the bottom right of the PSP screen)
STEP 3: Go to selections - modify - expand, set to 3 pixels and click ok.
Using the flood fill tool
fill the circle with a solid color.
(I used #a87653, one of the colors from the base.)
Back to selections - modify - contract, set to 3 pixels and
click ok again.
Now click delete.
This ring will prevent your applet from spilling out all over your page.
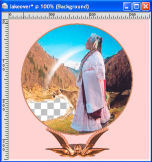
STEP 4: Make another new raster layer. Name this one 'scene'. On the layer pallet,
move the new layer under
the cut out layer.

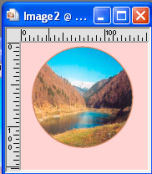
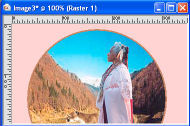
Open the picture you are going to use as the background in your globe.
Make a duplicate of it
(shift + D) and close the original.
Copy the duplicate (Edit - Copy or ctrl+c). Go back to the overlay gif
and paste it into the circle (Edit - paste into selection or ctrl+shift+L).
Now is the time to add any other images you may want inside the globe.
If you prefer the scene the way it is, skip step 5.
STEP 5: Making sure you are still on the 'scene' layer ![]() add yet another raster layer.
add yet another raster layer.
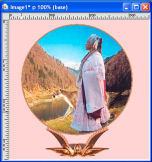
Name this one 'Lady'. Open the ladylion.gif and copy and past it into the selection.
With the Move tool, reposition if necessary.
Any transparent gif or picture tube will work if you would rather use something else.
STEP 6: On the layers pallet, click the 'cut out' layer to make it active.
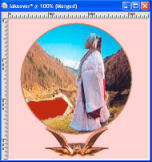
Now add another raster layer and call it 'Base'.
Using the Tube tool at these settings
![]() , add
, add
the base8 to your graphic.
Again, you can use any base tube you may have or make your own base.
STEP 7: Now I want you to make a duplicate of what you have. (shift+D)
Minimize the original for now and work
with the duplicate.
The first thing we do is merge the layers (alt+L+M+V).
With the selection tool set at
![]() ,
start at the
,
start at the
top left corner (x:0 y0), drag the selection and to the right until it is just under the lions
chin and
at the right edge (x:350 y:199). Copy the selection (ctrl+C) and paste it as a new
image (ctrl+V).
*NOTE* If you didn't use the ladylion.gif or anything else that covers part of the lake,
drag
your selection down only to the top of the lake. (x:0 y:0 to x:350 y:187)
STEP 8: Go back to the overlay graphic you were working on earlier.
Hide all layer except the scene layer
by clicking the little eyes on th layers pallet.
With the eraser tool
set as follows,![]() carefully erase the lake.
carefully erase the lake.
Go back to the layers pallet and make all layers visible. (click the eyes again)
Merge all the layers. (alt+L+M+V)
With the Magic Wand tool, click where the lake used to be. (hold the shift key and click
behind the lions front
leg to get that little triangle)
Use the Flood Fill tool to fill the selection(s) with a solid color that is not in you graphic.
I used #960606.
Deselect area. (ctrl+D)
STEP 9: Adding glass: This is where you use that selection you saved in step 2.
Load the selection back to your graphic. (alt+S+L+D) Choose the circle and click "Load".
Open the "globeglass1" file and copy it. (ctrl+C)
Go back to the overlay graphic and paste the glass into the selection. (ctrl+shift+L)
Deselect (ctrl+D)
STEP 10: Check your Materials pallet and be sure your fill color is on the bottom.

Set the transparent color. (ctrl+shift+V) ![]()
Save as lakeoverlay.gif. You can name it something else if you want but it must be a gif.