
Photoshop
Drawing
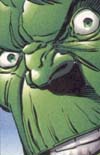 |
Firstly I used a pencil to outline the Hulksters head and on the areas where there are straight lines I held the shift key down to draw a straight lines. Where there is an angle I placed a starting dot mark and the finishing dot mark the depressed shift to create an angled straight line. I activated the ruler and show grid functions and placed the pictures side by side for easier referencing. I also enlarged the images to 300% zoom. To fill the shaded areas in I ran many lines of black at different angles across the area. To assimilate the blurred effect of the black outlining of the original and to fill in the shaded areas I used the blur tool on the drawn black lines. I enlarged the zoom rate to 800% for this. In blue sky area only I used the eye dropper tool to sample the colour scheme on the original Hulk and transferred this colour over to my masterpiece. I used a 5-pixel paintbrush to brush the colours on, starting from the lightest colour and shading up top the darker colour. To finish I used the paint brush tool on its smallest setting to outline the black lines with a sampled shade of green from the original |  |

