| FRAME POLISHING |
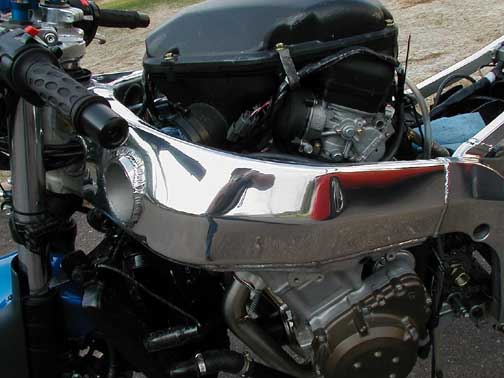
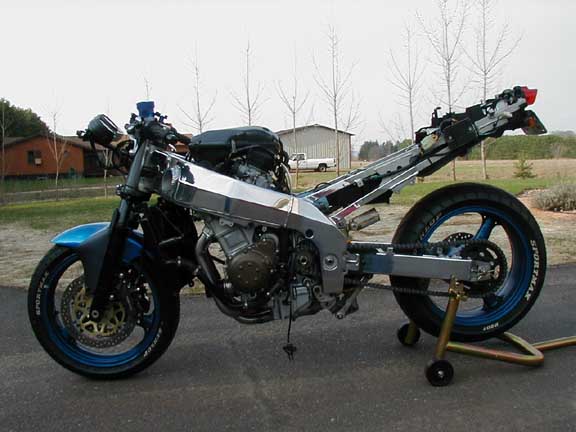
| Well, now comes the most time consuming part of this project. This part will make you say, "Self, what the Hell have I done"! Dont' worry, you can and will get thru this. It will take time, your hands will wrinkle like raisen, and you will get more than plenty of aluminum in your hair, mouth and clothes. It's sanding time!! When I refer to "the entire frame" I mean the ares on the frame that you are going to polish. First off some tips, get your bucket of water and put a few drops of dish soap in the water. This will help the paper slide on the frame and will help keep the paper from clogging as fast. You may also want a small spray bottle with soapy water. I like to use the spray bottle to keep the frame wet and use the bucket to keep the paper wet and cleaned out. Another thing that I found helped was to cut the sandpaper into small pieces, not fold up an entire sheet. I cut my paper into about 2" by 4" pieces and then folded the paper to get a 2" by 2" sanding surface. This is what worked the best for me, you may find something else that works better for you. Now I don't know how you are tackling this project. Are you doing the swingarm then the frame, the frame then swingarm, or both at the same time. Either way it doesn't matter, but I am writing this for the frame, so when you do your swingarm, remember what I said earlier, the swingarm is extruded, so you will need to sand it alot with 220 paper to remove the extrusion lines. After the extrusion lines are gone, continue sanding with progressively finer paper like I describe later. I would recommend that the first bit of sanding be the center section of the frame. Remember that this section is sand cast and will require a bit of work to get it to the stage of smoothness as the rest of the frame. When I did mine, I used a small electric palm sander with 220 paper. I worked that little sander hard! So hard in fact that now it smells funny and vibrates alot more than when new. Don't try to do this section by hand! Get a power tool. We will assume that you now have the center section to roughly that same smothness as the rest of the frame. When you look at the frame you will notice that the frame has sanding marks that look as if it was sanded with a disk sander and about 200 grait paper. Well, you are right, I believe that before Kawasaki paints the frame and swingarm, the whole entire thing is sanded with a disk sander and 200/220 paper. Well, you need to get rid of those round sanding marks! When you sand, sand in one direction. Perferably in the longest strokes as possible. For instance, when sanding the upper spar, sand from the headstock to the center section. Yes, you can sand the other direction, from the center section to the headstock, but don't sand across it. Try to always sand in one direction, not circles or in crossing patterns. Remember to keep your paper and frame wet. You don't need to keep water running across the work, but it needs to stay wet for best results. Now you are asking, how do I know when to go to the next grade of paper? Well, for the 220 paper, you can go to the 320 paper when you can no longer see and sanding marks from the disk sander. If you can only see marks from the 220 grit paper that you have been using, you can proceed to the next finer grade of paper, in this case, 320. The 220 and 320 sanding will take you the most amount of time. Also, don't forget that the better you sand with the 220, 320 and 400 grit paper, the easier the sanding will be with the really fine paper and the better your frame will look when you polish it. Just like painting, prep work will make your finished product look like either a $100 weekend project or a $1000 plus, multi weekend project! I have had people ask if I chromed my frame! Now the way to tell if you are ready to progress to each next finer paper is to look at the frame for only the sanding marks from the grade of paper you are using. When you sand with the 320 paper you can go to 400 when you can only see 320 sanding marks. When using 400 paper, you can go to 600 when you can only see 400 sanding marks. This pattern will continue for each grade of paper you sand with. I went from 600 to 1000, then 1200, 1500, finishing with 2000 grit paper. Some people have stopped with 1000 paper, some 1200, but I felt the need to got all the way to 2000. This will be your choice. When you get to the 1000 paper you will notice that the frame is starting to shine already. If you go to 2000 paper, your will may wonder if you even need to polish. Yes, you need to polish! I polished the frame with Tripoli compound on a spiral buff first. When you do this you are looking for the fine sanding lines to mostly disappear. After polishing with the Tripoli, I used White Rouge on a loose section buff. This is a final polish, you are just looking for a brilliant shine. At this point, you are done polishing your frame!! Congratulations!! Your only concerns now are for maintaining the shine. I have personnal tried many different metal polishes and they all seem to work about the same. Again, the prep produced a top quality product, so the maintenance polishing is easy. I have used Mothers Aluminum and Mag polish, Meguires Metal polish, MAAS metal polish, Wizards Cotton Candy metal polish and Wenol's polishing system. Of these 5, all seem to perform at the same level. Wenol's system has a finishing wax that helps protect the polished finish and I feel is helps the frame stay shiny for the longest period of time. Quick advise - If or when you ride your bike in the rain, you should wash and re-polish your bike soon. It will be easier to get the shine back if you get the dirt off sooner. Also, use lots of water. Rinse the bike first and keep the devise you are washing the bike with clean. The finish on your frame is now similar to a mirror, but aluminum is soft and the dirt can scratch it easily. |
 |
 |
 |