Home - Guest Book - Curriculum Vitae - My Articles - Acknowledgements - Site Information - Monthly Article -
Study Guide - Guide of Sri Lanka - Nisadas - Arts - Jokes - Greetings
Introduction
First, just understand HTML is a computer language to create web pages. Finally you will get to know it is all about a thing which deals between < > and </ >. In HTML, < > is called a “tag”. Respectively < > and </ > are a starting tag and an ending tag (Ex:- <body> and </body> ). Some tags don’t have following ending tags (Ex:- <br> ). So, HTML consists of this kind of tags. What you have to do is just type them on a text editor such as MS Notepad. Let’s have a try.
Step 1> Your first web page
>>Make a folder somewhere called "My web". This is the folder you are going to keep all the stuff which relates to your web site.
>>Go to MS Notepad and type as below.
<html>
<head>
<title>My first web site</title>
</head>
<body>
Hello world!
</body>
</html>
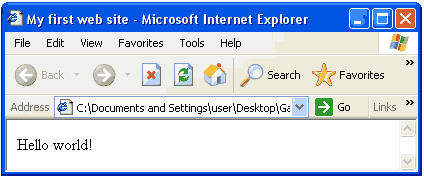
>>Go to File>Save and give the file name as index.html and save it in My web folder. Be careful about “.html” when you give the file name. This is the identification of a web page.
>>Go to My web folder. There will be an icon as below.

>>Double click on the icon.
>>Your browser (Internet Explorer) will open your “first web page” as below.
Tag Introduction
<html>,</html>~ Starting and ending tags of a web page. These are essential.
<head>,</head>~ Some important details about your web page (such as title) which you can not see on the body of your web browser are included between these two tags.
<title>,</title>~ introduce the title of your web page on the title bar of your web browser.
<body>,</body>~ Everything on the body of your web browser is included between these two tags.
Step 2> Let’s do something more on texts
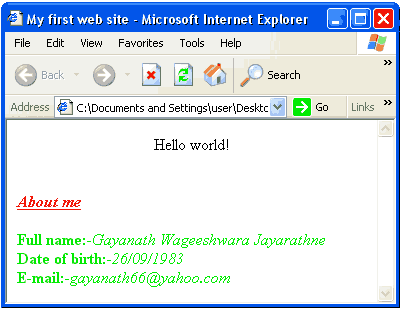
>>Now you are on your web page. Go to View>Source or right click on the browser body and select "View source". “source codes” of your web page will be open on the Notepad.
>>Make it new by adding source codes as below (Here, add your details instead of my details).
<html>
<head>
<title>My first web site</title>
</head>
<body>
<center>Hello world!</center><br><br>
<font face=”Arial,Helvetica” size=”+2” color=”ff0000”>
<b><i><u>About me</u></i></b><br><br>
</font>
<font face=”Arial,Helvetica” size=”+1” color=”green”>
<b>Full name:-</b><i>Gayanath Wageeshwara Jayarathne</i><br>
<b>Date of birth:-</b><i>26/09/1983 </i><br>
<b>E-mail:-</b><i>[email protected] </i>
</font>
</body>
</html>
>>Click File>Save and close the Notepad. Then on your web browser, go to View>Refresh or click the Refresh icon on the standard toolbar. After that your web page will change as below.
Tag Introduction
<font>,</font>~ To affect on the text on your web page.
face, size, color~ are called “Attributes” of <font> tag. In HTML some tags have attributes to have desired effects. When you indicate attributes be careful about = and “ ”
face~ indicates the font type. When you use “face attribute” be careful to use a font type that every computer has. Other wise, the web browser will show the default font that computer has, most probably “Times New Roman”. “Arial” is a well famous clear font that most computers have. When the computer hasn’t the required font, you can suggest an alternative font in “face attribute” using a comma ( , ). According to above source codes the web browser will show “Helvetica” font when the computer hasn’t “Arial” font.
size~ indicates the size of the text. You can vary the size from -7 to +7. The default size is 3.
color~ indicates the color of the text. Here, we use six digits including letters and numbers. To learn more and find the color code of required color, go to a photo editor such as Adobe photoshop. Instead of these color codes, for some colors, you can directly give the name. Those colors are black, white, red, green, blue, yellow, aqua, fuchsia, gray, lime, maroon, purple, navy, olive, silver and teal. If you want the viewer to be on your web page more time, don’t use dazzling colors.
<b>,</b>~ To make bold the text.
<i>,</i>~ To make italic the text.
<u>,</u>~ To underline the text.
When you use these tags, be careful about ending tags and the order they should be.
<b><i><u>About me</u></i></b>~ Correct order
<b><i><u>About me</b></i></u>~ Wrong order
<br>~ To make a line brake on the text.
If you just typed as below in your source codes, you won’t see it as it is on your web browser.
Full name
Date of birth
You should type as below to have two lines.
Full name<br>
Date of birth
Make sure this <br> tag hasn’t an ending tag as </br>.
<center>,</center>~ align everything between these two tags. You will learn more on aligning in Step 4.
In HTML you can not have more than one space between two words or two letters using space bar. To have more than one space you should type in your source codes for one space.
Full name :- <br>
Date of birth :-
If you type as above in your source codes, your web browser will show it as below aligning the sign :-
Full name :-
Date of birth :-
Step 3> Add images to your web page
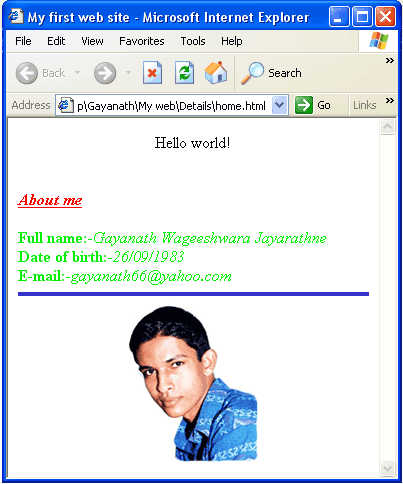
>>First you should save the required image in My web folder. The file type of the image should be either “gif” or “jpg”. In this case, I use "G.jpg". Images make a big effect on the loading time of your web page. So, always try to use images with less file sizes. Around 10Kbs is a good file size. Some photo editors such as Adobe photoshop have special features to reduce the file sizes of web images.
>>Open the source codes of your web page on the Notepad as you learned earlier and add the new source codes as below. You only have to add the red color codes.
<html>
<head>
<title>My first web site</title>
</head>
<body>
<center>Hello world!</center><br><br>
<font face=”Arial,Helvetica” size=”+2” color=”ff0000”>
<b><i><u>About me</u></i></b><br><br>
</font>
<font face=”Arial,Helvetica” size=”+1” color=”green”>
<b>Full name:-</b><i>Gayanath Wageeshwara Jayarathne</i><br>
<b>Date of birth:-</b><i>26/09/1983 </i><br>
<b>E-mail:-</b><i>[email protected] </i>
</font>
<hr color="3333cc" size="4">
<center><img src="G.gif" alt="How am I look like?" width="130" height="159"></center>
</body>
</html>
>>Save the source codes and refresh your web browser as earlier done. Then your web browser will be as below.
Tag Introduction
<hr>~ draws a line across your web page. You can specify color and size attributes. Consider there is no ending tag as </hr>.
<img>~brings the image onto your web page. For this tag also, there is no ending tag as </img>.
src~ specifies the name of the image and the place where it exits.
width, height~ specify the width and the height of the image in pixels. If you don't use these two attributes the image will be in its default size.
alt~ the phrase you specify using "alt attribute" will be shown when someone moves the mouse on the image.
Step 4> Link your web page to another
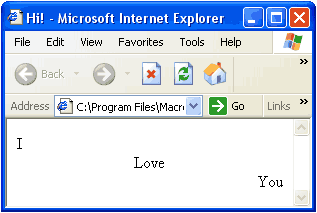
>>First you have to create another web page. To do this open a new Notepad window and type following source codes. After that save it in My web folder by giving the file name as hi.html
<html>
<head>
<title>Hi!</title>
</head>
<body>
<div align=”left”>I</div>
<div align=”center”>Love</div>
<div align=”right”>You</div>
</body>
</html>
>>Then go to My web folder and open the "hi" web page. It will be as below.
Tag Introduction
<div>,</div>~ are used to align required stuff. Make sure when you use <div> tag it also adds a line break. You can figure out this by looking at above example.
align~ is the attribute of <div> tag to align. left, center and right are the values you can specify for "align attribute".
As earlier done, you can just use <center>, </center> tags to make centered required stuff.
>>Now go to the source codes of your first web page (index.html) and add new source codes as below. You only have to add red color codes.
<html>
<head>
<title>My first web site</title>
</head>
<body>
<center>Hello world!</center><br><br>
<font face=”Arial,Helvetica” size=”+2” color=”ff0000”>
<b><i><u>About me</u></i></b><br><br>
</font>
<font face=”Arial,Helvetica” size=”+1” color=”green”>
<b>Full name:-</b><i>Gayanath Wageeshwara Jayarathne</i><br>
<b>Date of birth:-</b><i>26/09/1983 </i><br>
<b>E-mail:-</b><i>[email protected] </i>
</font>
<hr color="3333cc" size="4">
<center><img src="G.gif" alt="How am I look like?" width="130" height="159"></center>
<hr color="3333cc" size="4">
<center><a href="hi.html" target="_blank">I have to say something</a></center>
</body>
</html>
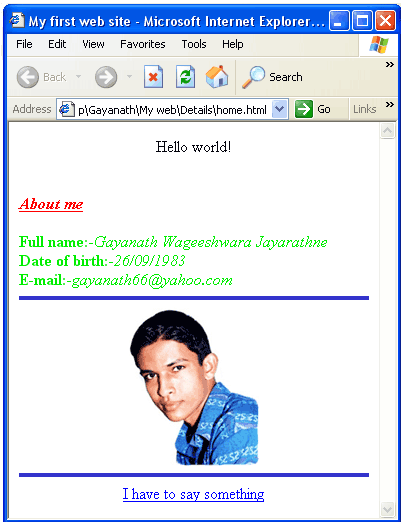
>>Save the source codes and refresh the browser window. Then your web page will be as below. Click on the phrase "I have to say something". Then you will go onto the other web page of you (hi.html).
Tag Introduction
<a>,</a>~ is used to introduce a "hyper link" on web pages. The phrase between these two tags is shown on the web page as the access to the new page. When you move the mouse on a hyper link a sign of hand appears. You can easily identify a hyper link by this manner.
href~ indicates the file name of the web page and where it exits. When the both web pages are in the same folder, you can just give only the file name as I have done above.
Think hi.html exits in a sub folder called Hello which exits in My web folder. If it is so, you have to give the tag as below.
<a href="Hello/hi.html">I have to say something</a>
You can use as below on the source codes of hi.html to make a hyper link from hi.html to index.html
<a href="../index.html">Home</a>
Make sure, you have to follow above two manners when,
"My web" is the main folder and "Hello" is the sub folder and
"index.html" exits in My web folder while "hi.html" exits in Hello folder.
To avoid the confusion, remember to save all stuff in the same folder and just use the file names as I have done.
Now think your web site is famous and one of your friends wants to add a hyper link to his web site from your web site. To be kind enough to your friend, add following source code to your page. Here www.ajith.com is the web address of your friend's web site. But be careful to type whole phrase "http://www.ajith.com" in the "href attribute".
<a href="http://www.ajith.com">Ajith is there</a>
target~ describes where your new web page should be open. The values you can give for this attribute are _blank, _parent, _self and _top. I have used _blank. This will open your new web page on a new browser window. Try out the others and see the differences. When you give these values be careful to add underscore ( _ ) at the beginning.
Step 5> Host your site!
Hi, now you have a little web site with you. So, don't you like to spread it on the "Internet". Definitely you do. When you host a web site, if you like to be confused, actually there are lots to consider. But to make the saying "simple is the best" correct I will give you some guidelines to host your web site as a "free hosting site".
>>Go to www.geocities.com and choose the free hosting package. To have this package you should have a "yahoo account". So if you haven't a yahoo account, first get a yahoo account.
>>After following the instructions, you will have an e-mail from yahoo informing the details.
>>You can enter to the location where your web site stuff is, by signing in at "www.geocities.com". There, be familiar with "File manager". This shows your web site stuff (this is like My web folder on your computer). By using "Upload files" you can upload files from your computer to there. So, you can also try out other features and enhance your web site.
Conclusion...
So, how do you feel? Did you get something? Hope so. As I mentioned at the beginning this is not a comprehensive course on HTML. If you got stimulator by referring this little amount it's a big pleasure to me. There are lots more. The best thing you can do to advance is referring a book on HTML. "Sams Teach Yourself HTML 4 in 24 Hours" is a better book that I can recommend. And also you can get more by visiting its companion site "The 24-Hour HTML cafe" .
To get more information on "web" visit "The World Wide Web Consortium (W3C)" on their web site www.w3.org And also I am there to help you with the things which I know. Mail me on [email protected] or just add your question to below comment area.
Home - Guest Book - Curriculum Vitae - My Articles - Acknowledgements - Site Information - Monthly Article -
Study Guide - Guide of Sri Lanka - Nisadas - Arts - Jokes - Greetings
Flowers to Sri Lanka LinkShare Referral Prg