Fairy Tag Tutorial continued..... |
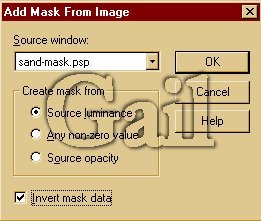
| 5. Add another raster layer. We will be putting our mask on this layer. Go to masks, new, from image. Where it says this window, scroll down to sand-mask. Make sure that the invert mask data is also checked. Click okay. Now put your cursor in the middle and flood fill with your background pattern. It will look like you filled the whole thing but it's not. Now go to masks/delete and click yes to merge into current layer. 6. Now go to your layer palette and right click on your layer. Duplicate it and then merge vixible layers. |
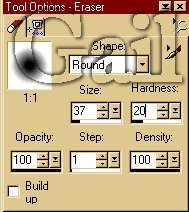
| 9. We are now going to add a border. Go to Image/add borders. Click yes that it can merge the layers. You want symmetric checked and 25. Click okay. 10. Now we are going to add the other mask called photo edge 02.psp. This we minimized on your workspace earlier. Add a layer. Go to masks, new, from image. Scroll down to photo edge 02.psp, source luminance checked and invert mask data checked. Click okay. Flood fill with the same tan (your foreground color) that you've already used. Again go to masks, delte and click yes to merge with layer. 11. Now we are going to take the eraser tool and erase just where the angel is. My eraser settings are .... |
| *page 1* |
| If you have any comments or questions about this tutorial, please feel free to contact me |
 |
| 7. Now again add a layer but go to your layer palette and drag this layer down to the bottom. We are going to flood fill this layer with the beige color in the background. To pick a beige color use your image 3 and the dropper tool. Left click so that your tan becomes your foreground color. Once you have your color, flood fill the bottom layer. 8. Now click back on your image 3. Again this is the copy you made of the fairy on the bench tube. Copy and past that as a new layer on your background. Now go to your layer palette and drag this layer to the top. |
 |
 |
| 12. We are almost finished. We just want to add your name. On this tag the font I used is called Hyacinth.tff but you can use whatever font you'd like. Add another layer. Now add your text with these settings...................... |
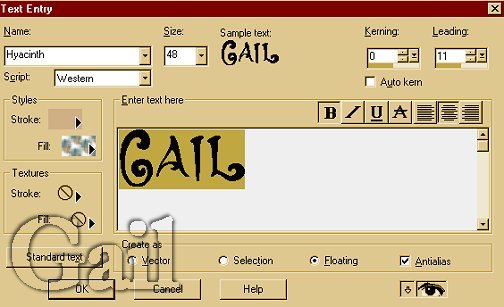 |
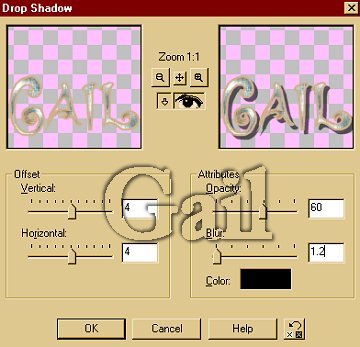
| Type in your name and then hit okay. Deselect and now move your name to where you would like it to be. I have mine right below the angel. Now go to effects, drop shadow with these settings .... |
 |
| That's it. You've completed the tag. Hope you are happy with the result. |