I don't know about you, but I'm fed up with the, so called, Fritz 'Damsel'.
Apart from anything else, it's about as alike to a real damsel nymph as a barge is to a canoe, usually twice the size of the real nymph and at least 10 times the thickness. It is fair to say that stripping a fly like this on most small stillwaters is a very effective way to catch fish, but then so is a hand grenade or a few ampoules of Cymag.
Instead of kidding myself that I was fishing imitatively, I decided to 'right the record' and create something that at least tried to resemble the real mccoy. Here goes!
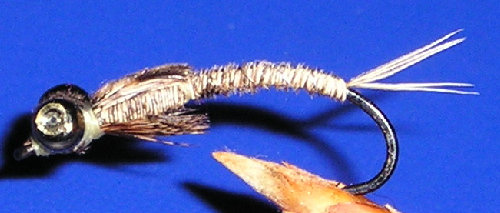
Ingredients for Flukes Proper Damsel Nymph.
Hook: Partridge Sedge / Caddis X Long size 14 Silk: Brown Uni Thread 6/0 Tails: Pheasant tail, for colours see 'Tying Instructions' Body: From tail Thorax: Pheasant tail Rib: Fine wire or monofilament nylon/fluorocarbon Other: Eyes formed from small glass beads, see text below.
Tying Instructions:
None of the ideas or techniques for this fly are new or my own. They're merely a combination of observations on the insect itself and good experiences with other peoples techniques on how to acheive the desired effect.
The ideas I've borrowed are from various sources, Arthur Cove for the slim abdomen formed from pheasant tails, Frank Sawyer and Olli Kite for the wing cases and ribbing - I can't remember the first time I saw partridge hackle tied in false as legs, but whoever came up with it, I've borrowed it ;-)
The first thing to deal with in this pattern is the eyes. Final instar damsel larvae have huge eyes, just look at an imago for a good idea of what they look like in the largest nymph. I'll digress a little here, but hey, it's my page ;-p
A long while ago I was in a haberdasher's shop, with the wife to be, looking at all sorts of bits and pieces to do with wedding dresses and the like. I confess, I was a little bit bored, haberdashers not normally being my choice of hang out, until I happened on a little pot of beads. They're glass, I think, and the same shape and size that you get on a 'friendship' bracelet - the sort of thing that used to be called 'Indian Weaving' I think. Suffice to say, if neither of those things make any sense to you, they're approx 2mm across with a 0.8mm hole in the middle and are 1mm thick. The particular ones I bought were a beautiful olive and purple pearl effect and, as I thought at the time, perfect for making insect eyes with.
The technique is simple - thread some 0.5mm diameter nylon monofilament through two of the beads and singe the end with a cigarette lighter. While the singed end is still hot and molten, press it against the metal shroud of the lighter to make a flat 'stop' on the end of the mono. Clip the mono to around 5 or 6mm the other side of the two beads and repeat the singeing and flattening so you end up with a dumbell of beads about 3mm in total width. Depending on how heat proof your fingers are you may need something to hold the beads and line with for the second part of this technique.
Now... on to tying the fly...
I've just created a 'walkthrough' with pics here or if you prefer the text only version, read on McDuff.
Tie on the thread and make an initial layer down to almost the bend of the hook. Bring the thread back to the eye in open turns and tie in the previously made eyes using a figure of eight as close to the eye of the hook as you can while leaving enough space to whip finish. Take the thread back to the bend in open loops and tie in 5 pheasant tail herls, and approximately 1 inch of wire ribbing material. Leave about 5mm of the herls as tails with the remainder to be used to build the abdomen.
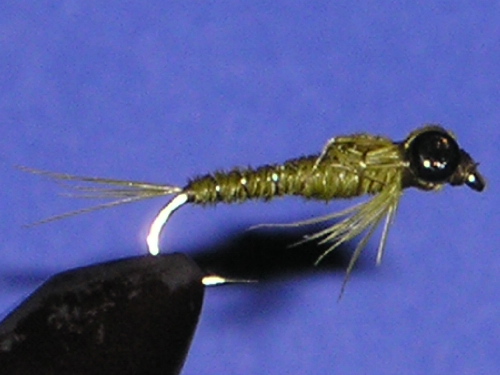
A quick note on colours: Natural damsel nymphs appear in a wide range of colours, shapes and sizes. Natural pheasant tail is an imitative colour, although by far the most common is a pale olive drab. Exact colour is up to you, but I would recommend the following combinations of colours and ribs as complementary, although fine monofilament nylon or fluorocarbon tends to go with any of them when cinched down very tight:
Natural cock pheasant and orange copper wire
Natural hen pheasant and silver wire
Dyed olive pheasant and gold wire
Now take the thread back to the thorax area and without twisting the herls into a rope, wind them in touching turns along the hook shank to achieve good coverage but as slim a profile as possible. As the hook has a very long shank, it very unlikely the herls will cover the whole shank with enough to spare to make a thorax and wing cases, so don't worry if they appear a little short as the next step is to tie in a larger bunch of herls to form the thorax.
Take approximately 5 to 10 herls and tie them in with the tips towards the eye of the hook. Cover the tips with thread so none of the tops protrude (note: I did try at first to use the tips to simulate legs, but due to the position at the back of the thorax it looked unnatural - a false hackle of appropriately coloured partridge does a much better job). Wind the thorax herls around the shank to make a 'cigar' shaped thorax, securing them with a single soft loop just behind the eyes.
Take the thread back OVER the thorax so it will be hidden by the wing cases, in a single long loop. Double the herl back and secure with one soft and then one hard wrap of silk, then take the silk back to behind the eyes, again going over the thorax so the thread will be hidden by the re-doubling of the herl. Before you redouble the herl, tie in a partridge hackle under the thorax and draw it through so the tips are just shorter than the thorax, tie in firmly with a couple of hard wraps and snip the hackle off, covering the excess with two or three figure of eight wraps over the eyes.
Now redouble the wing case herls and tie in behind the eyes, take the thread over the eyes and tie off the herls again in front of the eyes and whip finish.
To protect the wing cases from the fishes teeth, apply a single coat of head finishing varnish.