RESEARCHReports |

|
||||||||||||||||||||||||||||||||||||||||||||||||||||||||||||||||||||||||||||||||||||||||||||||||||||||||||||||||||||||||||||||||||||||||||||||||||||||||||||||||||||||||||||||||||||||||||||||||||||||||||||||||||||||||||||||||||||||||||||||||||||||||||||||||||||||||||||||||||||||||||||||||||||||||||||||||||||||||||||||||||||||||||||||||||||||||||||||||||||||||||||||||||||||||||||||||||||||||||||||||||||||||||||||||||||||||||||||||||||||||||||||||||||||||||||||||||||||||||||||||||||||||||||||||||||||||||||||||||||||||||||||||||||||||||||||||||||||||||||||||||||||||||||||||||||||||||||||||||||||||||||||||||||||||||||||||||||||||||||||||||||||||||||||||||||||||||||||||||||||||||||||||||||||||||||||||||||||||||||||||||||||||||||||||||||||||||||
|
An Introduction to Microscopy The world’s first microscope was created by Anton van Leeuwenhoek, who used it in his study of what he called ‘wee animalcules’. He was the first person ever to see bacteria. This microscope had only one lens and was similar to a magnifying glass; however, Leeuwenhoek was the best lens grinder in the world in his day, and the lens he created could magnify a microbe as much as 300X with a resolution of 1 μm. Later, Robert Hooke built microscopes with multiple lenses, called compound microscopes, but it was not until 1830 that Joseph Jackson Lister developed a significantly better microscope. Various improvements to this scientist’s instrument led to the development of the modern compound microscope which is used in microbiology laboratories today. This compound light microscope (LM) uses visible light as its source of illumination, and can be used to examine very small specimens as well as some of their fine detail. The total magnification of specimens using this type of microscope can reach 1000X or 2000X, with oil immersion lens, and since the white light used has a relatively long wavelength, it cannot resolve structures smaller than 0.2 μm. These limitations prove to be a problem when one is studying viruses, since they are less than 0.1 μm in size. And even though bacteria can be seen, their smaller components, say their fimbrae or pili, are not visible. Electron MicroscopyThe problems regarding the resolution and magnification of Mycoplasma and viruses was solved with the invention of the electron microscope. In electron microscopy, a beam of electron is used instead of normal light – free electrons traveling in waves. The shorter wavelength of these electrons results in the greater resolving power of the electron microscope, the wavelengths being about 100,000 times shorter than that of normal light. And instead of using normal glass lenses, this microscope uses electromagnetic lenses to focus onto a specimen a beam of electrons traveling through an evacuated tube. Two types of electron microscopes are available: the Scanning Electron Microscope (SEM) and the Transmission Electron Microscope (TEM). 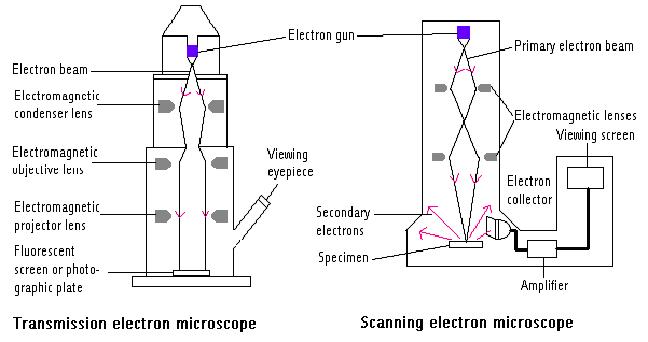
Scanning Electron Microscope (SEM)The scanning electron microscope came into widespread use in the 1960s. For this microscopy, the specimens are coated with gold, and an electron gun produces a finely focused beam of electrons called the primary electron beam. This beam of electrons passes through electromagnetic lenses and are directed rapidly over the sample’s surface, knocking out the electrons out of the coating, producing secondary electrons, which are transmitted to an electron collector, amplified, and used to produced an image on a viewing screen or photographic plate. Because the gold coats the specimen all over, and because the secondary electrons are scattered in different directions based on the positions of the gold atoms, the image produced is a three-dimensional one. The images are obtained using a closed-circuit TV, and the specimens are illuminated by a spot probe that is in constant motion. The microscope column acts as a high-resolution camera tube with the specimen as the target, and the camera can zoom in or out on the specimen studied. This microscopy can be used to study both material and biological samples, since its resolution is as great as 20 nm, and can magnify objects up to 10,000 times. However, there are some problems connected to this. For one, the specimens must be absolutely dry (100%), since the vacuum chamber apparently cannot tolerate moisture. This is for the SEMs in the Institute for Higher Learning. There are special SEMs called Cryo-Scanning Electron Microscopes, which can handle specimens that are not moisture-free, but the process of preparation and operation are time-consuming. Quick manipulation is essential in the case of Cryo-SEM since the specimens are immersed in a nitrogen slush, which quickly thaws under vacuum to liquid nitrogen. This problem, however, has been solved with the development of the variable pressure/environmental SEM, which uses liquid immersions. The process of preparing the samples for SEM is tedious. There are, admittedly, certain samples that can be viewed without preparation (material samples), although they might have to be washed with acetone first; however, all biological specimens must undergo elaborate preparation. The diagram on the following page shows the steps involved: 
The specimens are first fixed cryogenically by physical methods or chemically, by using osmium tetraoxide vapour or soaking in glutaraldehyde. The specimens are then dried. Air-drying is used for specimens such as insects, pollen and herbarium samples and occurs at a temperature of 40-60˚C. Delicate samples that cannot withstand this method of drying can be dried using alcohol, since water will collapse the surface tension. Freeze drying is carried out at a temperature of at least -60˚C, and must be carried out fast because slow freezing will result in the formation of ice crystals which will disrupt the structure of the specimen. Shrinkage of the specimen will also, inevitably occur. Not only that, there might also be debris or artifacts on the surface of the specimen, obscuring the actual surface structure. However, this preparation is very fast and does not require many solvents. Critical point drying, however, is very tedious and time-cosuming. However, the solvents used will remove all coatings and debris, and there is less shrinkage of the specimen. Coating of the specimen can occur one-directionally or multi-directionally. The uni-directional method involves the evaporation of carbon, palladium or gold. The multi-directinal method uses gold to coat the specimen. Gold leaf is placed on the anode, and argon on the cathode. The argon serves to turn the gold into powder, and to scatter or disperse the gold so that more surface area will be covered. Staining is by using lead citrate or uranyl acetate. Scanning electron microscopy has diverse applications. It can be used in element analysis to determine the surface and internal structures of a specimen, and its true topography – the image is based on distribution of elements of different atomic number, electroprobe transmicroanalysis (EPMA); image analysis and storage. It can also be used to determine soil suitability, examine semi-conductors, and in failure analysis and element labeling. Transmission Electron MicroscopeThe transmission electron microscope was developed based on theoretical work by Louis de Broglie, who demonstrated that accelerated electrons are associated with a wavelength inversely proportional to their momentum. In 1926, it was demonstrated that magnetic fields can act as lenses by causing electron beams to converge to a focus. The prototype built by Ernst Ruska and Max Knoll in 1931 could only magnify objects as much as 17 times; however, by 1950, refinement of lens design and other technical features lead to the development of a TEM capable of resolving up to 2 nm. This model had stable potential in accelerating the electron beam, had high-power lenses, a stable current supply and featured shielding from X rays emitted when electrons were absorbed, among many things. In transmission electron microscopy, a finely focused beam of electrons from an electron gun (which accelerate the electrons through a potential in the range of 40 to 100 kV) passes through a specially prepared section of a specimen. The beam is focused on a small area of the specimen by an electromagnetic condenser lens that functions almost similarly to the condenser of a light microscope in that it directs the beam in a straight line to illuminate the specimen. Unlike scanning electron microscopy, there are no secondary electrons involved. Like the light microscope, the lenses control illumination, focus and illumination; however, the specimens are usually placed on a copper mesh grid instead of a glass slide. An electromagnetic objective lens magnifies the beam of electrons passing through the specimen, and an electromagnetic projector lens focuses this beam onto a fluorescent screen or photographic plate. The final image, or transmission electron micrograph, shows a ‘map’ of dark and light areas, depending on the number of electrons absorbed by different areas of the specimen. The TEM has a resolution of up to 2.5 nm, and can magnify objects as much as 100,000X. The specimens must first be fixed using osmium tetraoxide or glutaraldehyde, after which they are dried and put in resin blocks and cut into thin sections of less than 1000 Angstroms in thickness with a diamond or glass knife. In the case of viruses, the viral particles are blended using a buffer, filtered and Triton X-100 detergent and thioglycollic acid are added to them. Since this technique involves electrons actually passing through the specimen the way light passes through a normal light microscope specimen, the specimen is very thin, and therefore the contrast between their ultrastructures and the background is weak. This problem is resolved by staining the specimens with chemicals that absorb electrons and produce a darker image in the stained region. Commonly used chemicals include lead, osmium, tungsten and uranium, which can be fixed onto the specimen (positive staining) or used to increase the electron opacity of the surrounding field (negative staining). The latter is useful in the study of extremely small specimens such as virus particles, bacterial flagella and protein molecules. A technique called shadow casting may also be used, whereby a heavy metal (platinum or gold) is sprayed at an angle of about 45˚C so that it strikes the microbes from only one side. The metal accumulates on one side of the specimen and leaves a clear area behind it (a shadow, so to speak). This results in a three-dimensional-like image, and provides a general idea of the size and shape of the specimen. This microscopy does not come without problems, however. The electron beam should be monochromatic and correspond to a uniform accelerating potential. The electron microscope column must also be kept at a vacuum of 10ˉ⁴ torr or better (a torr being a unit of pressure equal to 1/760 atmosphere) since electrons easily scatter in the air. Specimens for TEM must be resistant to both dehydration in the vaccum and beam damage, so that bombardment with electrons will not result in excessive overheating and subsequent destruction. The multiple scattering of electrons by the specimen factor also destroys contrast in the image, and therefore the specimen must be exceedingly thin, and it required special technical skills to produce usable specimens, and also a metal mesh support coated with a thin film of low scattering power. Because the information carrier for this microscopy is the electron, which is charged, has extremely small mass, and possesses a particle-wave duality nature, transmission electron microscopy can used to examine microparticulate or replicated materials, measure electron diffractions in crystalline objects, in microautoradiography for locating labeled compounds, in immunogold techniques for the identification of cell sites, histochemistry of localization of special cell components, product failure analysis (stress fractures of metals), rapid analysis of conductive dry material, health-related analysis (analysis of toxin in food and tissues, for example), in biotechnology in the rapid identification of contamination of batch fermentation process, and in the examination of oils and emulsions. These are not the only things TEM can be used for – indeed they only serve to reflect the diversity of applications of this branch of microscopy. |
|