sphere { 0,2 hollow
  texture { pigment { rgbt 1 } }
  interior {
    media { scattering { 1 1 }
      density { spherical }
    }
  }
}

light_source { <1e4,1e4,0> 1 }

camera {
  location <0,0,-3>
  look_at <0,0,0>
}

background { rgb <.4,.7,1> }

One of the most challenging tasks for POV-Ray (or for any other renderer) is the realistic simulation of clouds, smoke, and explosions. The media feature of POV-Ray was designed for the simulation of these (and other) items.
The first and simplest way to use media is to simulate a cloud. The following code produces the image to its right:
sphere { 0,2 hollow
texture { pigment { rgbt 1 } }
interior {
media { scattering { 1 1 }
density { spherical }
}
}
}
light_source { <1e4,1e4,0> 1 }
camera {
location <0,0,-3>
look_at <0,0,0>
}
background { rgb <.4,.7,1> }
|
|
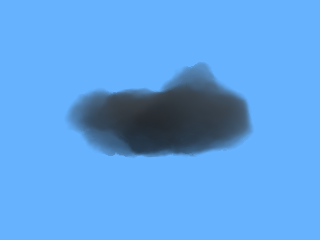
That's pretty good for starters. We'll make it look more like a real cloud by making the edge sharper with a density_map, add some turbulence with the warp keyword, and flatten it a bit with a scale transform. The new code and the results are as follows:
sphere { 0,2 hollow
  texture { pigment { rgbt 1 } }
  interior {
    media { scattering { 1 1 }
      density { spherical
        scale <1,.5,1>
        warp { turbulence .3 }
        density_map { [0 rgb 0][.1 rgb 1] }
      }
    }
  }
}

light_source { <1e4,1e4,0> 1 }

camera {
  location <0,0,-3>
  look_at <0,0,0>
}

background { rgb <.4,.7,1> }
|

|
Now this looks much more like a real cloud. You can sharpen it by narrowing the range from full transparency to full opacity. You can play with the settings in the turbulence warp to make it smoother or more swirly. Keep the turbulence inside the warp statement, and the warp after your other transforms, so that your transforms won't affect the turbulence (unless that's what you want).
The only weakness with this is that it's good for only one cloud. That's because the container object is a sphere, and for performance reasons, spheres make the best containers for something that is spherical in overall shape. If you want to do a whole bunch of clouds, you can either create a whole bunch of spheres, or you can use a different object and fill it with a different pattern. Here's a cloud bank:
#declare pigCloudBank=pigment { average
  pigment_map {
    [1 planar]
    [1 granite scale 100 ]
  }
}

box { <-200,-2,-200>,<200,2,200> hollow
  texture { pigment { rgbt 1 } }
  interior {
    media { scattering { 1 .5 } method 3 samples 30,100 intervals 1
      density { pigment_pattern { pigCloudBank }
        density_map { [.6 rgb 0][.61 rgb 1] }
      }
    }
  }
}

light_source { <1e4,1e4,-1e4> 1 }

camera {
  direction z*2.5
  location <-50,-25,-50>
  look_at <0,0,0>
}

background { rgb <.4,.7,1> }
|

|
If you rendered this one, you'll probably notice that it took a lot longer to render. This was because I increased the sampling a great deal so that there would be less banding in the clouds.
While you experiment with clouds, keep in mind that clouds are best done with scattering media only. If you want your clouds to have a dark underside (like real clouds do), don't include the no_shadow keyword in the container object.
Smoke is about as simple as are clouds. The only change is that in addition to the scattering media, you also include a degree of absorption media as well, with the same density pattern and turbulence setting, and the density_map for each media should match closely. This way the two media match each other. The easiest way to do this is to put the scattering and absorption settings into one media object, and it makes for better performance, too.
Here's a simple modification of the cloud:
sphere { 0,2 hollow
  texture { pigment { rgbt 1 } }
  interior {
    media { absorption 1 scattering { 1 .1 }
      density { spherical
        scale <1,.5,1>
        warp { turbulence .3 }
        density_map { [0 rgb 0][.1 rgb 1] }
      }
    }
  }
}

light_source { <1e4,1e4,0> 1 }

camera {
  location <0,0,-3>
  look_at <0,0,0>
}

background { rgb <.4,.7,1> }
|
|
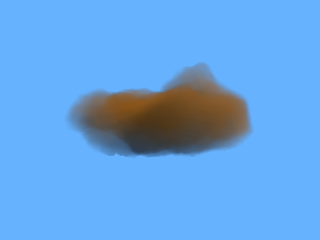
If you want the smoke to look more gray and less black, then adjust the scattering value a little higher relative to the absorption value. For colored smoke, set the scattering to the color you want. For instance:
#declare SmokeColor=rgb <1,.5,0>; // orangish smoke

sphere { 0,2 hollow
  texture { pigment { rgbt 1 } }
  interior {
    media { absorption 1 scattering { 1 .3*SmokeColor }
      density { spherical
        scale <1,.5,1>
        warp { turbulence .3 }
        density_map { [0 rgb 0][.1 rgb 1] }
      }
    }
  }
}

light_source { <1e4,1e4,0> 1 }

camera {
  location <0,0,-3>
  look_at <0,0,0>
}

background { rgb <.4,.7,1> }
|
|
The underside of this smoke is black because it's shadowed by the upper level of the smoke, and therefore is getting no light.
Getting the proper balance between scattering and absorption is a fine art; a bit too much scattering, and your smoke will be too pale; too little, and your smoke will be too dark. The right values will change from one scene to the next, and depend on the brightness of the scenery behind the smoke.
Fire is really a glowing gas, and glowing gases are best simulated by putting emission and absorption into the same media statement. Glowing gases cast shadows, but they are usually used in circumstances where shadow is not wanted, so the no_shadow keyword is appropriate for the container object.
Real-world glowing gases absorb exactly as much as they emit. If you want your fire, plasma, etc., to look realistic, you must absorb as much as you emit; that means that for best results, put both emission and absorption into the same media statement, so that there is no chance of the density patterns being different.
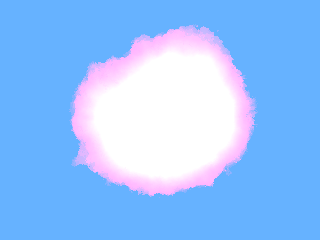
Here's one I did earlier:
#declare denFireBall=density{
  spherical
  turbulence .3 lambda 3
  density_map {
    [.01 rgb 0]
    [.01 rgb <1,0,0>]
    [1/4 rgb <1,.5,0>]
    [2/4 rgb <1,1,0>]
    [3/4 rgb <1,1,1>]
  }
}

sphere { 0,2 hollow no_shadow
  texture { pigment { rgbt 1 } }
  interior {
    media { emission 2 absorption 2
      density { denFireBall }
    }
  }
}

light_source { <1e4,1e4,0> 1 }

camera {
  location <0,0,-3>
  look_at <0,0,0>
}

background { rgb <.4,.7,1> }
|
|
I know that this looks rather funny against a sky-blue background, but that's how a smokeless fireball would likely look against a blue sky.
Generally speaking, you would use smokeless fire in situations where the smoke isn't needed for realism. The flame from a Bunsen burner doesn't produce any smoke. This would also work well for a neon sign, a force field in some sci-fi work, or what have you; the density would be a different pattern with different colors, but the theory is the same.
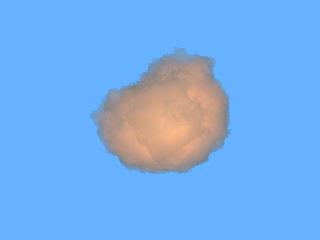
Explosions are a combination of fire and smoke. You probably knew this already. But for the purposes of modeling an explosion, you will need all three kinds of media going on. You will need emission and absorption for the fire, and scattering with absorption for the smoke.
This is easier for an exploding fireball, because you can layer all three media together in the same container and get a pleasing result. The densities for the emission and scattering will use the same basic pattern, with density maps that are not too different; the outer fringes of the scattering will have higher values than the emission, because the outer parts will have more smoke and less fire than the interior.
Now you can use just one absorption media to go with both the emission and the scattering media, but it's tricky to set the density map so that it exactly covers both both of the other media to exactly the right degree.
It's easier—but somewhat slower to render—to have two absorption media, one to match the emission and another to match the scattering. This way you don't have to monkey around with trying to do a weighted sum of the two density maps, which can be troublesome.
Here's an example for you:
sphere { 0,2 hollow no_shadow
  texture { pigment { rgbt 1 } }
  interior {
    media { absorption 8 emission 8 method 3 samples 30,30 intervals 1
      density { spherical
        warp { turbulence .75*.3+.05 lambda 2.75 }
        density_map {
          [1-.99*.75 rgb <0,0,0>]
          [1-.99*.75 rgb <max(0,1-.75*1.5),max(0,1-.75*4.5),max(0,1-.75*6)>]
          [1 rgb <.75,.25,0>] }
      }
    }

    media { absorption 3 scattering { 1 .3 } method 3 samples 30,30 intervals 1
      density { spherical
        warp { turbulence .75*.3+.05 lambda 2.75 }
        density_map {
          [1-.99*.75 rgb 0]
          [1-.99*.75 rgb 1]
          [1-.49*.75 rgb 1]
          [1-.49*.75 rgb 0]
         }
      }
    }
  }
}

light_source { <1e4,1e4,0> 1 }

camera {
  location <0,0,-3>
  look_at <0,0,0>
}

background { rgb <.4,.7,1> }
|
|
There are several ways to animate the different media effects:
#declare moveCloud=transform { translate x*clock }

sphere { 0,2 hollow
  texture { pigment { rgbt 1 } }
  interior {
    media { scattering { 1 1 }
      density { spherical
        scale <1,.5,1>
        transform moveCloud
        warp { turbulence .3 }
        transform { moveCloud inverse }
        density_map { [0 rgb 0][.1 rgb 1] }
      }
    }
  }
}

light_source { <1e4,1e4,0> 1 }

camera {
  location <0,0,-3>
  look_at <0,0,0>
}

background { rgb <.4,.7,1> } |
Render this for a couple seconds worth of frames, and you'll see the cloud as if the wind were blowing it.
If you play with media enough you will eventually come up with a science about it.
One aspect of media that you can use to your advantage is the way that multiple densities in a single media work together. The documents state that the densities for a given point are multiplied together. This allows you to have one density to control the point-to-point opacity of the media, and another density to simulate the temperature of the media at a given point. You can then use the temperature value for each point to specify the amounts of emission, scattering, and absorption, and let the opacity setting control the degree to which the temperature affects the media at that point. This allows you to worry about opacity and color separately from each other, which can simplify things.
If you get quite good at programming scripts, you can develop code which can combine your opacity and temperature settings into a single density map, and even create a density map that allows you to get by with one absorption media for smoking fire, instead of using two. This will give you shorter rendering times, which for some projects may be a consideration.
A far more advanced topic is the use of particle systems for controlling media. The details of implementing a particle system are beyond the scope of this tutorial, but the upshot is that in a particle system, the patterns are made by arrangements of objects, and not with a procedural pattern applied to a single object. The objects in a particle system are simple, but there are many of them, whereas what I describe above uses one object with a very complicated structure. With a particle system, your media will cease to have patterns; instead the shape of the fire, smoke, etc., will be modeled by a large number of tiny particles. Each particle is represented by a small sphere, with a constant density in it. A sphere with a constant density will render very quickly, which is good because particle systems use hundreds or even thousands of them. The goal of particle systems is to obtain realistic effects by simulating the behavior of a fluid substance as it interacts with itself and with other objects (both solid and fluid).