Setting up sound files to play out Deus Ex conversations
The Deus Ex audio format:
Deus Ex conversation files are of this format:
Sample rate: 44, 100 Hz
Bit Depth: 16-bit
Channels: Mono
File Format: .mp3
The lip sync technology in Deus Ex works best with this file format, and slight changes may make a huge impact here. The encoder you use to convert your recorded sounds into the mp3 format is also important.Encoding differences can give rise to the �conversation-plays-with-mouse-clicking� type of bug. NPC-to-NPC conversations will not play out at all.
Before going through with the following tutorial, download the following files. This tutorial also doesn�t step you through the whole process of setting up a conversation in Deus Ex; I am assuming that you are already familiar with that.Check http://www.planetdeusex.com/tack for good tutorials on DX editing.
Wav2mp MPEG2 audio encoder by John Schlichther (47 kb)
Please check this location to download the latest encoder.
Download here (47 kb)
AzzaGui Windows Interface for Command line programs
Azza GUI a progam that presents a Windows dialog for command line Win32 progams. You can write your own interfaces also.
Download here (248 kb)
Wav2Amp GUI� for Azza
The .gui file for using Wav2mp with Azza.
Download here (11 kb)
The instructions on setting up these small programs are fairly straight-forward. Put Wav2mp and Azza in separate folders. Put the .gui file for Wav2mp in the Azza folder. You are ready to go.
- Record your conversation files in *.wav files � with the highest sampling rate
and bit depth. This will provide for preservation of quality at the recording
stage. Using a good program at this point would be desirable, but not
absolutely essential. The Windows Sound Recorder works just fine, if you have a
quiet setting to do your recordings.
- Name your audiofiles according to the FName convention of Deus Ex. For example,
the first line of a character called �Krishna Nadar�, with an FName of
�KrishnaNadar� in a particular conversation should be recorded in the file
�KrishaNadar01.wav�.
- Convert the wav files to .mp2 files. The mp2 files will be written by default
into your wav2mp install directory. You can specify a different path if you
want to. If you can, write a batch file to automate the process of conversion.
- Before conversion, make sure that all your audio files
are of the following format:
- Channels:1 or 2
- Sample rate: 44,100 Hz
- Bit depth: 16 bit
- Format:.wav, (uncompressed PCM only)
Remember that you can record at higher settings, but you have to step down your audio files to this format, as Wav2mp accepts only these files for input.
- Now use the settings shown below for encoding:
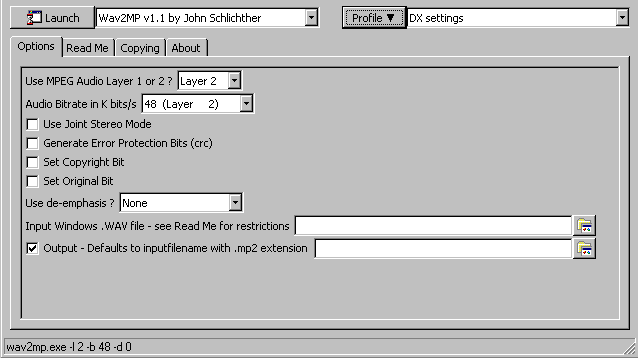
As you can see, I�ve saved the settings as �DX settings� in a separate profile.
- Rename
the .mp2 files to .mp3 files. For example, the file �KrishnaNadar01.wav� would
have been encoded to �KrishnaNadar01.mp2, and then renamed to
�KrishnaNadar01.mp3�.
- Place the .mp3 file in the appropriate folders and they can now be compiled.
End note:
This method is useful when you get the 'click-through-conversations� bug. It can also be used if you are looking for a free-lisence mp3 encoder, and cant afford sound editing programs like Sound Forge.