Start by buying a used Radio Shack F-150 (the 7.2V dual-motor variety). You can get them on eBay for around $40. Keep in mind that if you are going to race more than one vehicle, you will need to get them with different frequency bands (Band 1, 2, 3, and 5). Once you receive your truck, remove the body and trash it. Remove both bumpers and trash them also, but save all the screws that held them in place.
The biggest improvement you can make is to replace the stock 10-tooth pinion gears with either 13 or 14-tooth gears. This will result in 30-40% increase in top speed, with little effect on acceleration! Start by removing both front and rear motor and transmission assemblies. Remove the motors from their plastic housings, and remove the pinion gears with a hammer and chisel. Cut off about 1/4" of the plastic flange on the motor housing so that you can rotate the motor 180 degrees in the housing. This will give you just enough room to insert the larger pinion gear. Replace both the front motor wires with longer wires so that they will reach the radio. Replace the plastic end caps. Cut a � inch piece of 1/8� OD brass tubing and press it into the new 13 or 14-tooth pinion gear. Rough up the motor shaft with a file, and super-glue the gear/tubing onto the motor shaft. Reattach the motor and motor housing onto the chassis.
The standard Tamaya connectors become intermittently "open" with age. Cut the connector off the battery and replace it with a Type M power plug from Radio Shack. Drill a 3/8" hole in the side of the chassis closest to the battery plug, and insert a Type M power jack. Drill a 1/4" hole from the radio compartment to the battery compartment. Feed the power wires through this hole and solder to the jack. You should feel the added power immediately, as well as noticing that the lights don't flicker anymore!
The factory steering linkage rods are too thin and wear large holes into the plastic pieces they attach to. Drill out the holes in the servo saver and the front suspension to 9/64". Insert a #6-32 3/8" long bolt into each hole. Using 1/16� brass tubing, cut two pieces 2 1/8" and 2 7/8" long for steering linkage rods. Screw a #216-1/2 hook eye into each end of the tubing. The hook eye center-to-center length should be 2 1/2" and 3 1/4" respectively. Attach the eyes to the servo saver with #6-32 nuts and super glue. Attach the other eyes to the suspension with #6-32 nuts and check the wheels for alignment. Adjust the alignment by tightening or loosening the hook eyes. Finally, super-glue the nuts in place.
I never liked the angle of the front spring towers. The "stroke" of the springs is too long - on jumps the tie rods hit the motor housing and bend. Replace the "short" front spring tower assembly with a "tall" rear tower and springs scavanged from another F-150. I have found that shock absorbers in the front really don't help very much, but they could be added using the same procedure used for the rear shocks.
The rear of the car tends to bounce around a lot with the stock springs. If you are going to do any jumping, you need real shocks. A good buy is the Traxxas Tmaxx/Emaxx set of 8 springs/shocks. Remove the rear spring tower and saw off the riveted springs. Drill out the holes to accept a 10/24 bolt, and attach the top end of the shock with a lock nut. Screw the small set screws that came with the shocks into the bottom of the suspension and attach the other end of the shock with a small lock nut.
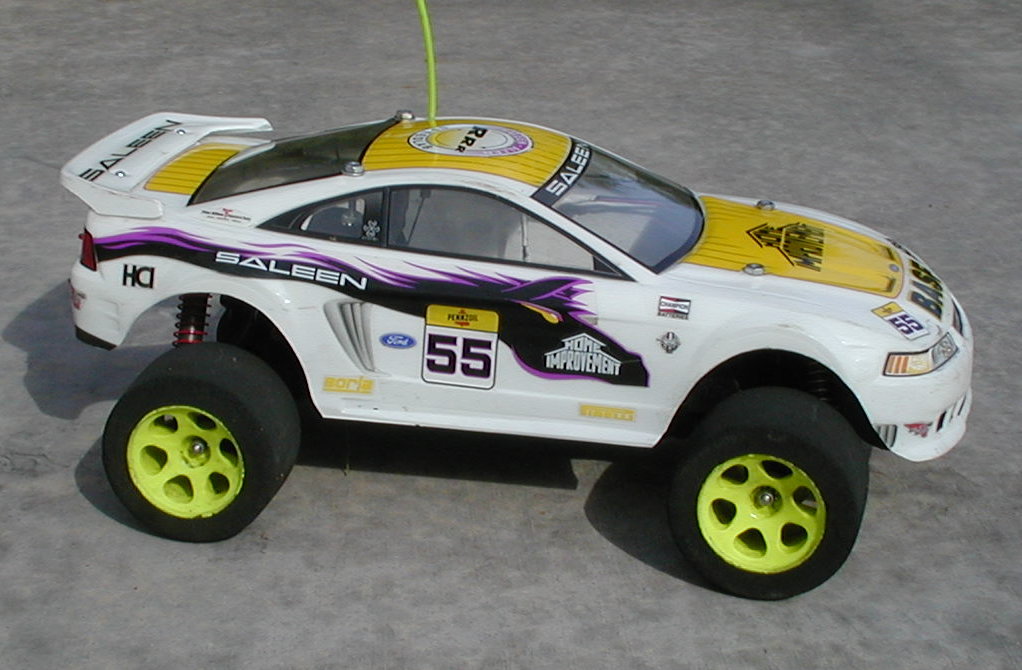
Remove all 4 wheels and discard the axle bolts. Make new axle bolts by grinding down the heads of four 8-32 bolts. Saw about 1/2" off the end of the axle bushings and insert the new axle. Buy four lightweight wheel and tire assemblies. I like the Jayco JAC2016 foam tires/wheels (3" diameter) and the Trinity TMT2004 Mini-T Monster On Road rubber tires/wheels (2.5" diameter). Drill out the axle holes to 5/32�. Screw the new wheel onto the axle, and secure with an 8-32 tee nut or lock nut.
If your wheels wobble when you apply power, the wheel bushings will need to be rebuilt. Remove the wheels, disassemble the suspension, and remove the driveshaft from the wheels. Remove the 1/8" plastic inner bushing and swap it with the 1/4" plastic outer bushing. For the front wheels only, you will need to sand the 1/4" bushing down to 3/16". Apply Vaseline to all moving parts as you reassemble them.
Now that you have installed smaller tires, you will want to lower the body. Remove the front body mounting bracket, and saw it off about 1" from the base. Make two L-shaped brackets from aluminum stock. Drill holes through the L-brackets and the body mount, and fasten together with a 1" bolt and nut. Replace the shortened body mount back onto the chassis. Buy your clear Lexan body (either 190 or 200mm wide) from a hobby store. Cover the inside of the windows with the stickers provided. Trim the body with a small sharp scissors, being careful to line up the wheel openings with the wheels on the chassis. Line up the body supports and mark the hole locations on the body with a marker. Drill four 1/8� holes in the body at these locations. Using 6-32 bolts (3/4� in front and 1 1/2� in back) and nuts, fasten the body to the chassis. You will have to enlarge the wheel openings beyond the cut lines in the body due to the large tires. Finally, drill a 1/8� hole in the body for the antenna tube. Remove the body and spray the inside with the Lexan-compatible paint of your choice. Remember to remove the clear plastic film from the spoiler only and spray the bottom of it. After the second coat is dry, put the body back on the chassis, remove the clear plastic film, apply the decals, and you are done.
For night racing, LED�s make great headlights and taillights. Start by removing the receiver cover and soldering a 9V battery clip between ground and the �switched� side of the on/off switch. Drill two holes in the front of the body and two in the back for the LED�s. Super-glue the LED�s in place. Solder a 20 ohm 1/2 watt resistor between the two front "bright white" LED's and a 100 ohm 1/2 watt resistor between the two rear red LED�s to limit the current to about 30 mA. Solder two wires to the other ends of the LED�s. Route the wires to the left door of the body, and solder them to another 9V battery clip. Insert the 7.2V battery, connect the two battery clips together, and make sure all four LED�s light up when the switch is turned on. If not, reverse the wires from the second battery clip. One final suggestion: glue or tape a piece of foam pipe insulation to the inside of the body behind the front bumper. Now, go outside and check out the lights at night - too cool!
| Batteries | 7.2 V NiCd or NiMH |
| Brown Band 1 TX/RX | 26.995/26.540 Mhz |
| Red Band 2 TX/RX | 27.045/26.590 Mhz |
| Orange Band 3 TX/RX | 27.095/26.640 Mhz |
| Yellow Band 4 TX/RX | 27.145/26.690 Mhz |
| Green Band 5 TX/RX | 27.195/26.740 Mhz |
| Blue Band 6 TX/RX | 27.255/26.800 Mhz |
| Weight (w/o battery) | 3 lbs. 8 oz. |
| Speed (3.5" tire/10T gear) | 1200 ft/min (13 mph) |
| Speed (3.0" tire/13T gear) | 1300 ft/min |
| Speed (2.5" tire/14T gear) | 1200 ft/min |