The Knit Stitch
To start your practice piece for this lesson, you'll need to cast on 20 stitches using the knitted cast-on. It is on the page Getting Started. This style may be easier for a beginner to practice with but you should also practice using the single cast-on as well because of its general usefulness.
Tie On
To make it easier to see the difference between the cast-on stitches and the new knit stitches, I'm going to tie on a different color yarn. This is the way you would add another yarn to your work to change color or to add a new skein when you finish the one you are using.
 |
 |
 |
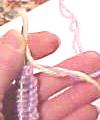
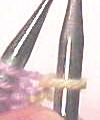
| Hold the end of the new yarn next to the old yarn. Twist the end over the top of the old yarn, under it, and back to the top. | Now bend the old yarn to the left so you can twist the end over the top, underneath, and to the top again. | Pull the yarn to tighten the knot next to your end stitch, leaving about an inch to weave into your work to secure and hide it. |
The Knit Stitch
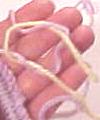
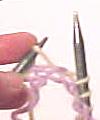
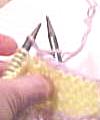
Hold the needle with the stitches in your left hand and the empty needle in your right hand. You make the knit stitch very much like a knitted cast-on stitch, except that you keep the new stitch on the right needle and slide the old stitch off the left needle. When wrapping the yarn around the right needle, the yarn should start behind the knitting and be brought between the needles, around the front of the right needle, and back behind the work again.
 |
 |
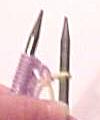 |
| Slip the tip of the right needle into the first stitch. Wrap the yarn around it. | Use the tip of the right needle to pull the yarn down and through the stitch to make a loop. | Leave the loop on the right hand needle as your new knit stitch and slip the stitch off the left needle. |
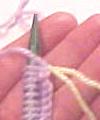
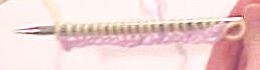
You should have 19 cast-on stitches still on the left needle and one knitted stitch on the right needle. Slip the tip of the right needle into the next stitch on the left needle and repeat to make another knit stitch. You should have 18 cast-on stitches on the left needle and two knitted stitches on the right. Continue knitting across the row until you have knit all the stitches onto the right needle. Now look at the row of stitches closely.
 |
 |
The picture on the left is what the row looks like on the right needle. The picture on the right shows the back. Notice that the tops of the cast-on stitches appear as a row of little bumps on the back. That is a characteristic of a knit stitch, that the tops of the stitches from the previous row should go to the back of the work. If a top comes to the front, you have made another kind of stitch called a purl stitch and need to redo the stitch.
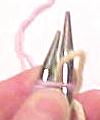
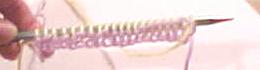
 Let's take a closer look at a single stitch. I've moved several stitches back to the left needle so I can stretch the knitting a little so you can see the stitch better. The yarn comes from the stitch to the right, goes through the stitch in the row below, over the needle, back down through the stitch below, and left to the next stitch. Please note that the yarn is not crossed under the needle.
Tip: If you should ever accidentally drop a stitch from your needle, you should make sure that it looks like this after you replace it. It is easy to twist a dropped stitch so that the yarn crosses under the needle, and you need to untwist it before replacing it and continuing your work.
Garter Stitch
If you also moved a few stitches to the left needle to look at a single stitch closely, move them back to the right needle making sure that they aren't twisted. Now turn the right needle so that it becomes the left needle holding the stitches to be knitted. Knit across the row again, turn the needle and repeat for several rows. You have just knitted the simplest stitch pattern, garter stitch. It is simply knitting every stitch on every row. Below is a picture of my sample knit on size 10 1/2 needles with a green sample knitted on size 6 needles.

As you knitted, the tops of the stitches from the previous row went to the back of your work. Because you turned the needle before starting the next row, the row of bumps is made on the opposite side for the new row. Thus garter stitch looks like ridges of bumps alternating with smooth ditches for the rows where the bumps are on the opposite side. Notice that you can hardly see those little ditches in the green sample, but they are there nonetheless.
Tip: When you have to count rows in garter stitch, count each ridge and each ditch as separate rows. The ridge is a row whose bumps are towards you, and the ditch is the next row whose bumps are away from you.
Tip: If you notice that the first stitch of the row is pulled out longer than the rest, pinch the yarn at the base of the stitch between your left index finger and the needle when you put the tip of the right needle into the stitch. This keeps extra yarn from the skein from being pulled through as easily when you make the knit stitch. This usually isn't a problem for the other stitches because the stitches on either side keep you from pulling out extra yarn to stretch the stitch so far out of shape.
Binding Off
When you have finished knitting the rows to make that piece of your project, you need to bind off the last stitches on the needle so that your work won't unravel. Knit the first two stitches onto the right needle, then put the tip of the left needle into the first stitch and pull it over the second stitch and off the needle. The first stitch is now held by the second stitch so it can't come undone. Knit another stitch from the left needle and pull the second stitch over it. Continue this way until you have knitted all the stitches from the left needle and have only the last stitch on the right needle. Cut the yarn leaving at it at least an inch long and pull it completely through the last stitch. Remove the needle and pull the yarn until the last stitch tightens around it. That finishes binding off your piece.
 The picture at the right shows a stitch being pulled over the new stitch and off the tip of the right needle. I've used a lavender yarn for the bound-off stitches so you can see them better. Notice that the stitches that were bound off formed a chain along the edge of the piece. There should be only one stitch left on the right needle after you pull the old stitch over it. What you are doing is knitting an extra row and stopping every stitch to pull the previous stitch over it to form a chain whose end is finished by pulling the yarn through it and tightening it.
Weaving in Ends
When you finish your piece, you should hide and secure the yarn ends by pulling them through the stitches at the edge of the piece on the back side of the piece. The back side will be the side that usually won't be seen when the project is finished, like the inside of a sweater. You can use a crochet hook or a sewing needle with a blunt point so it will glide through the loops and not split the yarn. If you have to sew the pieces together, you can wait until you have finished assembling the project so the yarn end doesn't get in the way of your sewing.
Selvage
Garter stitch makes a nice, thick fabric which keeps its shape well and lies flat. This makes it useful as a border (called a selvage) for another stitch pattern which tends to curl as well as for an overall textured stitch. If you see one or more stitches or rows knitted at the edge of a piece which otherwise is knitted in a different stitch pattern, it may be a form of garter stitch border or other selvage to reinforce the edge.
The First Project
 At this point, you are ready to make the first project, the Ocean and Bronze Eyelash Scarf. You have learned how to cast on, knit the garter stitch, and bind off. That is all you need for this glamorous scarf.
The Next Lesson
There is another stitch which makes the tops of the loops turn to the front of the work. It is called the purl stitch. When a row of knit stitch is alternated with a row of purl stitch, the resulting fabric has a smooth side with no bumps and a rough side pebbled with the bumps. This pattern is called stockinette stitch and it is the classic smooth knit pattern that most people think of when they think of knitting. Please click on the link to go to The Purl Stitch page.
Last update: December 16, 2003