Getting Started
You'll need knitting needles, a blunt pointed tapestry needle, a crochet hook (size I), a pair of scissors, a ruler, and some worsted weight acrylic yarn. Knitting needles come in different shaft sizes and lengths. I recommend getting the 14 inch long needles rather than the shorter 10 inch ones as you will need the extra length if you intend to knit adult size sweaters. I recommend getting size 5 and 6 needles to start, then see if you need to get additional needles. You may build a collection of different sizes as you need them for new projects. The size of the knitting needles and crochet hooks are stamped on them as well as printed on the package.
Projects using worsted weight yarn are often knitted on size 5 to 8 needles to make a light but warm fabric. The larger size needles make bigger stitches. I'll work the first few examples on large 10 1/2 size needles so you can see how the yarn makes the stitches more clearly, then switch to size 5 or 6 needles. I recommend that you work the examples on your size 6 needles so you can compare your results with the pictures. Knit along with me as I go through the basics.
Casting On
The Slip Knot
Casting on is the term used for making the foundation row of stitches on your needle. The first stitch is formed by making a slip knot. You can start with either end of the yarn on the skein (the name for the wound length of yarn sold in stores), but if you can find the end from the middle of the skein you can pull it out and feed the yarn more conveniently from there.
 |
 |
 |
 |
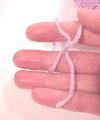
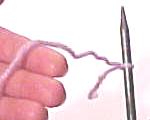
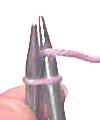
| Loop the yarn into a circle with the end underneath. |
Pull the yarn through the loop so that the loose end is trapped underneath. |
Pull the first loop tight around the base of the new loop you formed, leaving at least an inch of yarn free. |
Slip the new loop onto your needle and pull the yarn gently. It should fit neatly but still be loose enough to slide easily. |
Tip: You should always leave at least one inch of yarn in that loose end, more if you are using a slippery yarn. When you finish your project, you will weave the end into your knitting to fasten and hide it. A short end that works loose and has to be woven in repeatedly is a nuisance in a sweater or other project that will be subject to frequent use.
Single Cast-on
There are several methods to cast on the rest of the stitches you need for your project. I am going to show you two, the single cast-on and the knitted cast-on. The single cast-on is simple to do and makes a flexible, inconspicuous edge. I use this cast-on for most of my projects. The knitted cast-on forms a heavier edge which may be preferred if you need a firmer edge, such as a scarf which will have a fringe tied on and needs more support to keep the knots from puckering that end.
Here's how I do a single cast-on.
 |
 |
 |
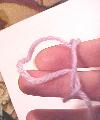
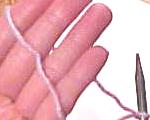
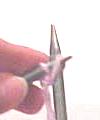
| Hold the needle in your right hand. Place the yarn over the fingers of your left hand on the palm side. | Lift your left hand to form a loop around it. |
Slide the tip of the needle into the loop on the palm side towards the fingertips. Pull the yarn gently to tighten. |
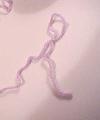
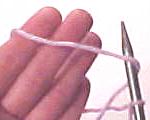
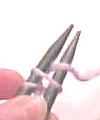
 This picture shows several stitches with the last one held out so you can see that the yarn from the skein is trapped behind the yarn from the last stitch. You should have a series of distinct loops, not merely have the yarn spiral around the needle. Also notice that the stitches are evenly spaced apart about half their height in distance. You need to allow a small amount of yarn between stitches so they aren't pinched together at the bottom. Your foundation row should be as wide as the rest of your knitting and lie flat with evenly spaced stitches connected by uniform loops. If one loop is a little too large or small, you can gently tug at the stitches to move the yarn between them to even them out.
Tip: Once you master the basic technique of making separate loops, you can control the yarn better by folding your left ring and little finger over the yarn and using only your index and middle fingers to make the loop. This lets you tighten the yarn with a little tug of your left hand once the loop is on the needle. You can cast on stitches quite quickly once you master this cast-on technique.
Tip: If you notice the yarn untwisting into separate plies while casting on, release the yarn to let it twist back together again. For loosely twisted yarns, you may have to do this every few stitches.
Tip: If you are having difficulty making your cast-on stitches loose enough to keep that row flat, try casting on with a larger needle than the one you will use for your project. That may help you make larger stitches to get started, but you should practice your casting on until you can make a neat edge that lies flat and does not have any unattractive large loops. You can't always be sure you will have a suitable size larger needle compared to the needles for your project.
Knitted Cast-on
The knitted cast-on starts with a slip knot, then uses the same technique as the knitting stitch to make the new loops, hence its name. Hold the needle with the slip knot in your left hand and the empty needle in your right hand.
 |
 |
 |
 |
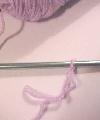
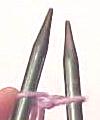
| Slip the tip of the right needle into the slip knot and wrap the yarn around it. |
Use the tip of the right needle to pull the yarn down and through the slip knot. This loop forms your new stitch. |
Slip the tip of the left needle into the new stitch and move it onto the left needle. |
For the next cast-on stitch, insert the right needle into the new stitch and pull a loop through just like you did to the slip knot. Move it to the left needle. |
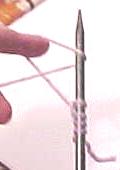
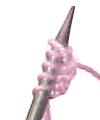 Cast on each new stitch the same way until you have enough on your needle. Here are several stitches, showing the thicker edge. Your stitches should be evenly spaced far enough apart that the row will lie flat.
Now that we've covered how to cast on your first row, we're ready to learn the first stitch, the knit stitch. Please click on the link to go to The Knit Stitch page.
Last update: December 20, 2003