|
Here are some pictures... (click on the thumbnails for larger versions) 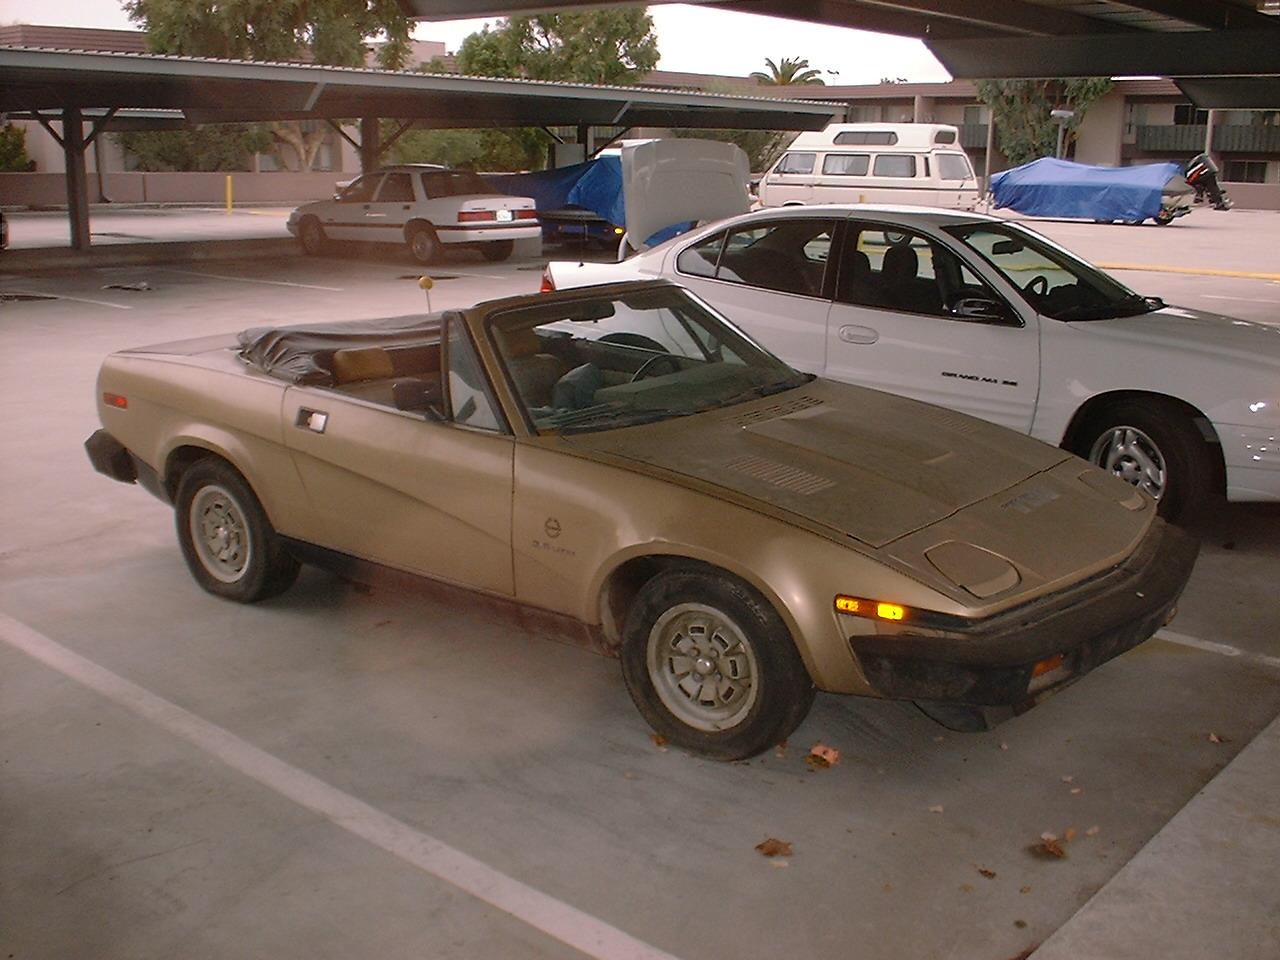
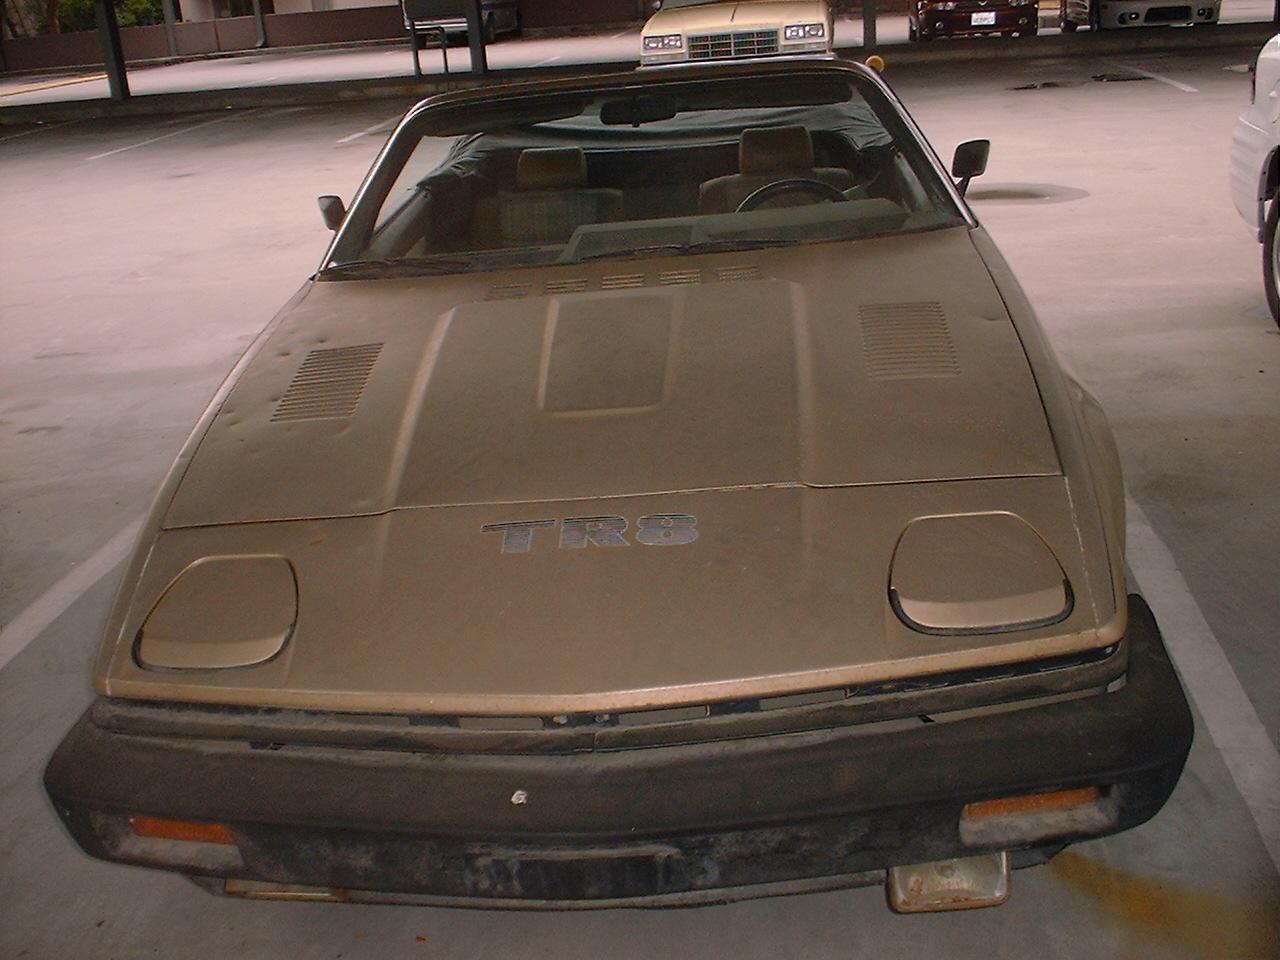
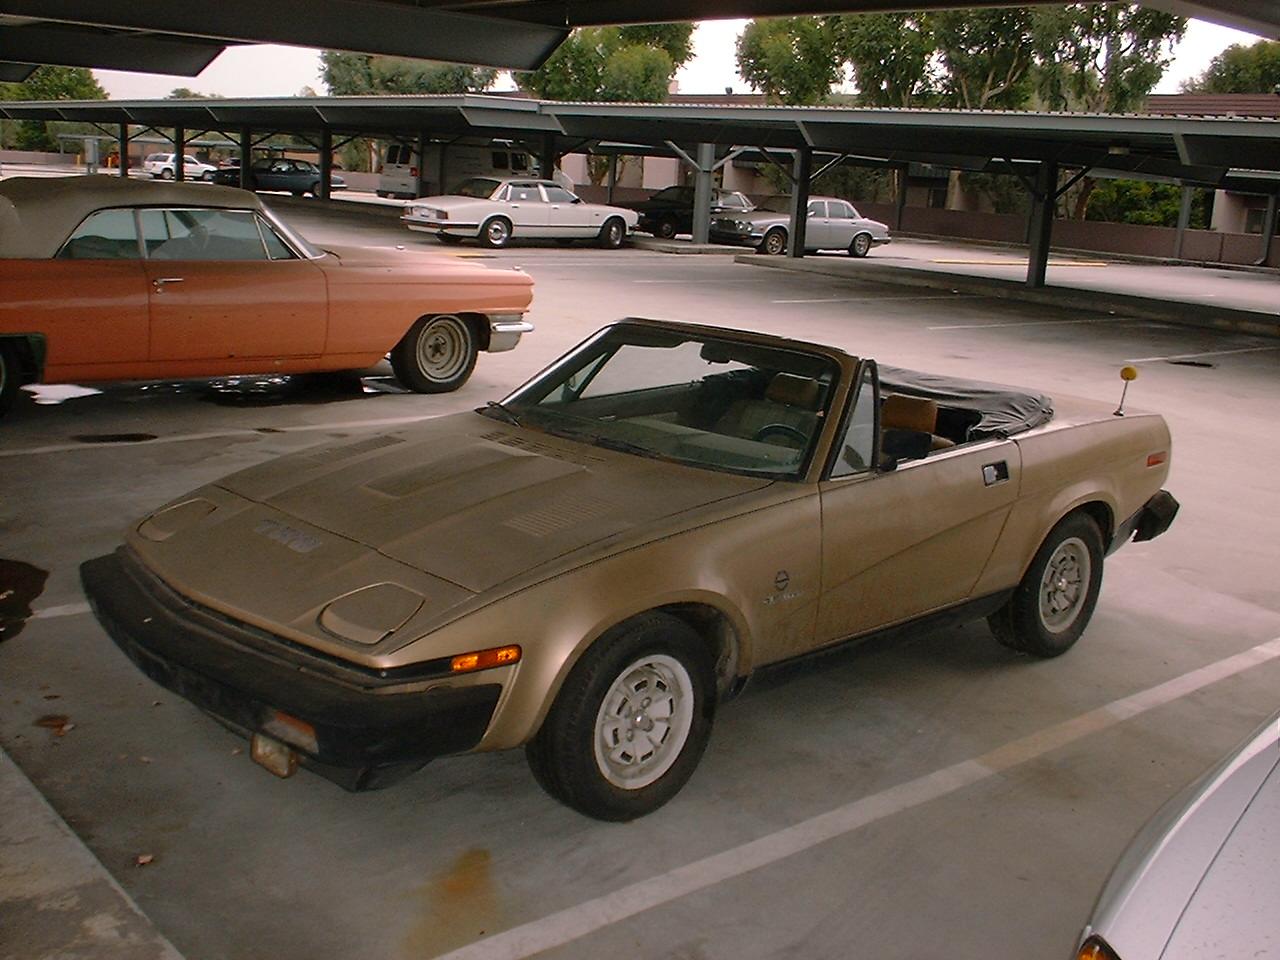
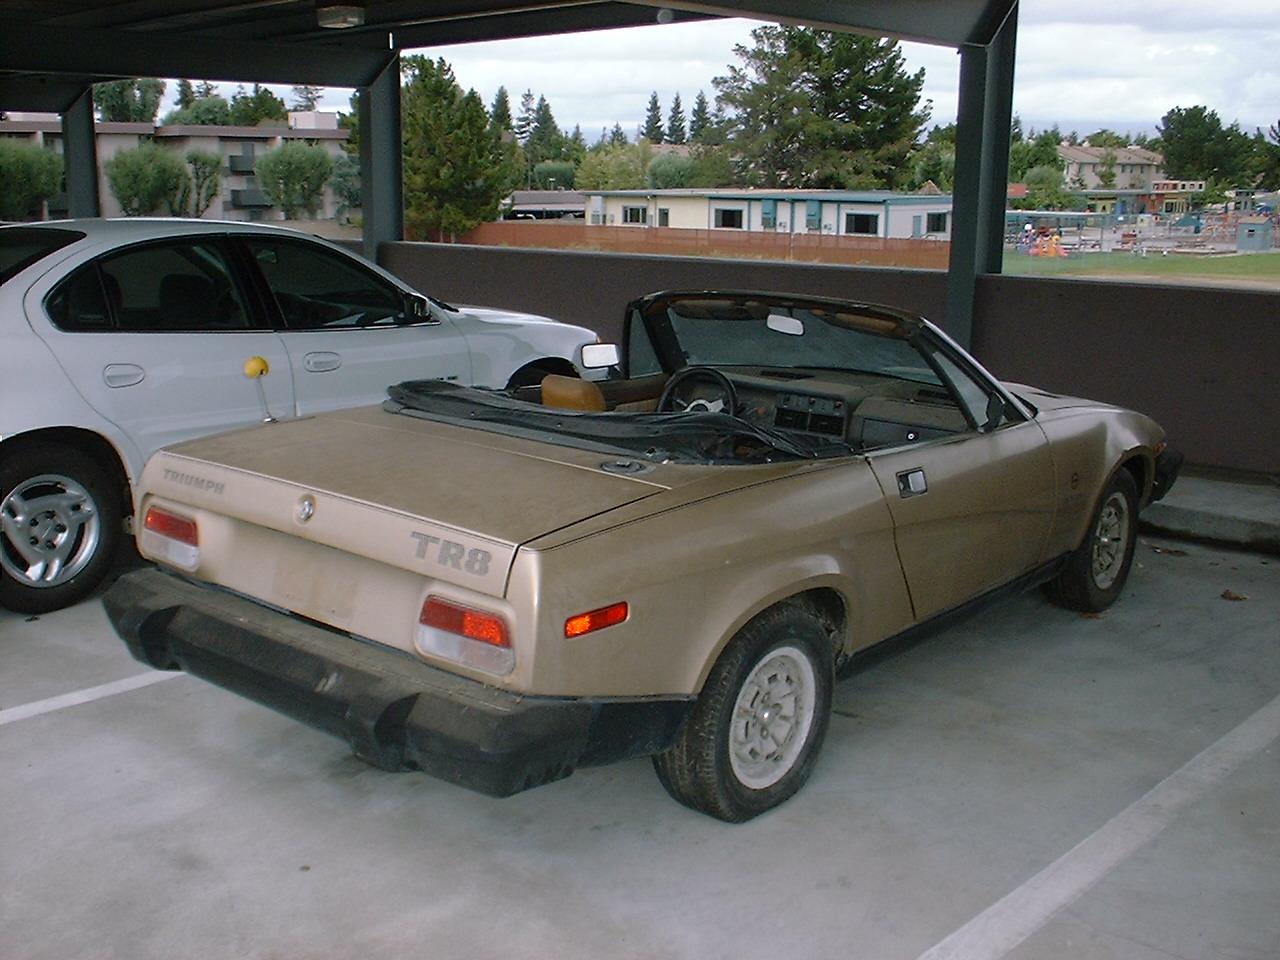

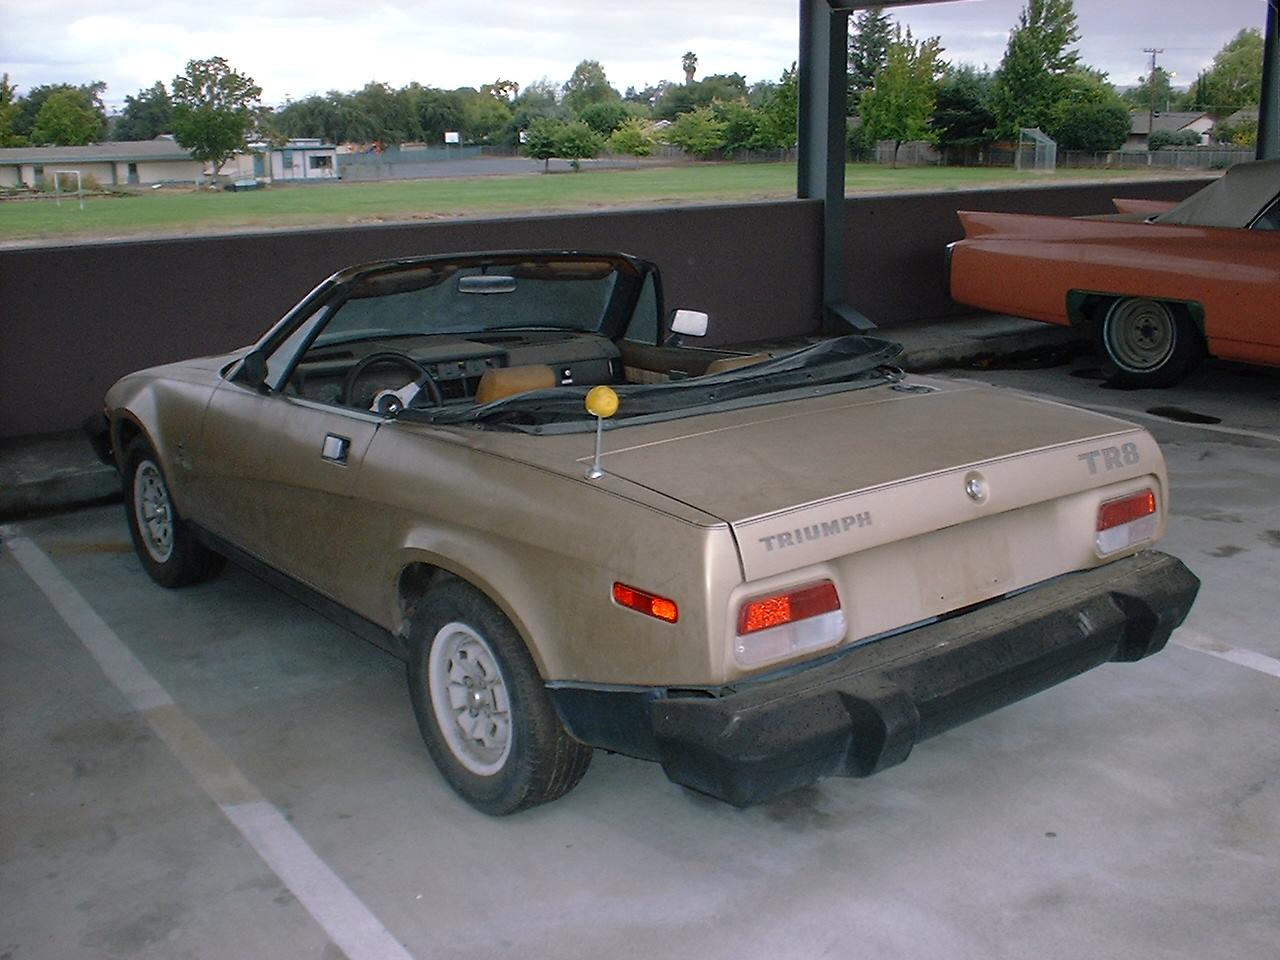
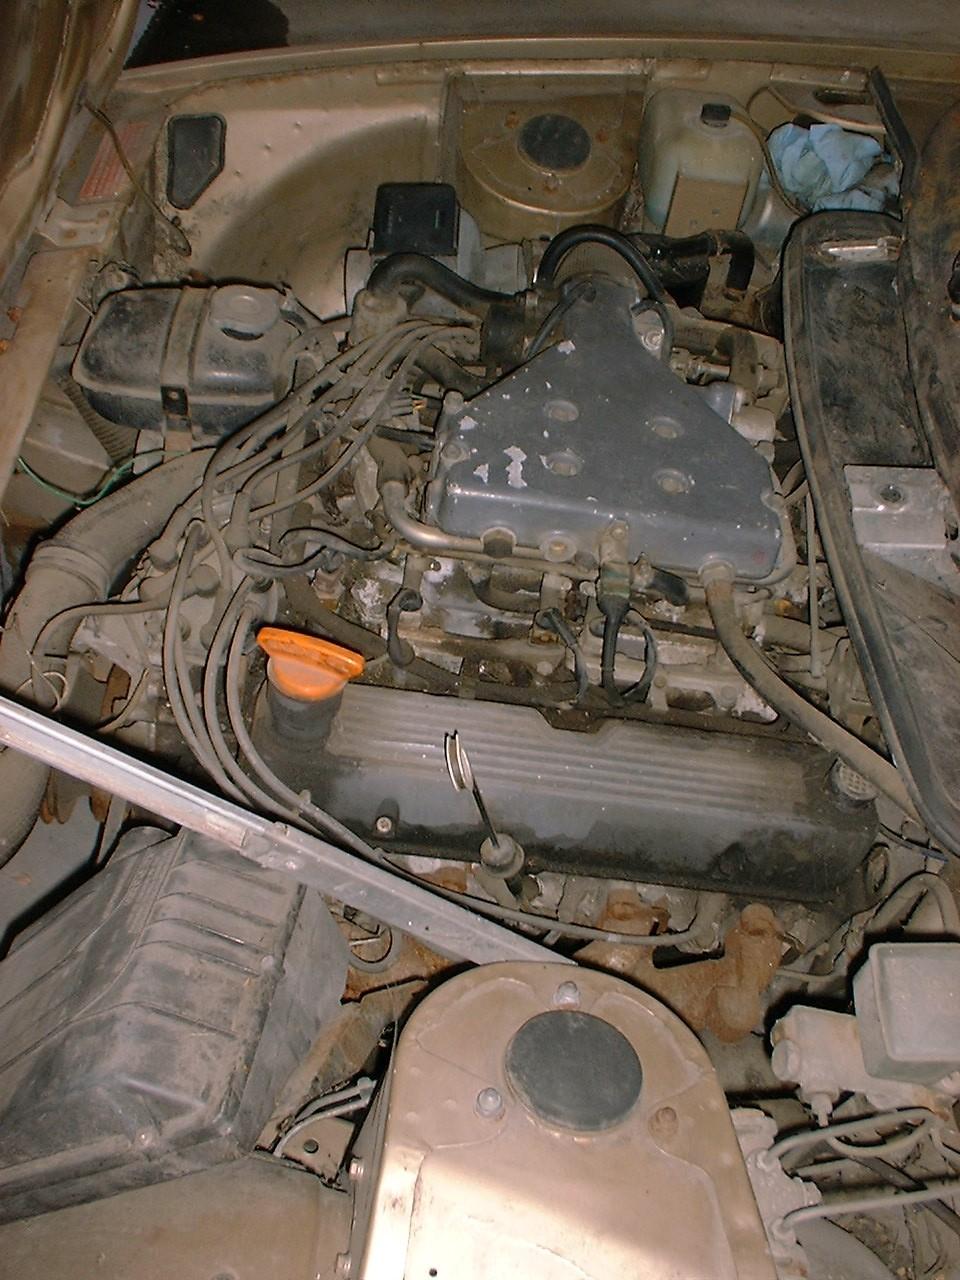
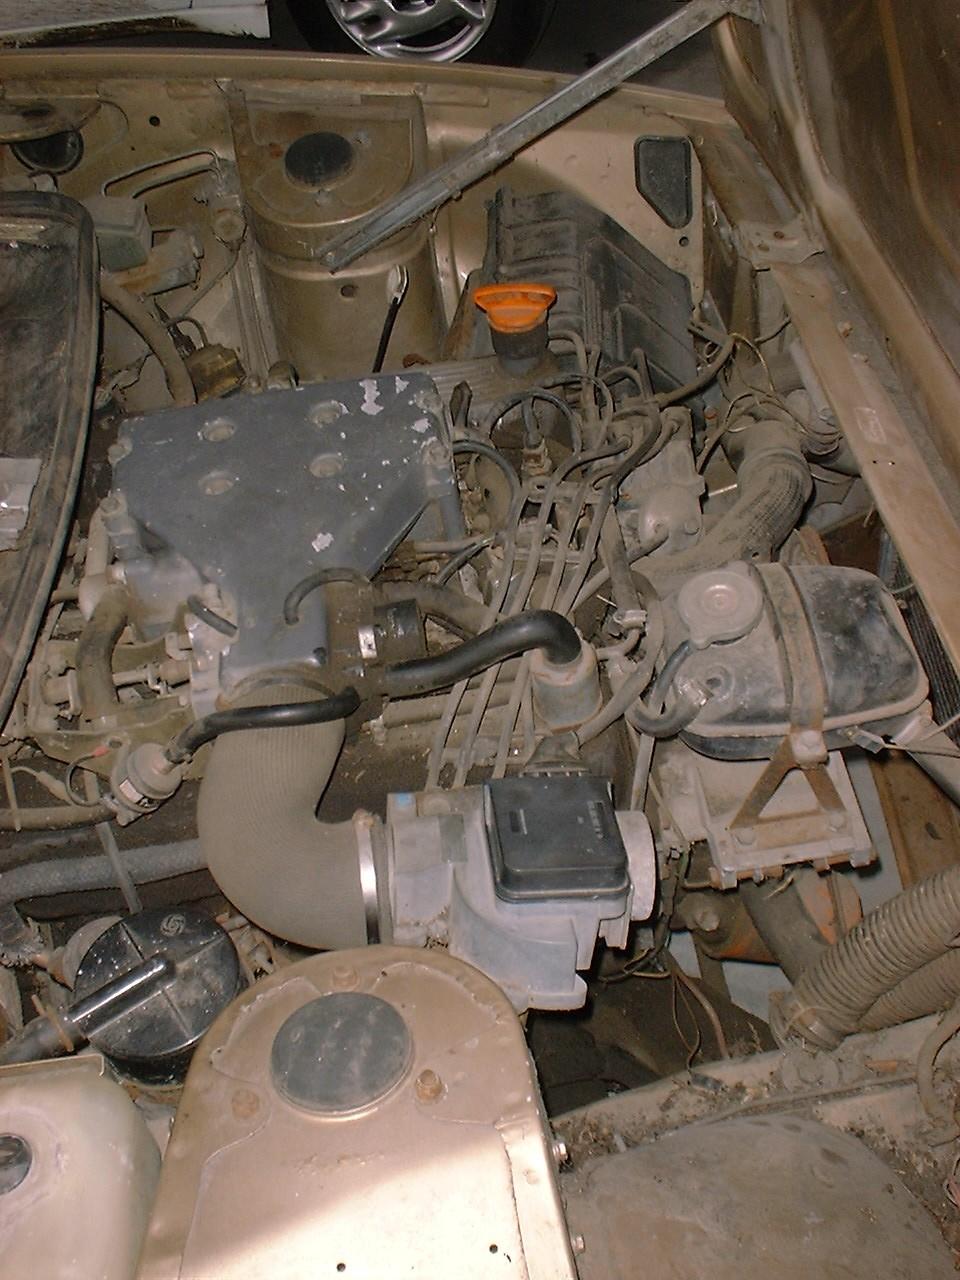
July 8, 2000 Car is missing part of it's exhaust system and the alternator. Body is decent, 'cept a few dings on flat areas of the panels... rust is almost non-existant. Paint is so-so... needs to be stripped and repainted (IMO). Interior is complete, but needs reupholstering badly. Not running - it'll turn over and bark, but won't run, like it's only using the cold-start injector - suspect the ECU. I resoldered a bunch of solder joints on the ECU - no improvement. Going to try and resolder a few more - and meter some of the resistors and capacitors to make sure they're still good. ??? ??, 2000 OK, missed an update... somewhere in there I tried to test out the wiring only to find that the fuel pump had died... Also found out that I had no key for the locking gas cap... picked it with a hair pin (how cliche) in about 30 seconds (sad). October 10, 2000 OK, got a new fuel pump... and an inline glass filter with replacable elements since this thing's been sitting so long, who knows what crud's in there. I just installed it, but realized I did not have the brain with me (back at the apartment), so I'll have to quit for the night (getting dark). Oh well... ??? ??, 2000 Worked on the car some more... pulled one injector rail to look at the injectors... metal's nice and shiney, figured they'd be rusted up. The seals are shot though - hard and crusty. The hoses that are part of the injectors are really hard too... probably shouldn't have touched them. December 5, 2000 EFI setup (from an SD1) arrived in the office, picking it up on the way to work tomorrow. December 10, 2000 OK, finally got to work on the car... working 10 hour shifts Wednesday to Sunday recently, so this was my first chance. Cleaned stuff, pulled stuff, took pics while opening everything up so I could see what hose goes where, etc. when I try and put it back together. Hoses to/from/between the fuel-rails were hard and brittle... vacuum lines mysteriously OK. December 19, 2000 Called around the local auto parts stores trying to find fuel-injector seals. Found one place that said they had one pack (enough for half the engine, wierd) and would have the other pack by morning. Cool. December 20, 2000 Went to the auto parts store to pick up the seals... wierd... they had four boxes, with three different types of seals in them! Hmmm.... pulled the Roadster Factory book out - looks like o-rings from the pic, but with one small and one large per injector. Looked at the note I wrote on while calling all the other parts stores... found the Beck-Arnley(sp?) part number and looked at the parts on the counter. Sure enough, the big-n-littles were it, even though they were the only ones that were _not_ o-rings (they've got a rectangular cross-section). Looks like they have to order another set from yet another store. Well, at least I can replace other stuff... asked if they had FI-usable fuel-line, yup - 2 feet total - over $5/foot! Asked if they had vacuum lines (just in case) - nope. Gumout? Nope. DC fluorescent droplights? Nope. Any DC droplights? Nope. Went to the car, decided to just replace the seals on the side I touched (I didn't remove both rails). Also replacing the one bank of injectors with the ones I just got in the mail. Cleaned everything up, replaced the high-pressure lines that I could with the 2 feet of hose, put it all back together - almost. Damn! Too dark too quick. Oh well, maybe tomorrow. December 21, 2000 Up at 7:18am... yuck! (gotta go to work at 1:00pm) Finished putting things back together - found parts I dropped but couldn't see due to the lack of light, etc. On a hunch, I decided to test the timing signal going to the ECU connector before plugging it in... nope, nuthin'. I located the ballast resistor (above the coil, very front of the engine compartment) and cleaned the wires off... looking at the wiring diagram - it's white with a black stripe. Nope, nuthin'. Pulled the plug, noticed the connector in question was loose. Bent the sides in a tad (female spade connector) and put it back on. Still, nuthin'. Checked the coil (the side with the same wire-color), yup - perfect. OK, bad ballast resistor - gotta figure out my way around this one before I can do anything else. January 7, 2001 OK, turns out it wasn't the ballast resistor that was flawed, but my testing methods. :^) I realized there isn't enough current past the resistor to drive even the tiny light bulb (instrument backlight) I was using. I went to Fry's and picked up a pack of LEDs and some alligator-jumper wires. Sure enough, I was now getting a signal on the output side of the ballast resistor and on the connector for the ECU... time to try it out again. I connected the original ECU, just to make sure... and VAROOOM! OK, not quite "varoom", but it was running! Unfortunately, it was only on one bank of cylinders... the ones I just replaced. Time to do the other side... oh well, at least I'm getting good at splitting the manifold. OK, the injectors have all been replaced now... time to try again. VAROOM! Bangin' on all eight! Boy does this thing have a nice bark! OK, let's see... I need an alternator (doesn't have one), coolant and brake fluid. January 8, 2001 Filled the brake fluid reservior and pumped it a bit to try and mostly fill the lines... have to bleed it later. Filled the coolant tank... cool, not leaking (yet?). Went to a couple British car salvage yards trying to find an alternator. It's strange, the alternator it's supposed to have is a 17ACR, since it's a non-A/C car... but it has the connectors for a 25ACR. Found one... not cheap! Spoke with the owner of the yard for a while. He just picked up a TR8 for $1,500! I checked it out - fantastic shape... only problem was water in the gas tank! The alternator is for a TR7, have to rotate the front housing 120 degrees and put the bolts in in a strange fashion. Ripped it apart... hmmm, bearings are dry. Lubed 'em a bit, but should grease them, or better yet, replace them with sealed bearings. Hooked up the alternator and threw on a belt... boy - strange mounting position. It's been almost 5 hours since the sun went down... without an exhaust system, I shouldn't be running the engine. I'll have to come back tomorrow to test it. January 9, 2001 Fired up the engine and watched the volt-meter (why didn't they put in an ammeter instead?)... so far so good, needle's pointing in the good direction. :^) Bled the brakes (OK, flushed 'em). Boy, did they need it... stuff was like swamp muck coming out. Peddle felt much better - right at the top, until I started the engine. Looks like I'll need to do a pad/shoe job on her too... or maybe it's just the rear adjusters. Have to check later. Cracked the clutch loose (it was frozen - like that's a surprize). Well, I actually drove it for the first time today! It's not running quite as well as I'd hoped, very lumpy under any load at all. I'm guessing spark plugs. Good thing I already bought some. :^) Pulled driver's side first. Eek. They look good. I hope I don't have a bunch of bad injectors. Got to the passenger side... kind of a pain compared to a TR7, but a dream compared to a Chevy V8 made in the last 25 years. Whew! These look horrible. They're very badly worn (almost no center electrode left) and they're heavily encrusted with carbon. Good. Looks like it was the plugs. Not enough light to clean the distributor, I'm guessing it's corroded too. Unfortunately, it's kinda late again... have to fire it up tomorrow to test it. Observations from driving the car: Slight whine, might be from the diff... hope so, as this car may have been towed (gas is so old it looks like old varnish). I don't want to have to swap out the transmission. Clutch feels wierd... hydraulics have fluid, but I keep having to pump it up. I think I need a master and possibly a slave cylinder. Probably just the master since the fluid hadn't leaked out. Shifter's nice and tight. Nicest I've felt in a wedge, actually. :^) Power steering on a wedge is nice, but it's going to take some getting used to... no more manhandling. :^) July, 2001 When I left California, I had the TR8 shipped to my sister's house in Florida. I had to go back to Michigan to get my belongings (including my RX-7) and ended up building a trailer, since I couldn't find any that were aerodynamic enough to trust towing behind my little wankel-powered sports-car (after all, she does have over 110K on the stock turbocharged engine, which normally only lasts about 90K!). February, 2002 Anyways, I'm back in Florida, and finally have a place with a real (narrow) garage. I'm also between assignments, so I figure now is the perfect time to get my toy from my sister's house and start working on it again. I spent more time than I care to admit going through every item in both The Roadster Factory and Victoria British Limited sale catalogs, ordering a ton of parts from both of them, plus Woody's Wedge Shop, Tire Rack, and even eBay! Even though the RX-7 made the trip fine, several months (and 5K miles) later it ended up blowing a seal or two. If you're familiar with rotaries, you'll know that water in the oil, and oil in the water is a very bad thing, but something to expect on an aged machine. The engine is fine, and runs very strong, but if I run it any more without rebuilding it, I'll destroy it. The car is parked until I can figure out what to do with it. Unfortunately, the cost of a good rebuild is close to the replacement cost for the entire car! Wierd timing... I found a nice 1976 TR7 on ebay in St. Petersburg (4 hour drive from here), and kept my eye on it. Since the bidding didn't go too high, and my primary driver is in a state of limbo, I borrowed my sister's truck, and went across the state to have a look at it. I ended up doing the same thing I did to get the TR8 (the real topic of this web page), I used the seller's computer to bid on it, and won. March (week 1), 2002 Well, the parts started rolling in... time to start work on the cars. I spent most of my time working on the TR7 so far, since it is now my daily driver. I ran a compression test with a tester that undoubtedly needs calibration, but unfortunately, they came out all over the place... from 110 all the way to 140. Good thing I have a spare V8 I pulled from a P6B a long time ago... I'll be able to rebuild it while still having an engine in the TR8 (it turns out according to the block ID that the spare engine was originally from an EFI TR8!). March 8, 2002 The (10) tires just came in... nice and sticky. I hope they handle as good as they look! I decided on the 205/60R13 size, since I've used that size on a previous TR7 with very good results. Even after 3-day FedEX charges, they still came out to only $45.27 each! August 2002 - week 1 It's been a while since I updated this page... I was out of town for two months, and really wasn't working on the car very frequently before that. Now I have a bit of a deadline, so I'm working on it a lot. I rebuilt the rear brakes, which was a horrendous task... took 2 days instead of the 2 hours I expected. They were so coated with sludge you wouldn't believe it - inside and out, even the backside of the endplate and outside of the drum! I installed the headers I got from Woody's Wedge Shop so I could figure out where to put the O2 sensor fittings, and figured out that I also needed the EGR fitting added to them (keep in mind that this is an EFI car). I took them back out and brought them up to a local muffler place to have the fittings welded in... they supplied the fittings, but I had to get a half-height 3/4-16 nut for them to weld on for the EGR. All together it only cost me $30 for the welding and fittings, and $.90 for the nut. In case anyone wants to see what the headers that Woody sells look like... 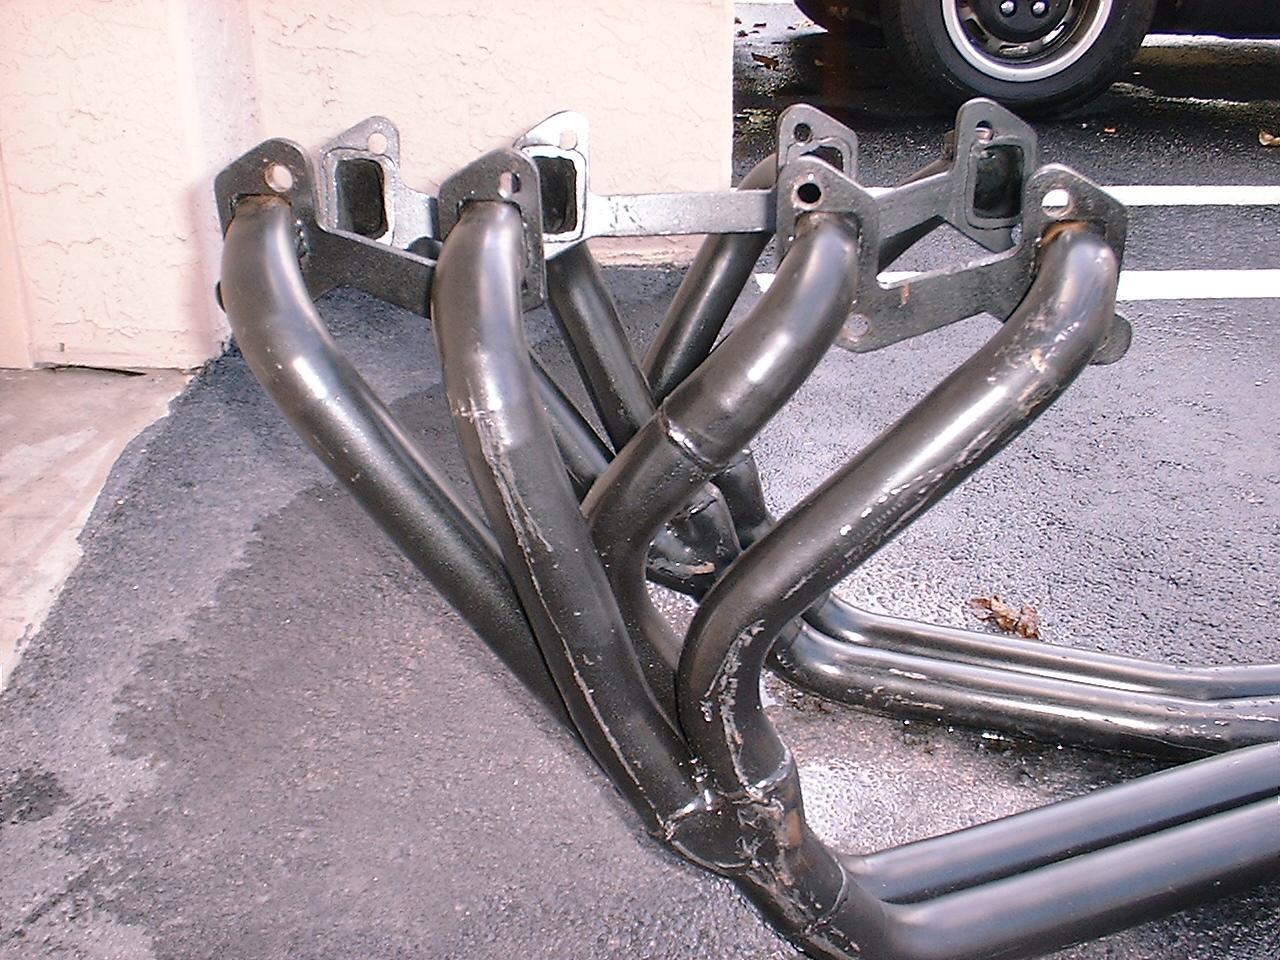
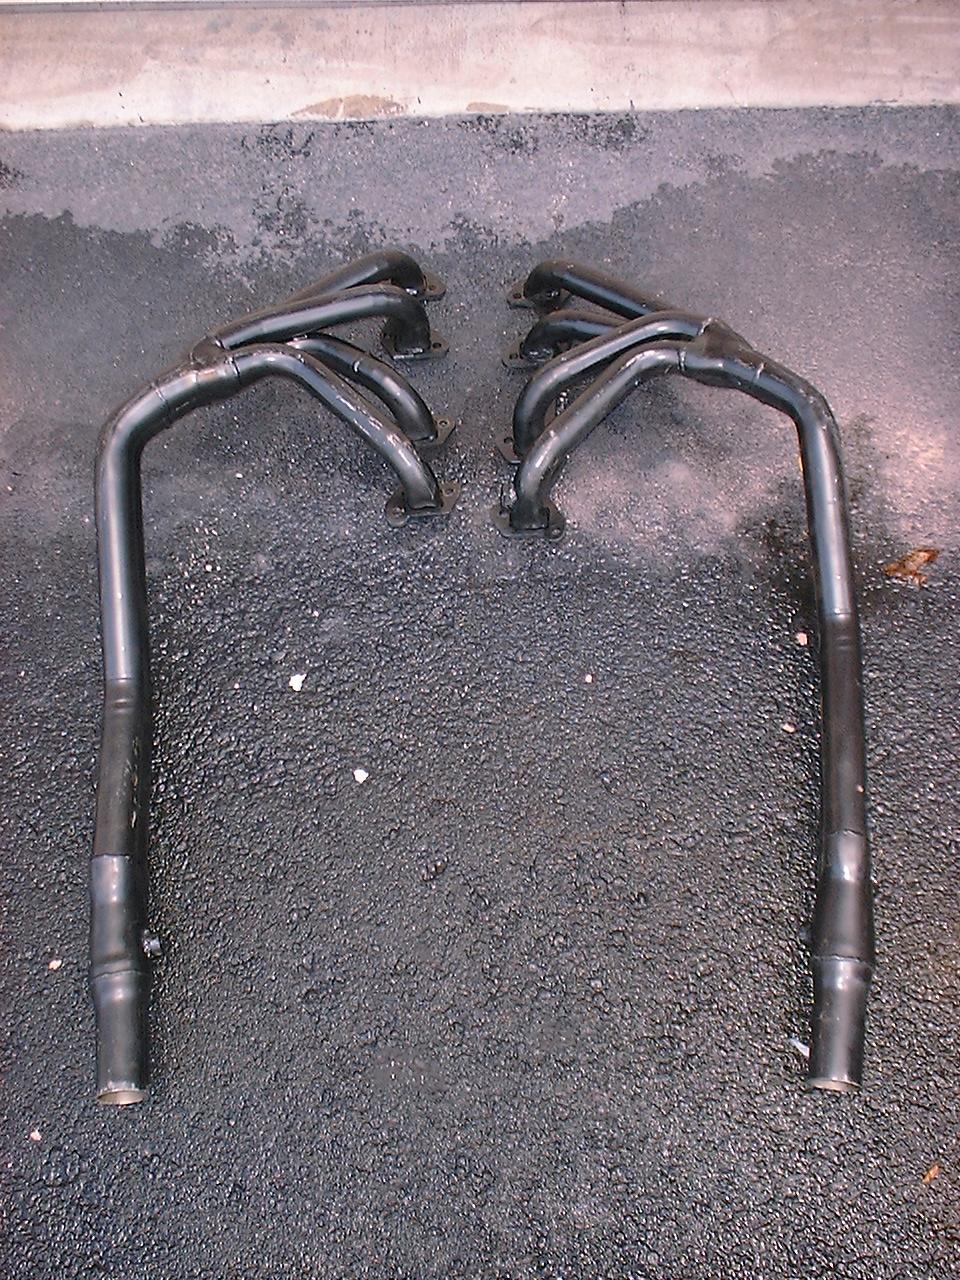
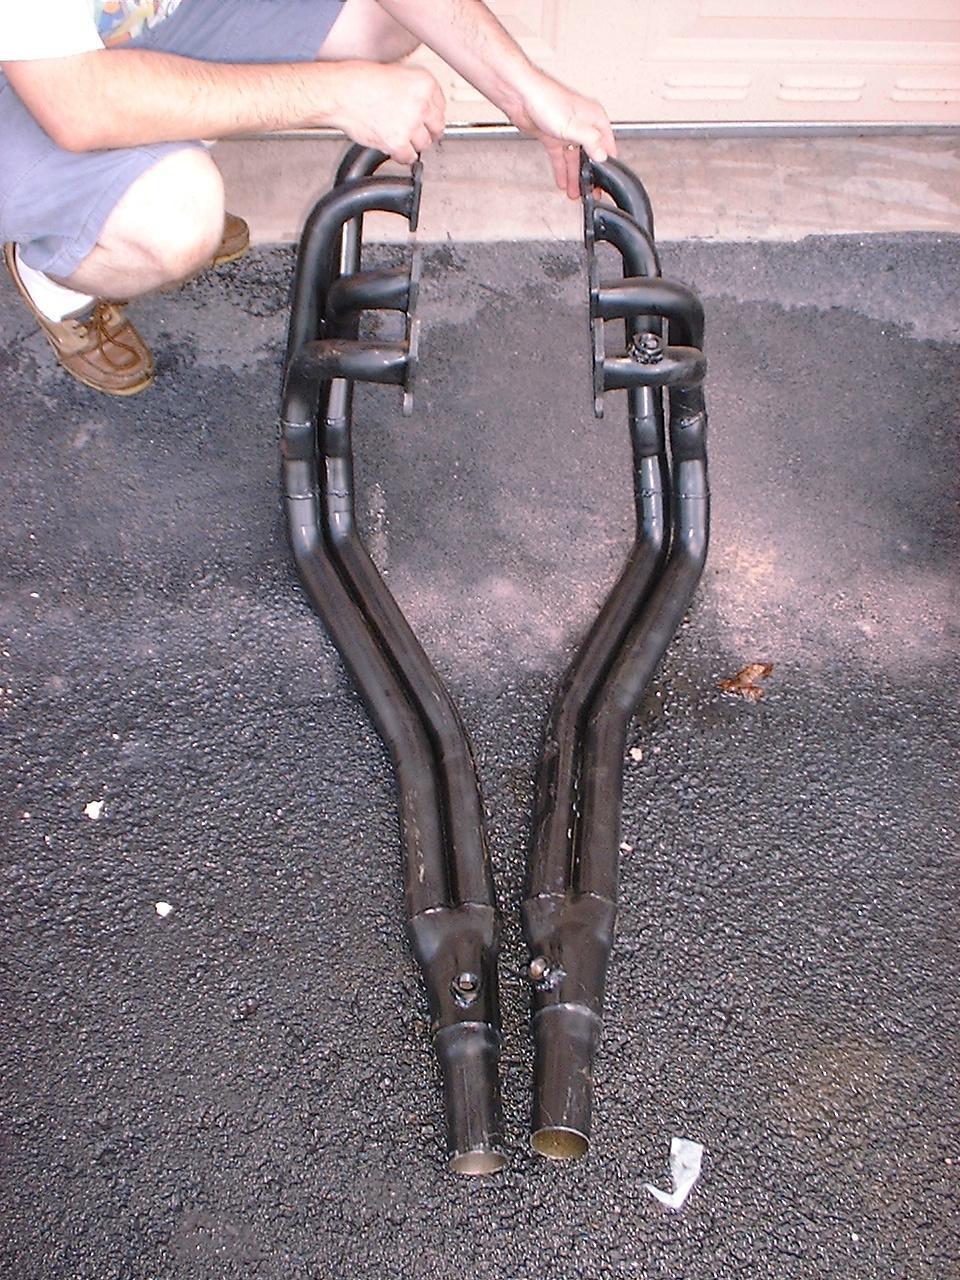
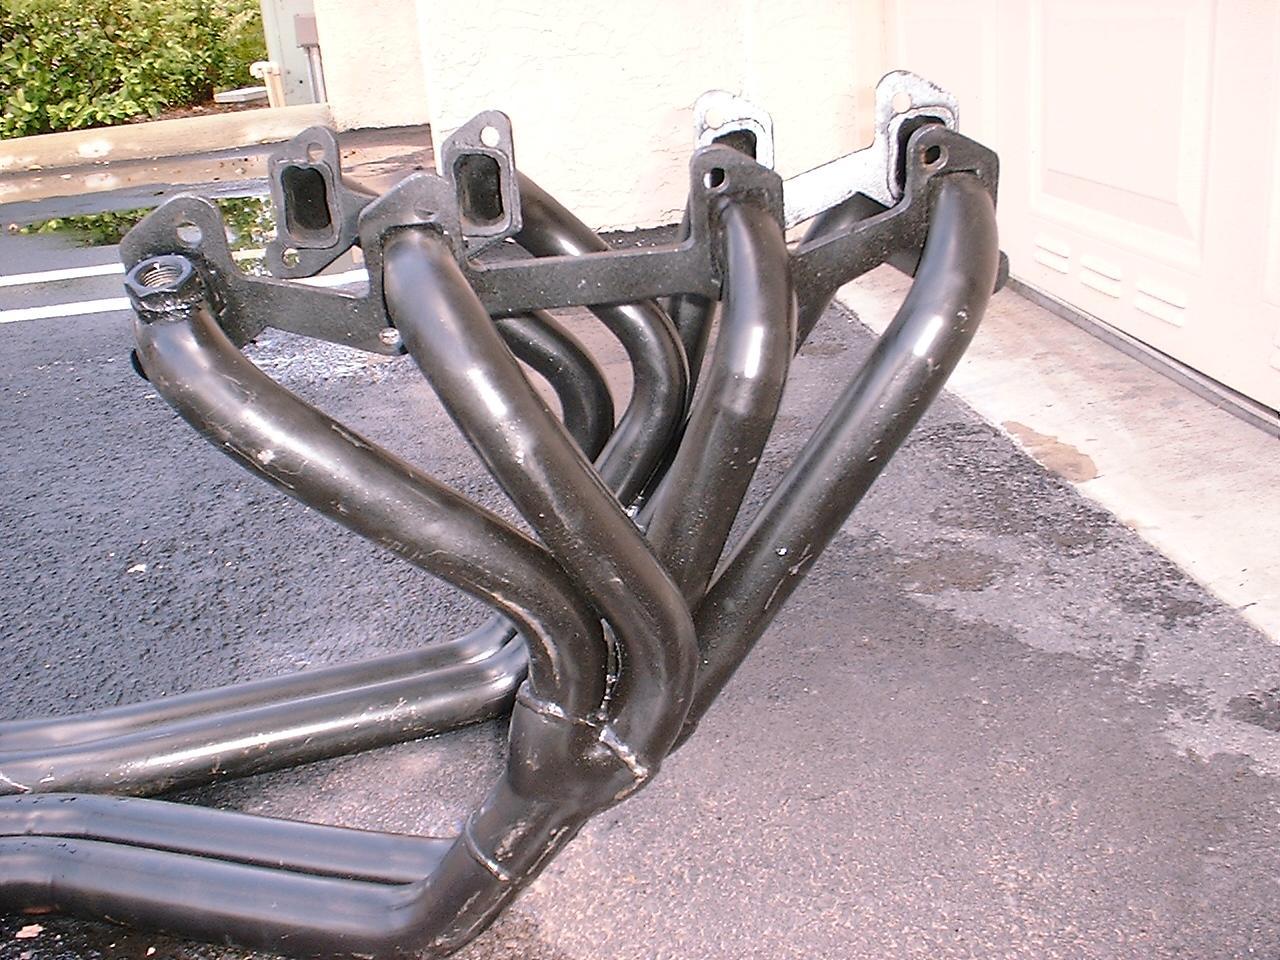
I'm told that Ted Schumacher's company designed these, and supplied the design to the header company where Woody gets them. If you're interested in my modifications for the EFI... 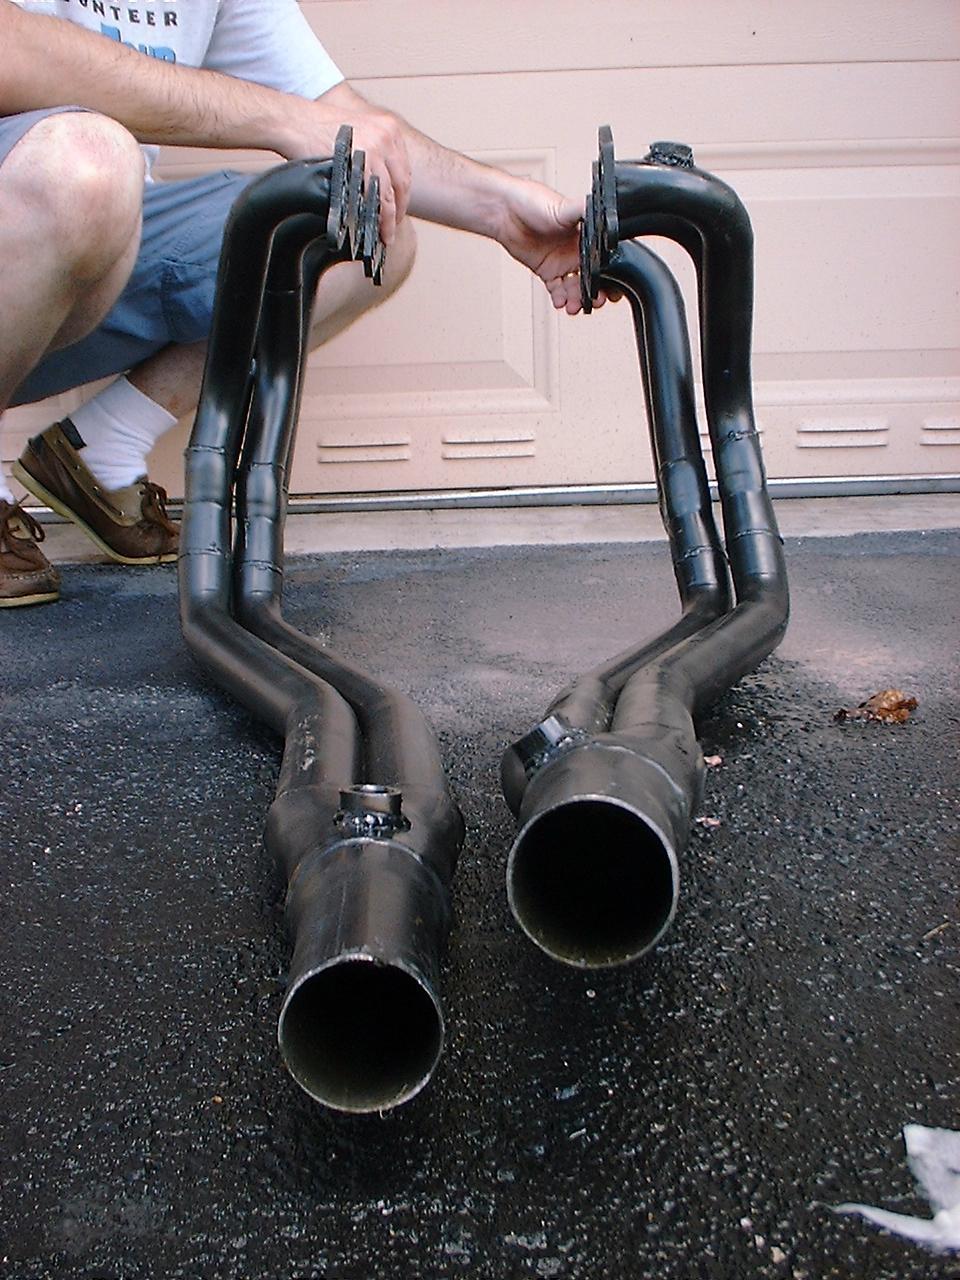
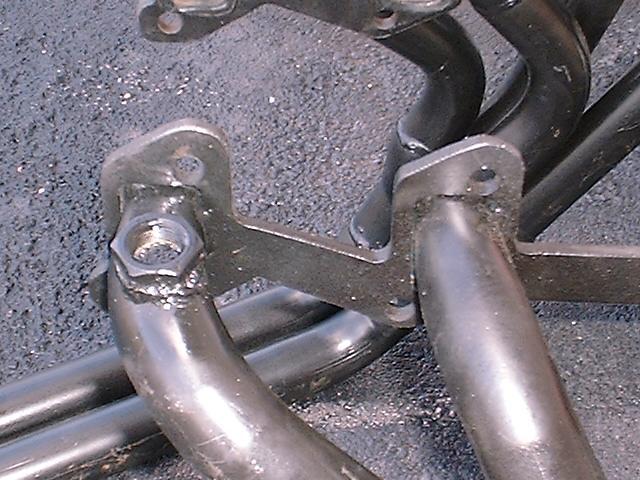
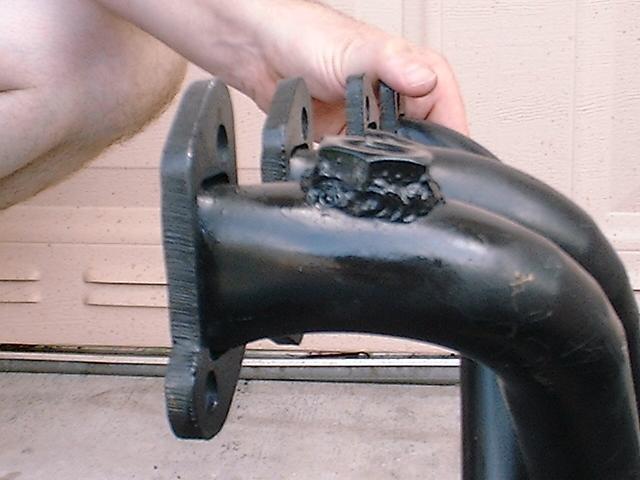
The EGR fitting should be further forward... the guy cut the hole in the right place, then welded the fitting back a considerable amount (requiring that I bend that super-strong stainless steel EGR pipe). I bought a pair of Thrush Turbo mufflers and pushed them onto the headers, just to quiet her down when I try to fire her up... I'm sure my neighbors appreciate it (I live in an apartment complex). Eventually the mufflers will end up in the rear, possibly with a pair of glass-packs underneath where the normal mufflers go. Well, I tried to fire the engine up numerous times, using all kinds of tricks, etc. It would only fire using the cold-start injector, so I thought the original signal-feed problem was back. I checked it out, and I was getting a signal to the ECU and to the injectors, so that's not it. I was not hearing the injectors clicking at all. Another odd thing was the brand new fuel pump was making a ton of racket, and sometimes it wouldn't even pump... I'd have to hook it up in reverse for a second, or tap on it, etc. sometimes, but this time none of the tricks worked. I let the pump cool down while I worked on some other stuff and tried it again later... all of the sudden it's working again! I ended up pulling the feed line to the injectors off and pumped fuel into a jug using the car's pump. The stuff that came out was really wierd... when I got the car the gas was a little varnished (red in color), but this stuff was almost black! It also left a wierd sticky sweet smelling residue on the inside of the jug! I pumped all of the fuel out and siphoned some from my TR7 to put into the tank with some injector cleaner... I figured if I add an entire bottle of this stuff with only a quart or two of fuel, it'll clean the system out at least a little. Well, it's far worse than I thought, and all kinds of nasty stuff kept coming out. I tried using some water on the sticky stuff, since gumout and brake cleaner (stuff in the red can) have no effect (the stuff in the green can has a fairly decent effect, but not great). A very good friend and I were brainstorming trying to figure out how to clean out the system. He suggested filling the tank with water and flushing the system out... at first I thought he'd lost his mind, but after thinking about it for a while I decided it was the only thing to do. I bypassed the injector rails, as I didn't want ANY water near the injectors... all I did was take a cheapo plastic and paper fuel filter and put it between the source and return lines. I took one of the jugs that had the sticky stuff in it and performed some experiments with it. I poured some water into it and soaked it for a bit, then slowly poured it out... I wanted to simulate the actions of filling and draining the tank (you can't shake the tank if it's in the car). At first, I thought it didn't work, even though the water turned a nasty color before I poured it out... I still saw a lot of stuff on the inside of the jug. I finally wiped it with my finger, and it wasn't sticky at all... in fact all that was left was a layer of super-fine rust! OK, now I know the system has a lot of rust in it too... now I have to pull the tank out so I can pressure clean the inside. Pulling the tank on one of these cars is quite a job. First you have to disconnect the brake line that connects from the chassis to the axle. Then you have to compress and remove the springs and shocks, and disconnect the front of the lower control arms so you can drop the axle out (you don't need to disconnect the radius rods). Next you have to disconnect the fuel line... I did this and let all of the fuel siphon out into more jugs. Then you disconnect the fuel return line... YUCK! All of the sudden I'm scrambling for another jug, as for some STRANGE reason, fuel is coming out of the return line, even though I'd already drained it from the source line! You also have to remove the screws that hold the fuel filler in place, and remove the cover that's in the trunk so you can have a friend push it into an awkward position while you're under the tank getting squashed - I mean removing it. The hard part is removing the tank straps without destroying them. I have a super-cheap 12V impact wrench that came in amazingly handy for this. The problem is, whenever you try and turn the nut, the strap tries to twist with it, so you have to hold it with channelocks. Unfortunately, you can only do this with the front end of the straps, as the rear is too tight to get in there with both the socket and a pair of channelocks. I finally managed to get the straps out, and had the tank balancing on a box that I put on the diff... otherwise it would have fallen on me while I was trying to remove the straps. OK, finally got the tank out and poured out another gallon of gas! I brought the tank outside where I had more room (and ventilation) and proceeded to remove the fuel sender and fuel pickup. EEK! This thing is beyond belief... I've never seen anything like this mess! The pickup and sender are covered with sticky-crunchy black goo. 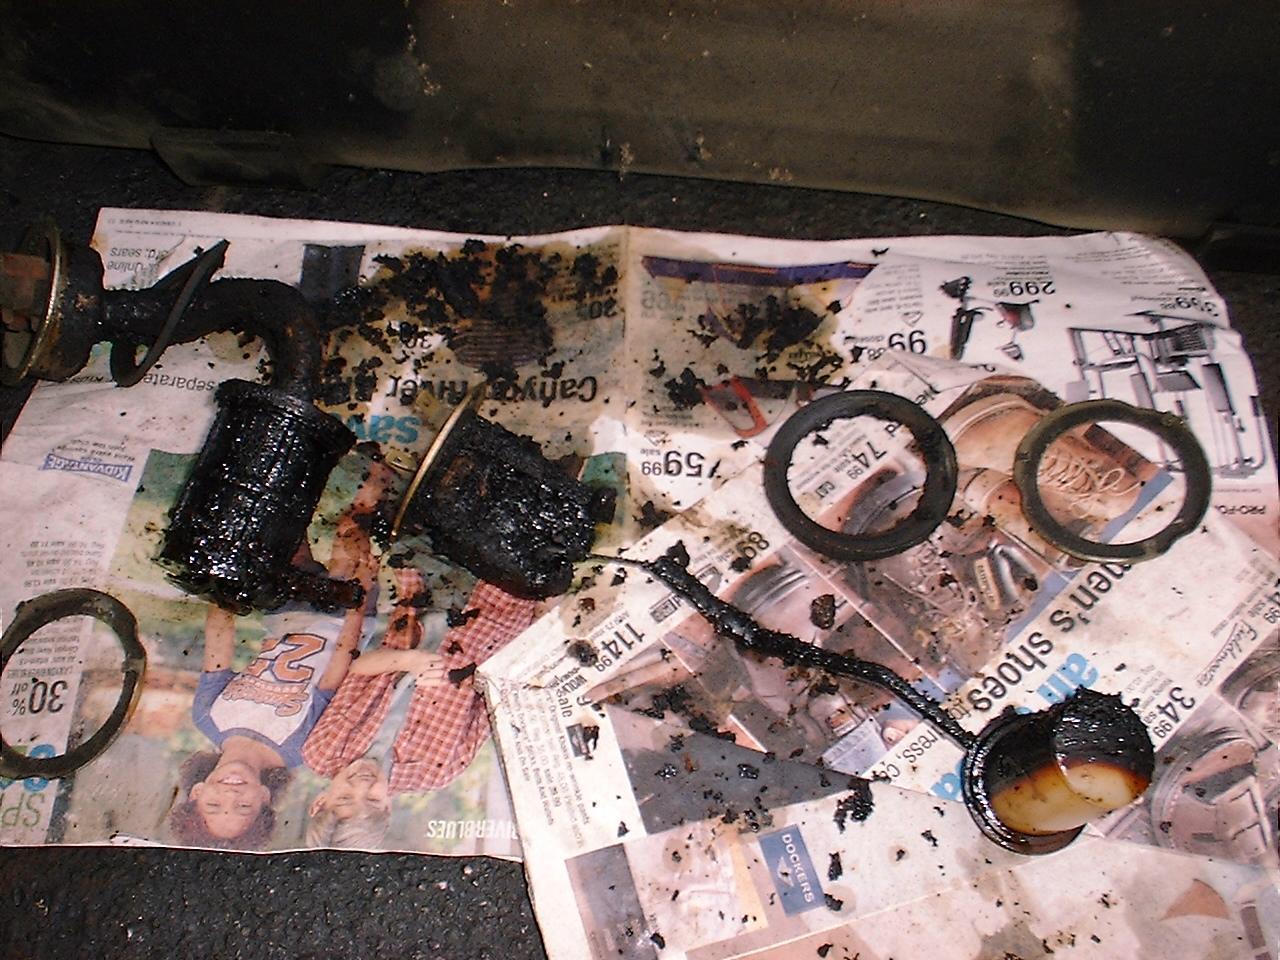
Notice how thick the stuff is around the rod... The pickup itself is destroyed, the screens are clogged and torn away due to the strong vacuum created by the pump. I looked in the tank and tipped it up, there was another couple quarts of fuel in there I had to dump out! I ended up looking in through the hole where the pickup mounts and tipped it up. There must be over 10 pounds of sugar in there! I'm not kidding! When I was holding it up on end, it started to mudslide a bit. It was about 2" thick on the bottom, and nearly 1" thick on the top and sides! No wonder the tank is so heavy! August 2002 - week 2 With the fuel rail bypassed and the tank out of the car, I put the source and return lines into a jug of distilled water (from my dehumidifier). Lots of nasty gook came out... the water looked like chocolate milk in a few seconds. More chunks came out as I let it run, so I left it for several minutes. I finally decided that it wasn't pulling any more crud out, and I should just dry out the lines with some denatured alcohol that a good friend dropped off. That's when things got interesting. As soon as I turned on the fuel pump with the lines in the alcohol, it ended up darker than molasses, and more opaque than the water before it! I changed the alcohol after a few minutes, and the new alcohol got dark in seconds too! I ended up having to change it a 3rd time to get the lines, rail, pump, and regulator cleaned out. I brought the old/original injectors up to my kitchen to soak them in water with some dish soap to try and break up the nasty sticky stuff. It helped, but not enough. Thinking about what happened with the lines, I tried soaking them in the denatured alcohol instead. WOW! As soon as I put them in, the dark stuff started leaching out! Within minutes, I had 4 of the injectors cleared to the point where they would flow. By the next morning, 3 of the remaining ones were flowing too. It only took some agitating and a few hours more soaking to clean up the remaining injector. This gave me another idea... I hooked the fuel-rail back up to the source and return lines, with the other injectors and regulator in place and replaced the water jug with a bottle of alcohol and ran this through the system for a while. I tried many times, left it soaking under pressure for a day and a half (occasionally firing up the pump to recirculate and represurize) with no luck. These injectors are totally gummed up. I pulled the fuel-rail again, and removed all of the injectors. This was far more difficult a task than it should have been. Not only were the integral injector hoses slightly hardened and stuck to the rail, but the large "seals" (they don't seal anything) that hold the injectors in the clamps were totally stuck in the corroded clamps. I managed to get 4 injectors loosened up from the clamps, but the other side was totally stuck. I even tried channelocks with no luck, had to destroy the seals with needle-nose pliers to get them out. I proceeded to soak them in the alcohol that I had the other injectors in. By the next morning, 4 of them were operational! I dumped them all upside-down and nasty thick black stuff that looked like sitcom coffee poured out. I refilled them all and let them soak some more. This worked, they are all operational now! I'm still soaking them more since stuff keeps coming out of them. I cleaned up the corrosion out of the clamps... man what a mess! I used a wire brush to get the powdery stuff out. I then had to use a screwdriver to get the crusty stuff out. I then went through 4 VersaPak batteries (one of which was a NiMH) with my dremel-like tool and a rotary wire-brush to clean them up the rest of the way. This took hours - they were really corroded. I ended up squirting a bunch of alcohol into the cylinders on a hunch... I'm hoping that the reason one of the cylinders is very low on compression is that nasty gook keeping the rings frozen in place. If my hunch is correct, then the alcohol should loosen the goo up enough for the rings to move back into place (I sure hope so!). I'm going to let it soak for at least a day. After the remaining gas evaporated, I sprayed out the tank with water to get the asphalt-looking stuff out. This mostly worked, though there's still about 5-10% left. I also found a tiny hole in the top of the tank... have to get out the JB-Weld to fix that one. I'm repeatedly flushing out the tank... so far, so good (though a lot is still coming out). Eventually, I plan to flush it with alcohol (need to buy more, already used a gallon). Once she's back together, I'm going to run her with a large amount of alcohol mixed with the gasoline to make sure everything's cleaned out. This should help clean out the intake manifold and intake ports as well. (I'm trying to avoid having to rip everything apart) August 2002 - week 3 After soaking for a couple days (with me dumping them out and refilling them a few times), the injectors I removed from the car are all firing! I ended up hooking them up to a fuel rail and installing it into the system so I could pressurize it and flush them out. A lot of nasty crud came out of one of them, probably the same one that took the longest to soften up. They all cleaned up fairly quickly, within a couple seconds of firing the denatured alcohol through them. I need to get some more denatured alcohol now, and a graduated cylinder. Since I have 16 fully functional injectors now, I'd like to "flow" (balance) them. I was trying to find something to capture the alcohol in, and to measure it with. A good friend and I were wandering around a couple local stores trying to find a graduated cylinder. He ended up finding a baby bottle with measures marked into it every 25ml, which worked out quite well. We metered the flow by turning on the injector with a VersaPak battery (3.6V) and timed it to 20 seconds with a stopwatch. While 30 or 60 seconds would have been a more accurate measure, as would building a timing circuit to fire them, we decided this was good enough for what we were doing. Here's the results:
So it looks like I have 7 that flow 60ml in 20 seconds, and I'll have to use one that flows 9% less in one cylinder. Keep in mind that these numbers are based on denatured alcohol, not gasoline, so the actual flow of the fuel may be different. The tests all used the same alcohol, so the only variable is the injectors (so the relative flow differences should remain accurate). For those who don't know, the American market Rover 3500S (SD1) used the exact same engine and fuel injection system as the TR8. The same guy who's been helping me so much (Bob Gray) found the right kind of EFI hose clamps at AutoZone in the Help section. Unfortunately, Discount Auto Parts' Help section is a fraction of the size, so I had to drive back to AutoZone to get some more (they have two sizes in the box of 12 for $6, and I needed more of the larger ones). I figure if I'm going through this much work, I might as well make use new clamps instead of trying to clean all of the corrosion off the old ones. I reassembled and installed the fuel rails, cleaned out the upper manifold and installed it, and basically put the whole intake and fuel injection system back together. Bob (the guy who's helped me out so much on this project) ran up to the gas station for a couple gallons while I was putting the stuff back together. After he got back with the gas, we poured some into a jug that I was using to flush the system, about 3/4 gas and 1/4 alcohol, and gave her a twist. It runs again! The only major problem now (with the engine) is, I seem to have some header flange leaks, and I'm afraid to torque the bolts any more since they're going into aluminum (I need to get studs). I also slapped both front lower-control-arms back on, and installed the driver's side strut assembly, and removed both knuckles, but haven't been able to get the tie-rod ends off (I need another big wrench). August 2002 - week 4 I went up to an industrial fastener shop (Florida Nut & Bolt) to get some studs for my headers. I was surprized to find they didn't have any... but what they did have may just be better: Set screws the right size! These will be easier to install, as I can use an allen-wrench instead of jamming nuts on each one. September 2002 I finally found a radiator shop willing to clean the rust out of, and replate the gas tank. Most of them said the EPA was cracking down on them, and made it nearly impossible for them to do so. It cost $130 (+tax), but I got it done finally. It wasn't quite what I expected... just looks like cheap paint. The guy said it's called "redcoat" - never heard of it... hopefully it's an appropriate product. |