| |
Frames
Tutorial
What are
Frames
-
Frames are a way to enhance
the layout of your web pages. It allows you to divide the screen
into distinct "windows", each displaying unique and independent
documents simultaneously. It provides more flexibility to the user
(and the developer) than the usual window display, where only one
web page can be viewed at a time. The use of frames is highly
debated, since it can lower your search engine ranking, crash some
browsers, and simply turn off some viewers. I have found that
frames are over done on the Web. Don't get me wrong, I have
developed web pages using frames - but only 2 frames at a time
instead of 3 or more. The more frames you use, the more
crowded your page looks.
-
The first thing
to know is that frames cannot be viewed with all web
browsers! HTML frames were developed by Netscape, and can be
viewed with their version 2.0 or more recent versions. All of the
newer web browsers are frames compatible, such as Internet
Explorer 3.x and the like. We will discuss later how to include
tags that enable frames-incompatible browsers to view your
instructions on accessing the documents in your web site without
using frames.
One of the best uses of frames is to allow
the user to navigate easily through your collection of documents.
This is done by assigning one frame to be a sort of index
to the information, and to have the other frame(s) hold the
contents of the various documents indexed. This allows the
user to browse the collection of documents while still being able
to view the whole index of information available.
Most web
pages use frames as a simple way to allow the user quick access to
a wide array of information. The viewer can choose from among
several independent frame windows displayed. This reduction in the
amount of searching and branching through linked web documents to
access the desired information can be a great relief to the
user.
-
Let us first look at
the tags used to construct frame documents:
-
-
-
<frameset> is the tag that
identifies and defines the frames to be set up;
-
-
</frameset> is the tag used to
signify the end of the set;
-
-
<frame> tag is used in associating
each individual window with a particular URL to be displayed in
that frame;
-
-
<noframes> tag displays
information to users with a frames-incompatible browser. It has
the end tag
-
-
</noframes>. Both of these tags
and the information contained between them are ignored by
frames-cabable browsers.
-
-
Also, here is a look at the
attributes used to specify the parameters
of the various frames tags:
-
-
In the <frameset> tag:
-
-
rows sets the relative sizes of frame
rows by % of screen, pixel size, or residual amount (*);
-
-
cols sets the relative sizes of columns;
-
-
In the <frames> tag:
-
-
src defines the document source for each
frame;
-
-
scrolling sets the scrollbar on or off
by yes/no/auto;
-
-
name allows the absolute "naming" of a
specific frame in assigning documents;
-
-
noresize fixes the relative dimensions
of the frames as displayed on the screen.
-
-
Also, in the
<a>tag for hyperlinking documents:
-
-
target is the attribute used to link
documents to a specific frame.
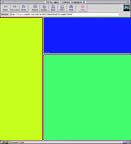
- Lets put these together in a simple HTML
example to see how these tags and attributes can be used: (we'll
call this file frames_setup.html)
- <html>
<head>
<title>Simple
Frames</title>
</head>
<frameset
rows="50%,*" cols="150,*">
<frames src="images/doc1.html"> <frames src=
"doc2.html" scrolling=no>
<frames src=
"doc3.html" scrolling=yes>
<frames src= "doc4.html" name=
"bottom_right">
<noframes> This
web document has frames and can be viewed only with Netscape.
Copy the code above here to see the the no-frames version.
</noframes>
</frameset>
</html>
Some of the things to notice about
this example are that:
-
-
- The <frameset> tag is used to set
the order and size of frames.
- The order by which frames are filled goes
across each row.
- Frames can be instructed whether or not to
have a scrollbar (leaving it blank is the equivalent of setting it
to auto).
- Frames can be "named" in order to provide
a site for a "target" document (to be discussed below).
- Notice the frame sizes are set in the
<frameset> tag by either percentages, relative pixel width,
or residual value (*).
- The <noframes> tag contains text
that will be read by a frames incompatible browser. You can
include a link directly to the web documents from here.
- If you noticed, you can move around the
borders of the frames with your mouse. To freeze the frame
dimensions, add the noresize attribute to the
<frameset> tag.
One of the key
elements in assigning documents to specific frames is the targeting
of the document to the name of the frame you want it assigned to.
What this means is that you can assign a "name" to a frame, and
allow it to be the destination, or "target", for a linked
document .
Naming Frames
A name is an attribute that is
usually assigned to a <frame> tag to label the frame for
reference by the target attribute. For example, in the above
illustration, frame number 4 was named "bottom_right" to illustrate
not only where it is relative to the other frames, but to illustrate
that this will be its absolute name that can now be referenced to by
any hyperlinked document.
Targeting Documents
A target attribute allows you to direct any
document to a named frame. The target attribute is included in the
<a> tag when hyperlinking the document you want displayed in
the frame to the web document that is displaying that
frame.
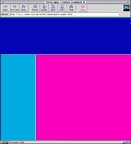
Let us look at another simple example of relating
targeted documents to named frames. In our previous example we
defined four distinct frames and assigned a web document to each
one. Now, instead of having one document per frame we can put the
titles of our documents in one of the frames, and have the
documents they refer to displayed in an entirely different
frame.
Let index_list.html be an index of titles of your files
(doc1.html through doc4.html), and content.html be a web document
that contains some instructions you want to display only initially.
We can now assign the titles to one frame and the document contents
to another frame by changing frames_setup.html to read:
<html>
<head>
<title>Simple Targets</title>
</head>
<frameset rows="50%,*" cols="150,*">
<frames
src="images/index_list.html">
<frames src="images/empty.html">
<frames src="images/empty.html">
<frames src= "content.html" name=
"bottom_right">
</frameset>
</html>
We can now set up index_list.html to look like
< html>
<head>
<title>Simple
Titles</title>
<h3>Titles</h3>
</head>
<ol>
<li>
<a
href="doc1.html"
target="bottom_right">Title1</a>
<li>
<a
href="doc2.html"
target="bottom_right">Title2</a>
<li><a
href="doc3.html"
target="bottom_right">Title3</a>
<li><a
href="doc4.html"
target="bottom_right">Title4</a>
</ol>
</html>
To see how
this will appear on the screen:
click
here
You will
notice that the browser loads the documents that have been targeted
to "bottom_right" into frame #4, and loads the index.html file
into frame #1.
This allows you to use one frame as an index,
while using the other frames as
the windows to peruse
the
documentation.
Unique Target
Names
There arefour unique
names reserved by the frames developers to signify particular
applications. They all use the underscore character before the name.
They are:
target="_blank" is used to cause the link to always be
loaded in a new blank, unnamed
window.
target="_self" causes the link to
load into the same frame or window as the source document.
target="_parent" directs the document
to be loaded back into the parent window or frameset containing the
hypertext document. It is usually practically the same as the
previous
definition.
target="_top" removes all of the contained frames and loads
the document into the entire window of the browser .
Another
useful convention developed is the use of the target attribute in
the <base> tag. This allows you to set a default frame as the
named window for all of the targeted hyperlinked documents to be
placed into.
[ The End
]
|