|
Totoally updated FAQ with pictures
|
Talk about DREs, or anything else
|
See how much money I've wasted!
|
|
The Disc Read Error PS2 FAQ
By Col_Sandoz & XShady Version 0.97 (January 24, 2003) This document is a work in progress. |
| INDEX: 1. Intro 2. Warnings 3. Diagnoistic Mode 4. Cleaning the Laser 5. Do I need to adjust the voltage? 6. Clicking and Squeaking explained 7. Adjusting the Voltage 8. Disclaimer 9. Contact 10. Credits --Just Added: Adjusting Voltage on a Ver 4 or higher PS2 by Ylbissop (multiple sections are contained on each page, scroll down if you dont see the data you want) |
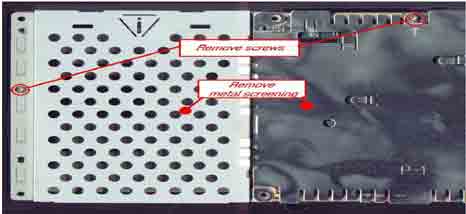
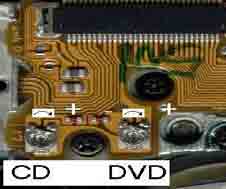
| ADJUSTING THE VOLTAGE: Read these instruction all the way through, and make sure you understand all the steps before doing anything! 1. Remove your warranty sticker, located next to the power cord. Take off the cover to the expansion bay. 2. Remove the screw covers on the very bottom of your playstation 2. There are six total. Four of them will be rubberized and two will be plastic. You may need a flat head screwdriver to remove the plastic ones. Ignore the extra 4 plastic covers on the raised, upper portion of the underside of your PS2, these are for removing the top shell. 3. With a phillips-head screwdriver remove the six screws under the covers you just took off. Four short and two long. 4. Pull up on the bottom portion of the case to remove it. 5. Remove the metal shield covering the circuit board (the shiny one). With the front of the PS2 facing toward you, it is on the right. There is only one screw holding it in place, it has an arrow pointing toward it. 6. Remove the expansion bay plate (the dull one with holes). With the front of the PS2 facing toward you, it will be on your left. Once again there is only one screw holding it in place with an arrow pointing toward it. 7. Lift out the expansion bay housing. It is attached to the circuit board by a short ribbon cable. Under this are the laser control screws. 8. The laser control screws are on a small amber circuit board slightly recessed in the plastic case. You will be adjusting one or both of the two small silver screws with a black screw inbetween them. With the front of the PS2 facing you, the silver screw on the LEFT controls the voltage for the CD reading. The silver screw on the RIGHT controls the voltage for the DVD reading. I suggest putting a small dot, with a sharpie pen, in the 12 o'clock position of each screw to help with the adjusting process... 9. Stand the PS2 on it's side (vertically, memory cards at bottom, power button at top) at a slight angle. You wont be able to stand it at this angle unless it is done on carpet floor. Having a friend hold it in position might be better. Make sure that the expansion bay housing does not come in contact with the curcuit board, as you will be turning it on, and you dont want the metal housing to short out the board. Let it hang down, away from the board. 10. With the PS2 plugged in (power and video) turn it on. You are ready to adjust the voltage for the laser. Only adjust the screw for the type of disc you are having problems with. If you are having problems with both, do them one at a time. Remember, now that the unit is on its side the CD voltage control screw is above the DVD control screw. If at all posible use a non-metalic screwdriver, as static electicity can ruin this portion of your PS2 (a $65+ part!)... 11. Turning the screw clockwise increases the voltage, counter-clockwise decreases the voltage. Because you risk of blowing the laser if you give it too much voltage, always start by decreasing voltage. In my experience, you generally have to add voltage, but for safetey, I suggest you reduce voltage first. Using a small screw-driver (non-magnetic & non-metallic if possible) turn the appropriate screw counter-clockwise two degrees. Load in the CD and wait, if you still get a disc read error move the screw another two degrees. Repeat the process... If you still get disc read errors after about 20 degrees of rotation, put the screw back to the 12 o'clock position and start moving the screw clockwise two degrees at a time. It may take a while, but you will most likely find the sweet spot where your discs begin to read again. I have never had to move the screw more than 30 degrees, although I have heard as much as 180 degrees are needed for a modded PS2 to play backup CD-Rs. 12. Try a few different trouble discs before re-assembly to make sure you dont need more fine adjustment. As well, hold the PS2 elevated in the horizontal position and make sure it reads while in this position. I have found that slightly more voltage (2-6 degrees) is needed to run discs in the horizontal position than the vertical position. 13. Turn off the PS2 and re-assemble it. |